Onboarding Setup Guide and Data Migration
  1. Help Center
  2. Getting Started with Commerce7
  3. Onboarding Setup Guide and Data Migration

Setup Guide Checklist

If you're new to Commerce7, you'll see a Setup Guide in the Admin panel. The Setup Guide will take you through the tasks required to get you up and running on the system. Take a look at the below for further details.

New to the Setup Guide? 

START HERE: Accessing & Working with the Setup Guide


Setup Guide Sections

  1. Getting Started Section
  2. Collecting Payment Section
  3. Setting up your Store Section
  4. Creating Wine Clubs Section
  5. POS Section (Optional)
  6. Reservations Section (Optional)
  7. Data Migration Section (Optional)
  8. Start Selling Section
  9. Adding Optional Setup Guide Checklists specifically for POS, Reservations & Data Migration
  10. Add These Valuable Features: Cart Carrots & Personalizations
  11. Additional Resources: Some things to try!
  12. Go Live and Enable Emails Button (PLEASE READ)


START HERE: Accessing and Working with the Setup Guide

Accessing the Setup Guide

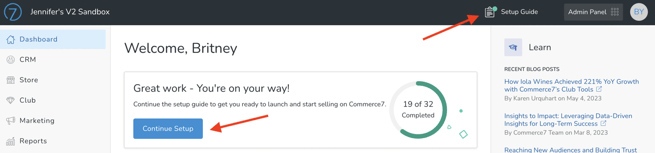
Until you are launched, you can always find your Setup Guide on your Dashboard or in the upper right corner of the Admin Panel.


Screen Shot 2023-05-08 at 4.45.50 PM-1

Working with the Setup Guide

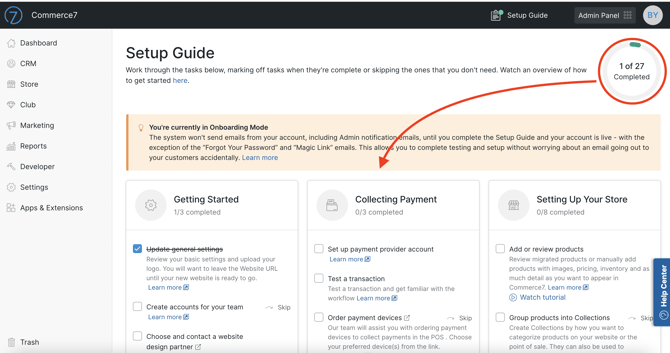
Check off the items in the each section as you complete them.

Screen Shot 2024-03-08 at 12.28.43 PM

Going Live

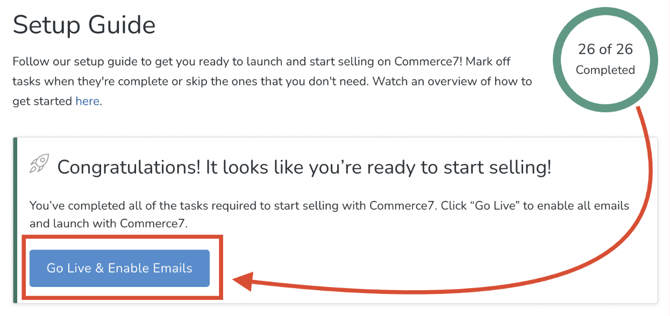
Once they are all checked off, you will be able to click the Go Live and Enable Emails button. IMPORTANT: BEFORE CLICKING THE GO LIVE BUTTON, PLEASE READ THIS.

Screen Shot 2023-08-25 at 9.49.26 AM


Let's Look at each of the Sections in Detail

Each section focuses on specific relevant tasks. 

1. Getting Started Section

  • Get started with onboarding
    Review our tips for a successful onboarding and watch the tutorial video to learn the basic navigation within Commerce7. Click here for an overview & video tutorial.
  • Update general settings
    Review your basic settings and upload your logo. You will want to leave the Website URL until your new website is ready to go. Click here to learn about the General Settings screen.
  • Create accounts for your team
    Create unique logins for each team member - and define their roles. Click here to learn how to add staff Accounts.
  • Choose and contact a website design partner
    To use the Commerce7 ecommerce tools, you will need a website. Select a design partner to create your website or to help you add the tools to your existing one. Click here to learn more about your options - and for a list of trusted design partners.


2. Collecting Payment Section

  • Set up payment provider account
    Fill out your business and banking information so that you can take payments for Orders. Click here and choose your region to get started.
  • Test a Transaction
    Test a transaction and get familiar with the workflow. Learn how here.
  • Order Payment Devices
    Our team will assist you with ordering payment devices to collect payments in the POS . Choose your region and preferred device(s) from the link in this article

Advanced ⭐️


3. Setting Up Your Store Section

  • Add or Review Products
    Review migrated products or manually add products with images, pricing, inventory and as much detail as you want to appear in Commerce7. Learn all about Products here.
  • Group Products into Collections
    Create Collections by how you want to categorize products on your website or the point of sale. They can also be used to include/exclude products from promotions/coupons. Learn how to set up Collections here.
  • Configure Shipping Rates & Zones
    Add Shipping Zones, Methods and Rates. Consider implementing Flat Rate Shipping. Learn about setting up shipping rates here.
  • Configure your Fulfillment Method
    Learn about fulfillment options and connect your fulfillment method. Learn about configuring your Fulfillment Method here.
  • Create Store Promotions
    Create coupons for discounts that are applied with a code or create a promotion that will automatically discount products or shipping based on specific criteria. Learn all about Promotions, Coupons & Promotion Sets here.
  • Review your Locations
    Review your default inventory location and optionally create additional locations for pickup location, inventory, etc. Learn how to set up your Locations here.
  • Configure Transaction Emails
    Review and edit the transaction emails sent to your customers for orders, club signups, etc. Learn about the triggers and how to edit the transaction emails here.
Advanced ⭐️


4. Creating Wine Clubs Section

  • Create Clubs
    Create wine clubs for each level of membership that you offer. Set up Traditional or Subscription clubs based on how you want each to run and the features available for your members. Learn how to set up the Clubs that are right for you here.
  • Create Club Promotions
    Create promotions to automatically give discounts to club members orders. If multiple promotions need to apply (i.e. Product and Shipping discount) create a Promotion Set. Learn all about Promotions, Coupons and Promotion Sets here.


The POS Section (Optional Checklist)

  • Get Started with Commerce7 POS
    Watch our POS training videos for an introduction to Commerce7 POS functionality. Watch the video series here.
  • Configure POS Profile Settings
    Control whether you prompt for tips, where inventory pulls from, and which Collections will display on the POS. Learn how here.
  • Connect and Test Payment Devices
    Configure and connect your payment devices. Test a transaction and define your workflows. Learn how here.

Advanced ⭐️


The Reservations Section (Optional Checklist)

  • Get Started with Commerce7 Reservations
    Learn about Commerce7 Reservations functionality here.
  • Add Locations
    Add a location for each area where reservations take place. Learn more here.
  • Add Reservation Experiences
    Add "Reservation Experiences" for each experience that you offer such as tastings and tours; add availability and group limits. Learn how here.
  • Add Staff Members
    Add each person who can be assigned to an incoming reservation along with their working hours. Learn more here.
  • Add Property Map
    Create and add an optional property map to manage daily reservations. Learn more here.

Advanced ⭐️


The Migrating Data Section (Optional)

  • Choose and Contact a Data Migration Partner
    Work with a data partner to migrate any of your existing information to Commerce7. Learn how here.
  • Meet with Data Migration Partner
    Review scope of work and determine what data will be migrated and the schedule for when you can expect to see data in your Commerce7 account. Learn more here.
  • Complete Credit Card Migration from your Current Provider
    Credit card migration takes place as part of your data migration. Our team will plan this with you and your Data Migration Partner. If you do not have credit cards to migrate, skip this step. Learn how here.
  • Review Migrated Data
    Spot check your products, customers, order history, club memberships, and credit card tokens to ensure data have been migrated accurately from your previous software. Learn more here.


5. Start Selling Section

  • Double Check Inventory Counts
    Make sure that inventory is completely up-to-date by either manually changing or having the inventory migrated through your Data Migration Partner. Learn about Inventory and Inventory Locations here.
  • Test Workflows
    Ensure that funds are going through your payment gateway. Ensure orders are working correctly on your website, POS, and in the admin panel. To see a list of what should be tested, click here.
  • Authorize Commerce7 as Sender of Emails
    In order for your customer emails to not be marked as spam, an SPF record must be set up for your domain name. Send your web designer the instructions in the link. Learn how here.
  • Update your Website URL
    Once your website is live and ready to go, you will need to update your URL in Commerce7 so that the email call to action buttons are directed to your URL. Learn how here.
  • Schedule a Pre-Launch call with Commerce7
    Reach out to your Onboarding Specialist to book a pre-launch call or submit a request to support@commerce7.com.


Adding Optional Setup Guide Checklists specifically for POS, Reservations & Data Migration


Add These Valuable Features! Cart Carrots & Personalizations


Cart Carrots & Personalizations

Screen Shot 2023-08-25 at 5.22.30 PMUpsell Online with Cart Carrots

Incentivize your Customers to add more to their Cart while they are shopping on your site. Learn all about Cart Carrots here.

Personalize your Website

Provide your Customers with personalized experiences based on their unique relationship with your brand. Learn all about Personalizations here.


Additional Resources to Consider - Try them!

Screen Shot 2023-08-25 at 5.23.10 PM

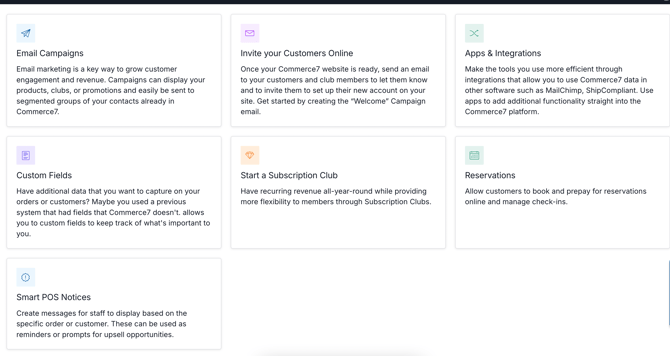
Apps & Integrations: Take a look at our wide range of apps and integrations to find the perfect fit for your business needs. Explore the options available and discover what works best for you.

Email Campaigns: Take advantage of Commerce7's built-in Campaigns tool, which seamlessly integrates all analytics back into the CRM.

ShipCompliant: Do you have a ShipCompliant account? Leverage Commerce7's ShipCompliant integration to check compliance, assess real-time taxes, update fulfillment statuses, and more.

Meta Data: Capture additional data for various elements in Commerce7, including Orders, Customers, Customer Addresses, Products, Reservations, Reservation Experiences and Club Memberships.

Invite your Customers to your new site with a Welcome Campaign: Utilize Commerce7's Campaigns tool to inform your valued Customers about your exciting new website.


Go Live & Enable Emails Button

Important: When you have completed all tasks in your Setup Guide, you will see a blue 'Go Live' Button. When you are ready, click the Go Live/Enable Emails button. (Up until this point, Transaction Emails have been disabled for the exception of Password Reset and Magic Link). Once you click that button, any actions that trigger a Transaction Email will be sent.

Screen Shot 2023-06-07 at 1.46.50 PM

Be sure to coordinate with your Designer/Developer on a Go Live launch date/time. You will want to be sure that all design/development is complete before going live.