Create Reservation Experiences (such as tours, tastings, and more) that can be easily booked online by your Customers - or by your staff in the Admin panel.
In this article:
Creating a Reservation Experience
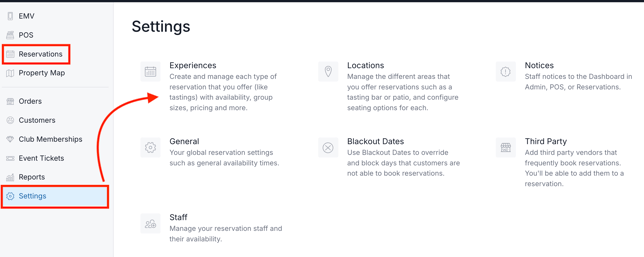
- To begin setting up your Experiences, navigate to the Reservations portal in the upper right.
- From the Reservations Page, click Settings > Experiences.
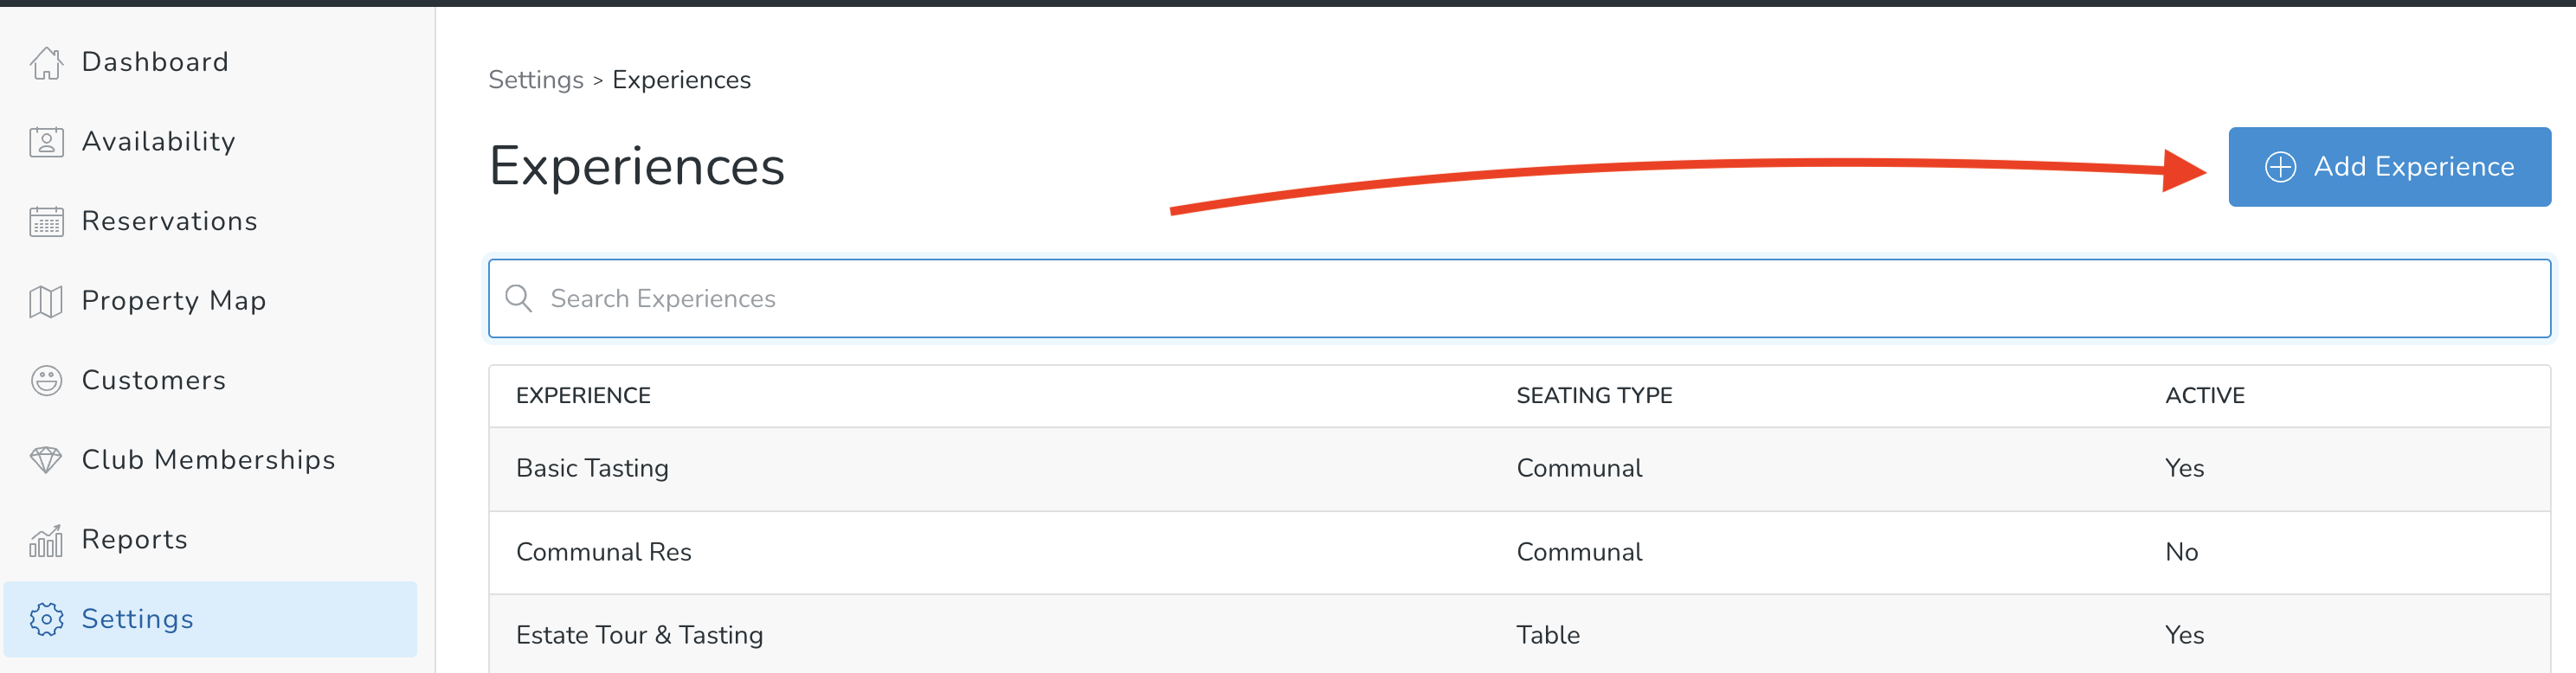
- Click the Add Experience button.
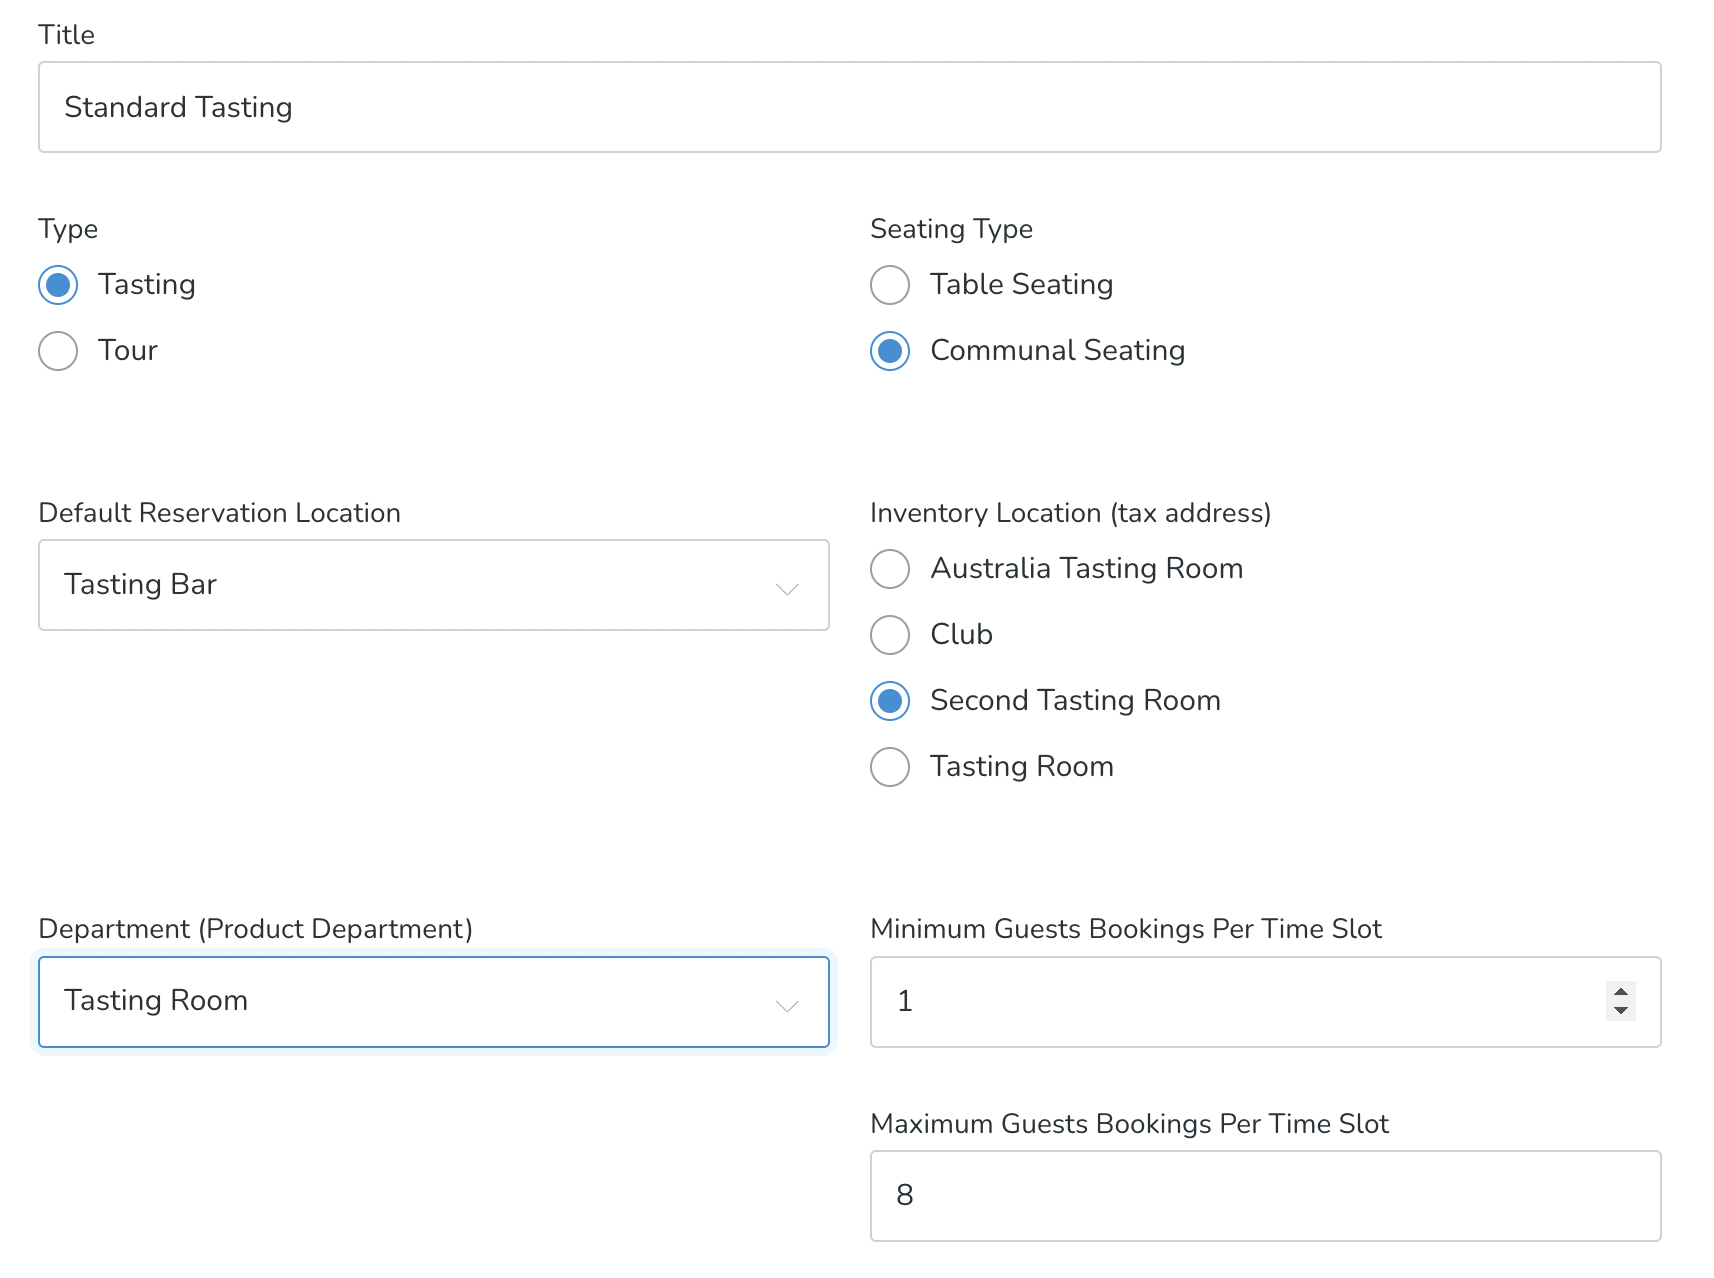
- Create a Title for the Experience (example: Vineyard Tour). This will be customer facing.
- Select a Type for your Reservation, you can have a Reservation be either a tour or a tasting. If your Reservation does not fall into these two categories, there's no need to worry. These two "types" do not have any additional functionality or attributes associated with them. They are simply used for tracking and reporting purposes.
- Next, select the Seating Type, once you select Communal or Table seating, the Default Reservation location field will populate all the Locations you have available under each Type.
- Select a Default Reservation Location from the Locations you have already created. If you haven't setup locations yet. Here is how to set up Locations for Reservations.
- Select an Inventory Location for your Experience. Your Inventory Location options correlate to your Pick Up Locations.
- For table seating you can select a Minimum and Maximum Number of Guests in a Group that are allowed to book in one Reservation.
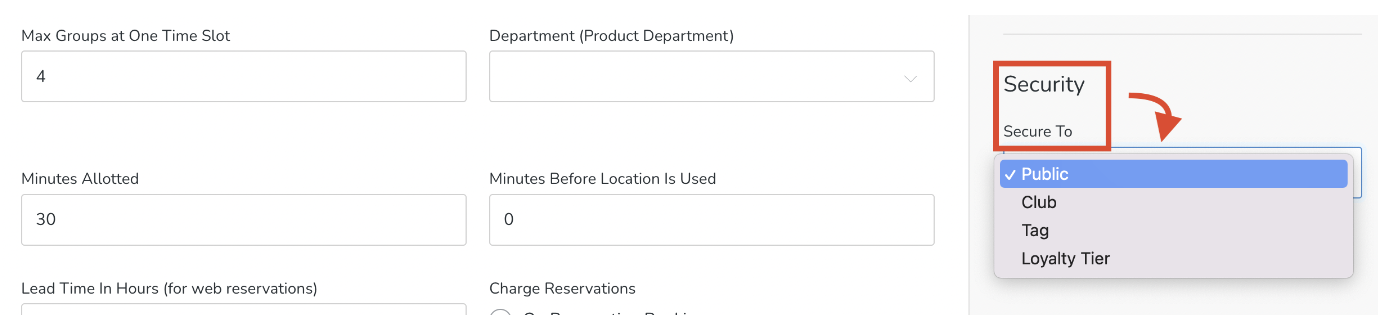
- Select the Maximum Groups at One Time Slot which is the number of parties that can be booked into a single Reservation time slot.
- Select Department from the Product Departments that you have set up.
- In the Minutes Allotted field, specify how long a Table for this Experience will be reserved for. Note: This number is not tied to the Reservation time slots you set up. For example, if you have a 2 hour Reservation that starts at 12 but offer a 12:30 time slot, the 12:30 time slot will still be available for booking.
- In the Minutes Before Location Is Used field, specify how long before the default Location is used. For example: Let's say that the private tasting begins with a short 15 minute tour around the estate before arriving at the tasting room Location - in this scenario we would enter 15 into this field.
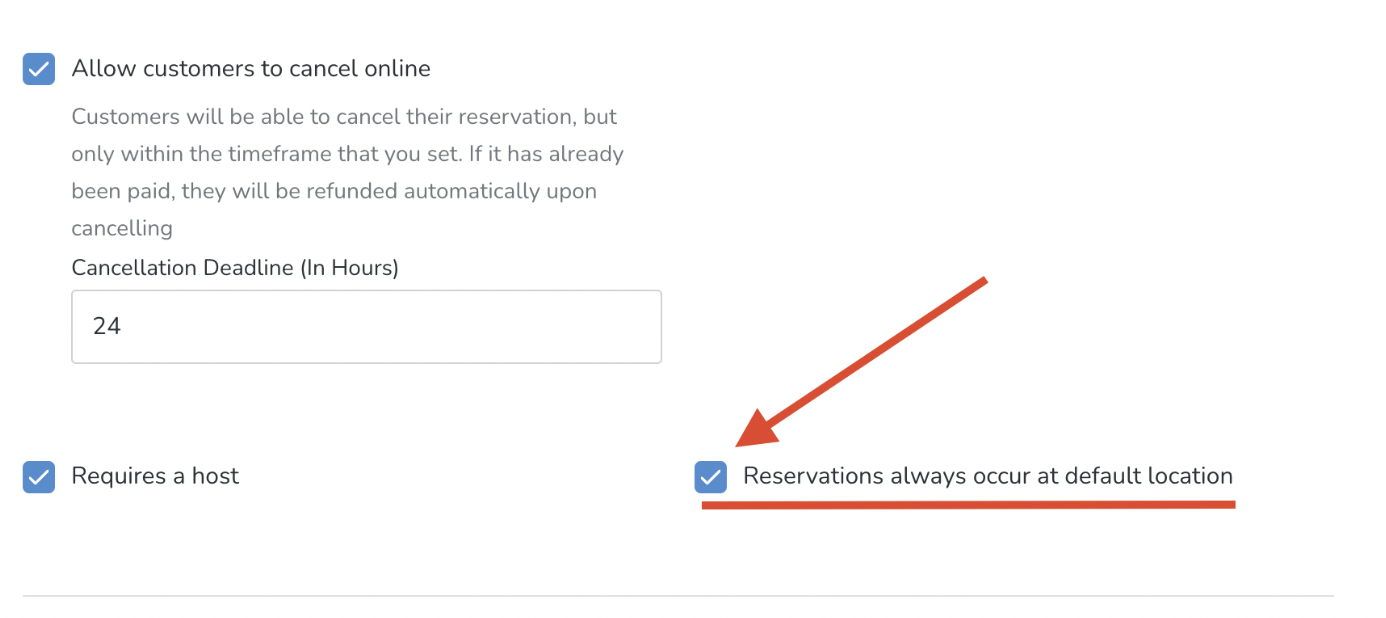
- Check off the box Requires A Host if your Experience is going to require a host. The system will prompt you to add a Host or edit the Location while booking an inbound Reservation, if you have these checked off. Here is how to set up staff for Reservations.
- Lead Time in Hours (for web Reservations) this is the lead required for a customer to book a Reservation on the website for the specific Experience. This overrides the Lead Time under Reservation General Settings.
Note: Lead time will only apply if the hours are greater than what is in General Settings. - Allow Customers to Cancel Online (if checked) will allow your Customers to cancel their own Reservations online. Define a number of hours by which the Customer must cancel. And if you allow customers to cancel a prepaid reservation, the system will automatically refund them.
Note: This feature is only compatible for our Frontend V2. If you are still on V1, consider upgrading as no further feature development is happening for our old version. - Charge Reservations determines when the reservations will charge the customers' credit cards. You can set your Experience to capture payment at the time of the booking, or 48 hours before the reservation date, or when the guests check in. (If the Experience has a cost of $0, no payment will be captured, and the Reservation will be saved with a status of 'Reserved').
- Check off the box Reservations Always Occur at Default Location if your Experience will always occur at the default Location. This means that this Reservation will never bump to another Location.
- Pick a Date range for when the Experience is Available. You can leave the End Date blank if the Experience is perpetually available.
- Upload an Image of your Experience for your front end site.
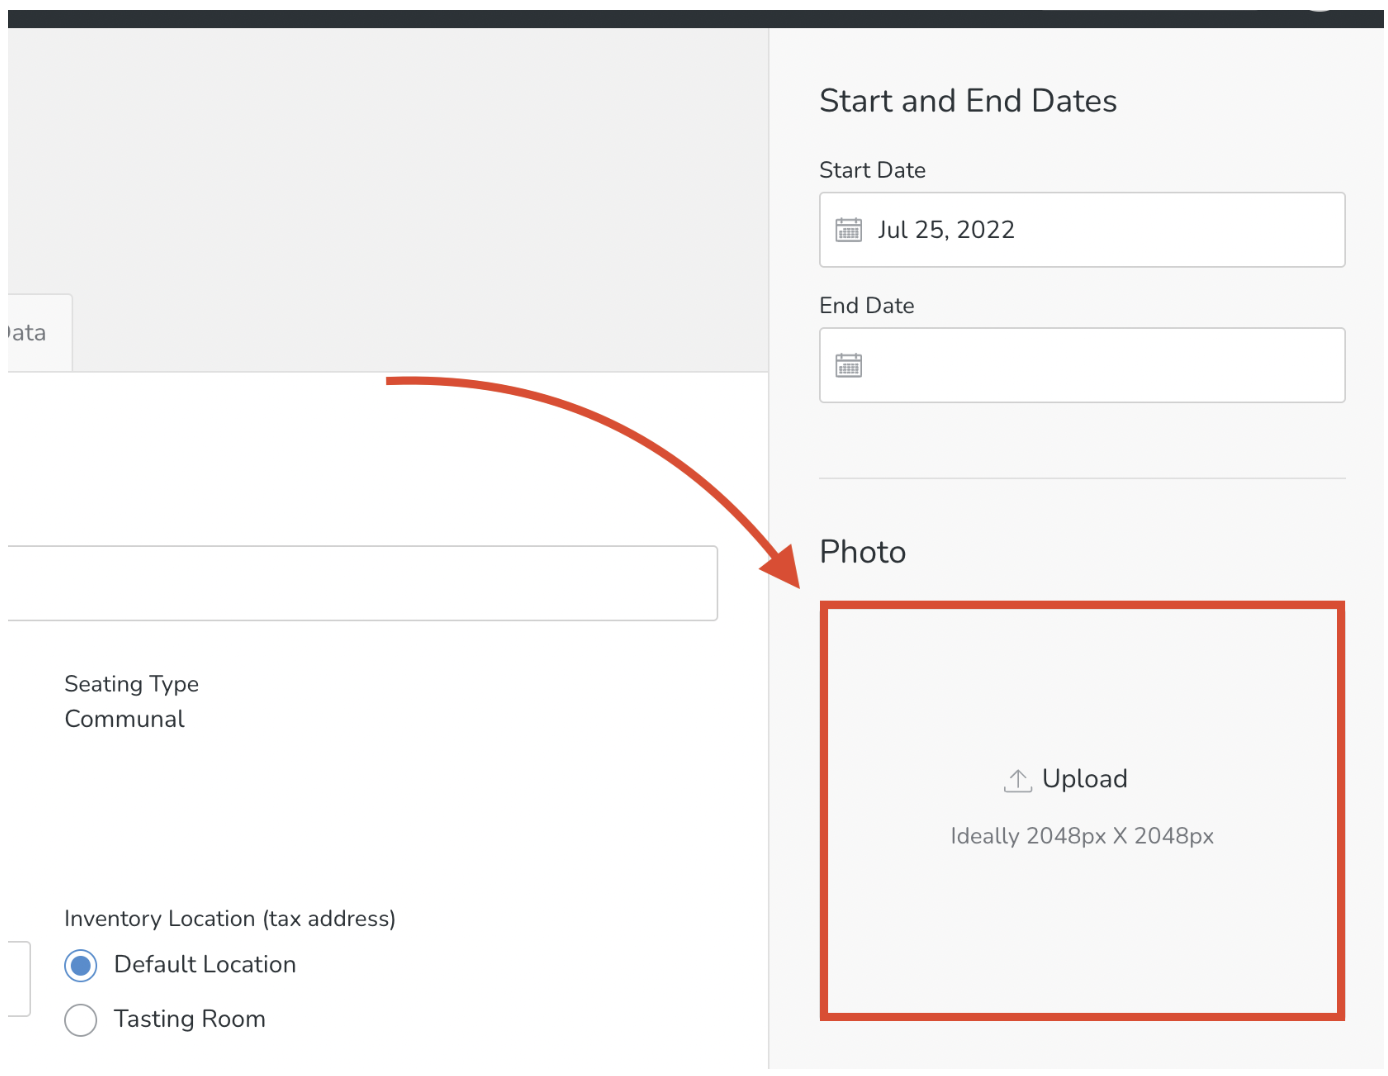
- Enter a Secure To parameter. Examples: If this Experience is available to everyone, choose 'Public'. If it's available only to Club members, choose 'Club'.
- Optionally add some content in your Reservation. You can use this box to describe the details of the Experience.
- Each Experience has Email Instructions field that can be used for important guest information and it will be added to the Reservation Confirmation transactional email. The content you add here will replace the {{emailInstructionsl}} on the Reservations Confirmation Transactional email. This allows you to tailor different email instructions for each Experience. If you leave the Email Instructions field blank, it will be blank in the Reservation Confirmation transactional email. Learn more about Setting Up and Editing Transactional Emails here.
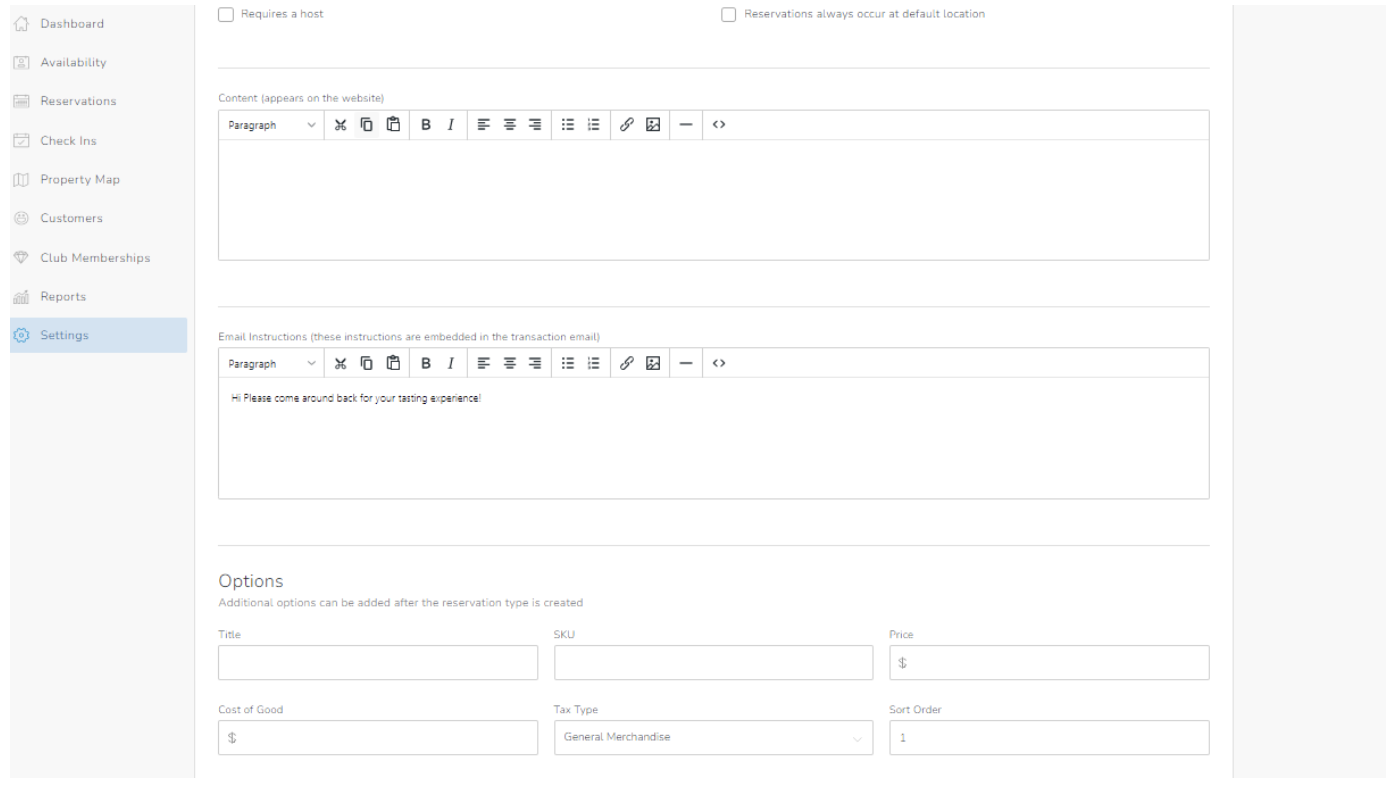
- Add in a Title for your initial Variant, a SKU, price and use the drop down menu to select the tax type. You can also add a sort order if you plan to have more than one variant.
- You can optionally add additional variants to your experience by clicking the 'Add Additional Option' button. For example, your estate tour experience may have a variant that comes with a tasting, and another variant that includes a rare vintage tasting.
- In addition, you can add a sort order for the variant, this will control the order in which your options for this reservation type are displayed on the front end. Please note that you cannot select products that have been set up under Store > Products. Reservation options must have a unique SKU.
- Click "Save Option" when you are finished adding Variants. To add another Variant, click "save and add more".
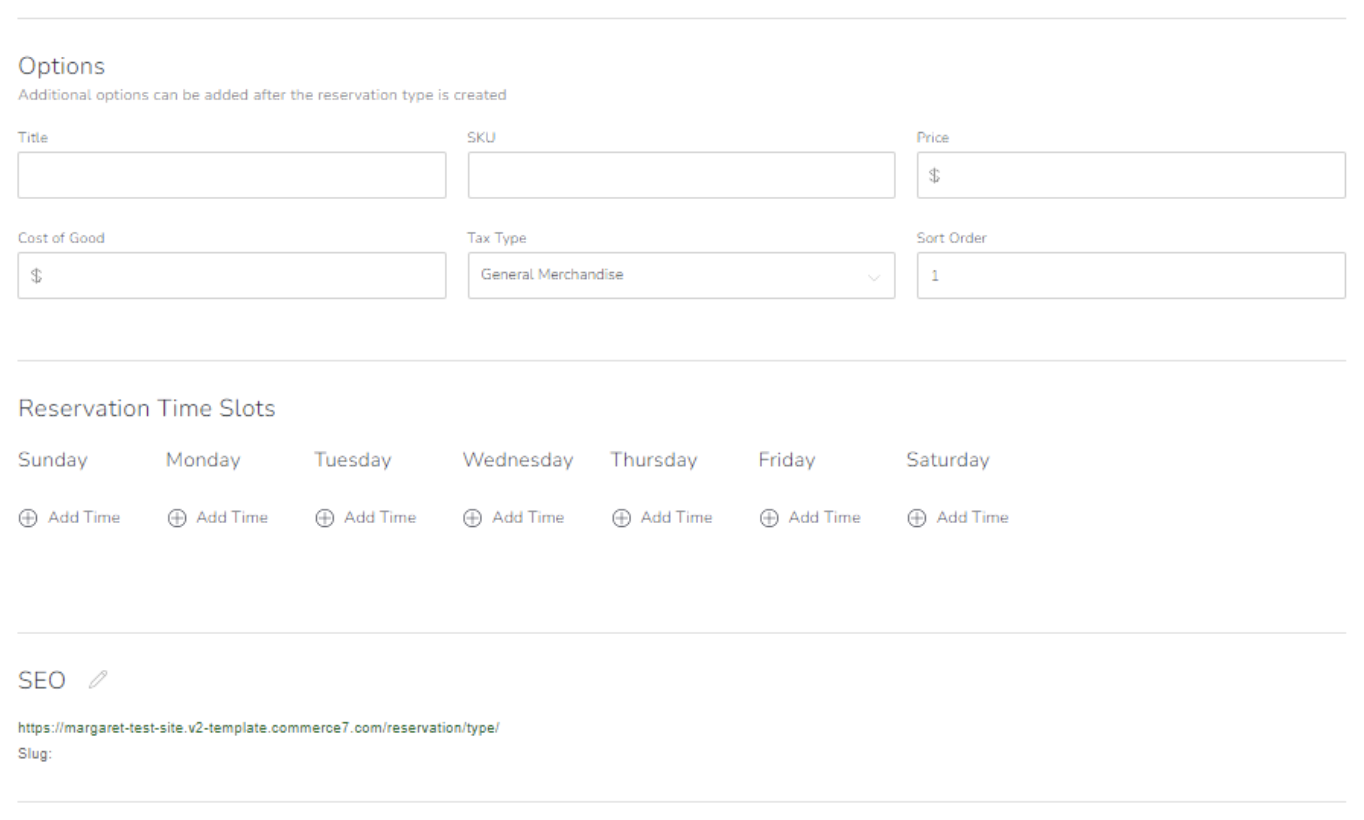
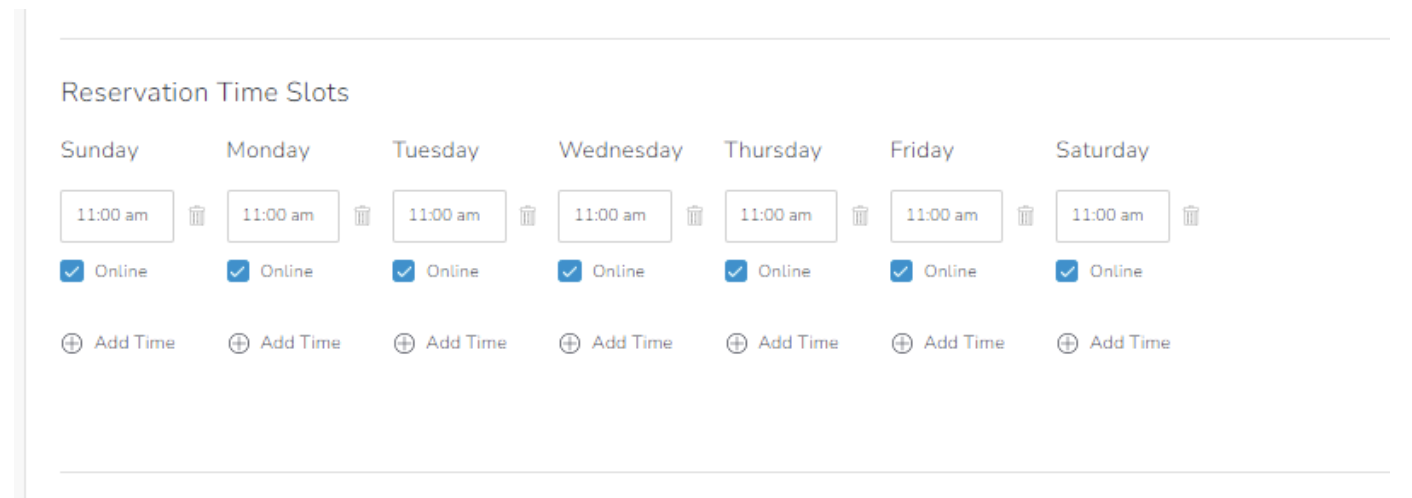
- Select Reservation Time Slots for the days and times when guests will be able to book your experiences. Click on a day, and then enter in the time when the experience is available. Note: You must enter your time in the following format "0:00pm or 0:00am"
- If you want guests to have the option to book their experience online, check the Book Online, check box below each time interval. If the box is unchecked, guests will not be able to book that time online, and the only way they can reserve that time is if a staff member books it from the backend.
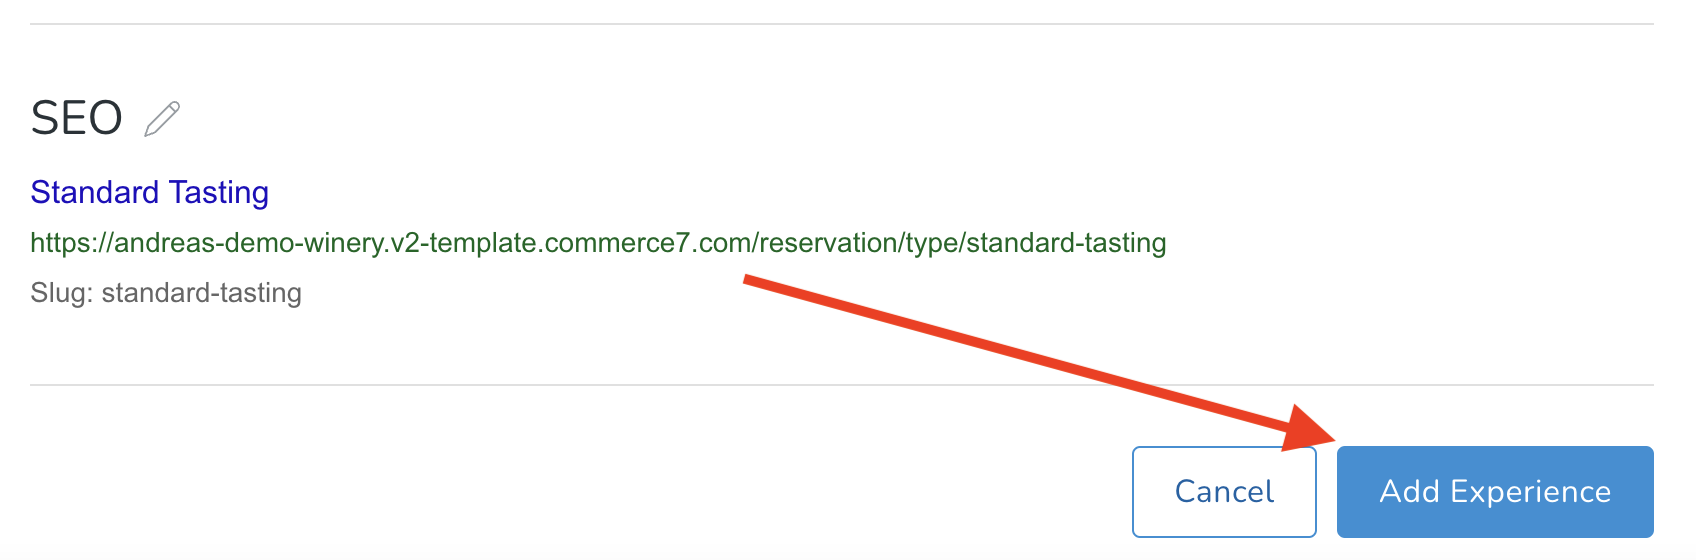
- Optionally edit the meta tag title, description and slug by clicking the pencil icon near the bottom of your screen.
When you are finished creating your Experience, make sure to click "Add Experience".
Once an Experience has been booked for a Reservation, the Experience can no longer be deleted. We recommend inactivating an Experience if you no longer want to offer it. You can do this by entering an End Date in the past on the Experience.
Website Display: What will your Customers see?
On the front end, you can plug our reservation widget into your website, and a consumer can come to your site and book your newly created Experience. (You can also simply visit the URL listed in the bottom SEO portion of your Experience under Settings > Experiences.)
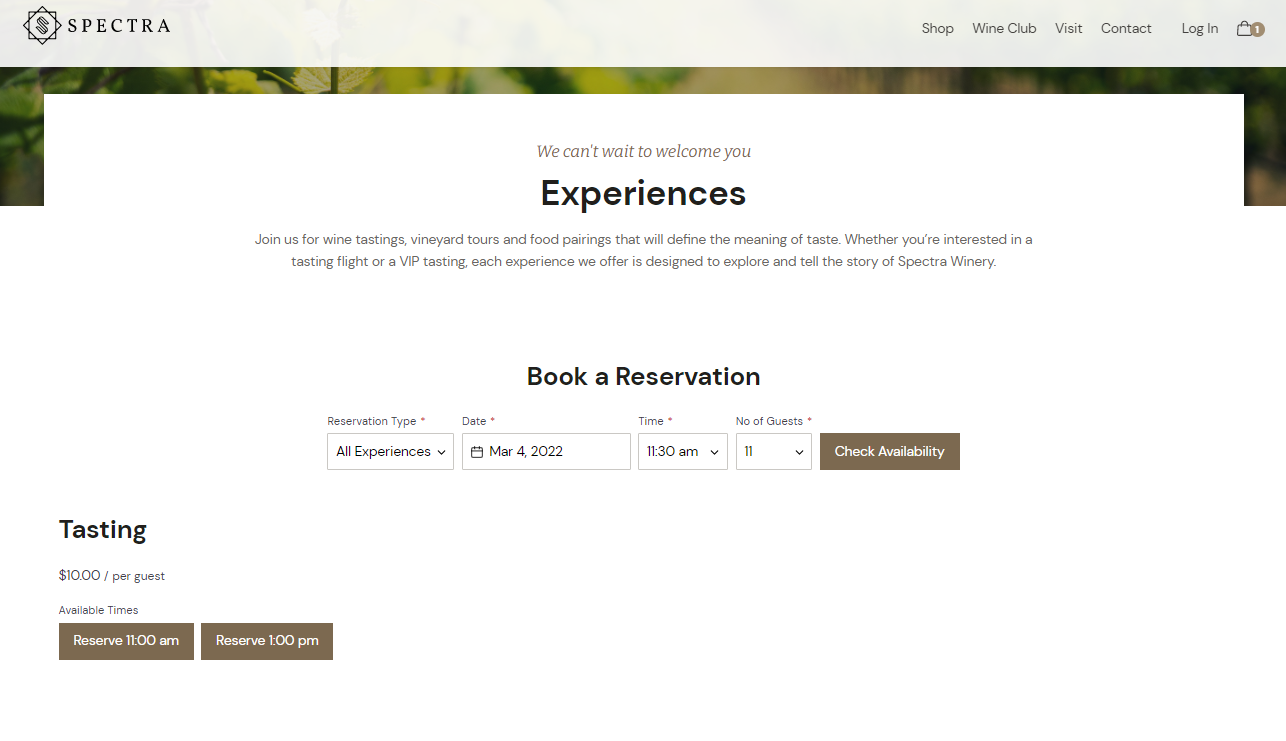
- Your customer can select an Experience (if you have more than one), desired date, the number of guests and Reservation time.
- After clicking "Check Availability", customers will see the closest available times for that reservation/experience.
- If their desired date/time is not available, they will be recommended similar alternatives or an alternative date.
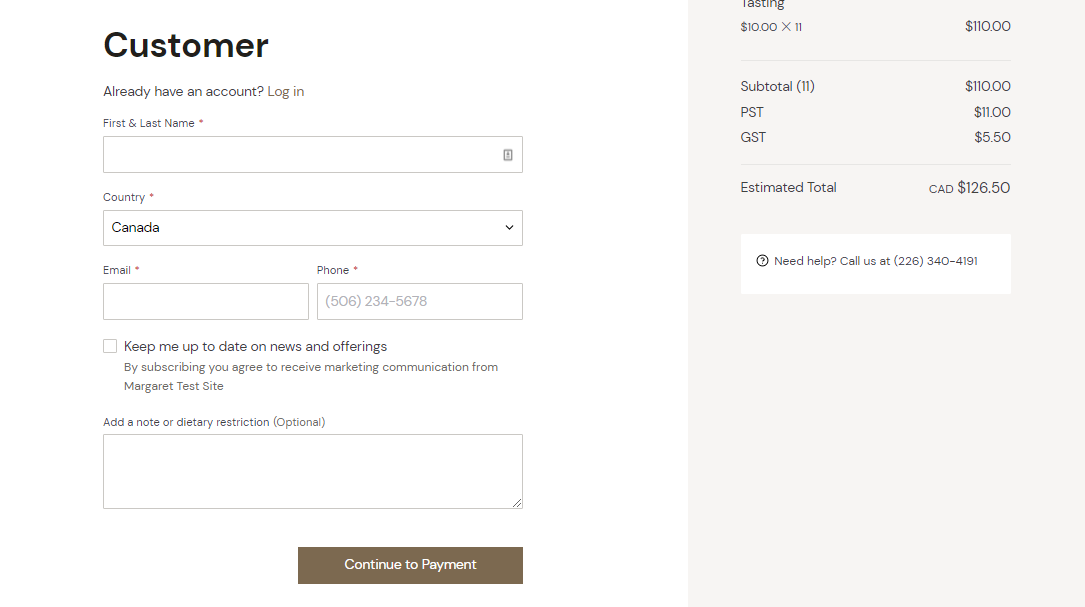
- During check out the customer has an option to add notes or dietary restrictions that will be attached to the reservation.
- After booking an Experience, your customer will see the page below with an overview of the reservation and a reservation number.
- The customer will also receive a series of transaction emails based on actions on the reservation.
- Reservation Confirmation transaction email will be sent upon a reservation being made.
- Reservation Update Confirmation transaction email will be sent when/if an update is made to the reservation i.e. when payment method is updated.
- Order Confirmation Email will be sent upon payment capture. (If payment is taken on booking, they will only receive this email and will not receive the "Reservation Confirmation" email.
- If a reservation is booked with less than 48 hours of the date and time selected, the customer will be charged at 8:00 a.m. the following day. If the reservation is booked within the same day selected, payment must be manually captured on the reservation
