Commerce7 has a free Event Ticket Extension that makes creating, selling, and managing event tickets easy.
This Extension is best used for one-off, unique events. If you have weekly scheduled events such as tours or tastings, you'll be better off using our reservation management system to facilitate those.
The Event Tickets feature is not available for C7 Lite users.
If you would like to upgrade to the full version of Commerce7, please contact Support.
In this article:
- Enabling the Event Tickets app
- Creating event tickets for purchase (products)
- Selling event tickets
- Managing purchased tickets
Enabling the Event Tickets app
- To turn on event tickets, navigate to Apps & Extensions in the Commerce7 admin panel
- Click Commerce7 Extensions and then click Event Tickets

- Click Add Extension
Creating event tickets for purchase (products)
Now that your event tickets app is active, you can create event ticket SKUs.- Navigate to Store > Products > Add Product
- Select Event Ticket
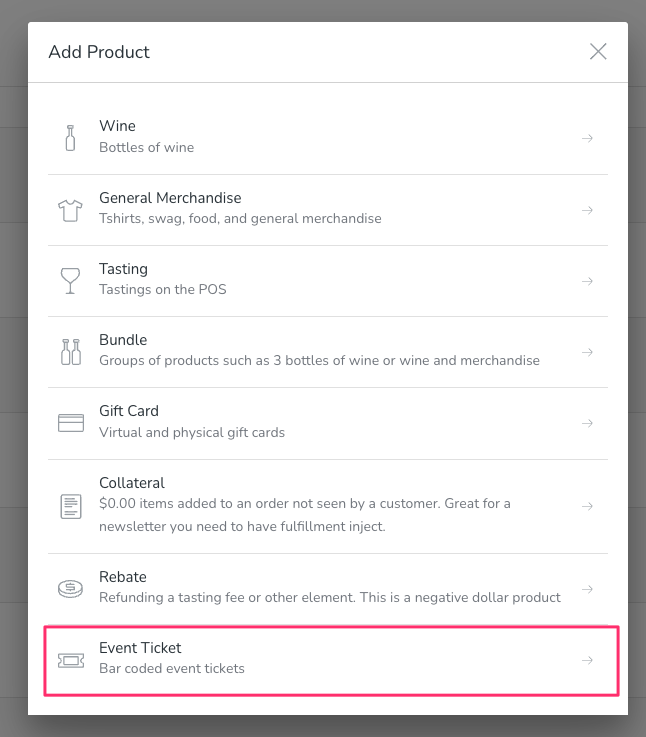
- You'll create one event ticket product for each event taking place. (ie. Each event will have a single date and time.)
- Complete the fields like any other product, with the addition of a couple of exta fields just for events. If you scroll down, you'll see new fields for Event Date, Event Time, and Location. (The event time and date are listed in the customer's transaction email after the ticket is purchased.)
- You have the option to check the box for 'Automatically set Web Status to 'Not Available' after the event has started'. When selected, the Web Status will automatically change to 'Not Available' once the event has begun. This action removes the product from online availability, preventing Customers from purchasing it.

- Optionally, you can also use variants on the product to have tiered pricing. Click Add Additional Variant to add more pricing options on the same event/product.

An example use could be different pricing for "Adult" or "Child". (Make sure to add the description of each type in the Title field so that customers know why the pricing is different for each.) - If you have a limited number of tickets that can be sold, make sure that you enter the Inventory available so that it's not oversold!
- Email Instructions field: If you'd like to include special instructions for this particular event (example: 'The first band goes onstage promptly at 8pm'), you can add the message to the Email Instructions field.

- You will also need to add the variable to the to Event Ticket Confirmation transaction email. (You will only have to do this one time).
- Go to Settings > Emails.

- Click into the the Event Ticket Confirmation email.

- Add the variable to the Email Content block and Save.

- Go to Settings > Emails.
- You will also need to add the variable to the to Event Ticket Confirmation transaction email. (You will only have to do this one time).
- If you want to restrict the event ticket to only be purchasable by certain customers (like customers in a specific club or allocation), use product Security on the bottom right-hand side of the page.
- When you're done entering your product details, click Save Product and you're done!
- (Make sure that the product status is set to "Available" and that you've also added the product to the applicable product Collections on either your website or POS to have the product display.)
Note: Events with multiple dates should have an individual event ticket created for each date. Ex: Rosé All Day Weekend should have a separate event ticket for Friday, Saturday, and Sunday etc. For weekly or scheduled events, it might also be better to use the reservations system.
Selling event tickets
Like any other SKU, event tickets can be purchased on your website, on the POS, or in Admin.
- When a customer is online or in the tasting room, the event ticket product can be added to the order/cart as a normal product
- If a guest customer is checking out:
- Tasting room - Make sure you enter an email address on the receipt confirmation modal so that the customer can receive their tickets via email. (If you forgot to do this you can attach a customer record to the event ticket generated under Store > Event Tickets later.)
- Online - Customers will be asked to enter in a First Name, Email, and Phone.
- Once the order is complete, the customer will receive the standard Order Confirmation confirmation, but in addition, they will also receive the Event Ticket Order Confirmation transactional email.
- This email contains details about the event and a barcode that can be scanned upon check-in. If there were multiple tickets purchased, a barcode for each will be included.

- This email contains details about the event and a barcode that can be scanned upon check-in. If there were multiple tickets purchased, a barcode for each will be included.
- Every time the event ticket product is purchased, you will see a new "ticket" added under Store > Event Tickets. (There is only one event ticket product being sold, but a new ticket and barcode is generated each time it is purchased.)
Note: When an event ticket is purchased online, if it's purchased with other items, the tax rate that's applied with either be the Web Inventory Location or Pickup Inventory Location used for the other order items. If the ticket is purchased on it's own, then the event's Event Location address will be used for the tax rate.
Managing purchased tickets
By going to Store > Event Tickets, you can see a full list of event tickets purchased. Here is where you can manage ticket check-ins and cancellations.
Note: If one customer purchases 2 tickets, there will be two separate rows for them in the table, but if one is selected, you will be able to see all related tickets from the same order.
Checking in guests for the event
- Go to the Store > Event Tickets page
- To check guests in by scanning the barcode:
- You'll need the Zebra barcode scanner: Zebra Symbol LI2208 Mfr Part#: LI2208-SR7U2100SGN.
- Once in the event tickets page, you can scan the customer's barcode to have them automatically marked as "Checked In".
- If multiple tickets were purchased in a single order, each barcode will need to be scanned. (There would have been multiple listed in the transaction email.)
- To check guests in manually:
- Find the event ticket in the list that you want to check in. You can search by the order number or by the customer's name. (You can also filter down the list by the specific event ticket product, event date, etc.)
- Once you've found the ticket, you can click Check In from the table view or click into the ticket for more details and additional options.

- If you check a guest in by mistake, by clicking into the ticket you'll see a button to Undo Check In. This will revert the status of the ticket.

Cancelling and/or Refunding a ticket
If a guest has not yet been checked in, you can cancel an event ticket.
Cancelling a ticket and Refunding a ticket are two separate actions
- Cancelling will not refund the customer.
- Conversely, refunding the customer will not cancel the ticket.
Cancelling a ticket
- Click the specific event ticket under Store > Event Tickets
- Click More Actions then Cancel Ticket. This will not refund the customer.

Refunding a ticket
- After the ticket has been cancelled above, click the link in the "Purchase Order" card displayed on the page (in the example above "#1114").
- This will open the order where the ticket was originally purchased and contain all payment information
- At the top right of the order, click Refund Order
- On the refund page, select the event ticket from the list, select the quantity to refund, then complete the refund. More information on performing a refund can be found here.