In this article:
- Getting Started - Activating and Configuring the Loyalty Extension
- Setting up Loyalty Tiers
- Enabling/Disabling Points Redemption for a Specific Product
- Viewing Point Balances via Admin
- Viewing Point Balances via Website (as the Customer)
- Redeeming Points for Orders via Admin
- Redeeming Points for Orders via POS
- Redeeming Points for Orders via Website (as the Customer)
- Adding or Subtracting Point Balances Manually
- Reports
- Queries & Tags
- Frequently Asked Questions
- From the Blog: Introducing Loyalty on Commerce7
- Free Training Friday Webinar: Loyalty Feature
The Loyalty feature is not available for C7 Lite users.
If you would like to upgrade to the full version of Commerce7, please contact Support.
As the legality for loyalty reward programs varies based on location, please consult your legal team before enabling the Loyalty tools.
Front-end Loyalty features are available on our V2 front-end only. Loyalty tools can still be used on the V1 backend (Admin/POS), however your customers are not able to view or redeem points on the V1 front-end. Please reach out to support@commerce7.com with questions about this.
🎓 Commerce7 Academy Callout
Did you know that there's a Commerce7 Academy course all about our Loyalty extension? Click here to access concise video modules that guide you through the process step by step.
Activating and Configuring the Loyalty Extension
The first step in creating your Loyalty Points program is to Activate the Loyalty Extension.
- From the Dashboard, go to the Apps and Extensions tab.
- Choose Extensions > Commerce7 Extensions.
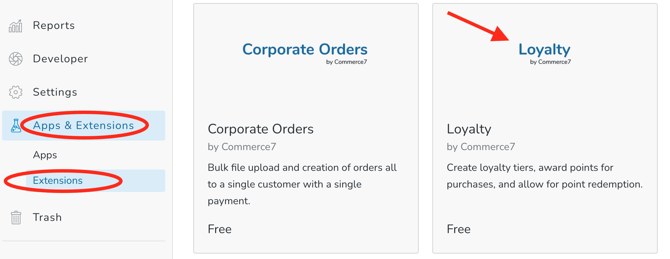
- Click the blue Add Extension button to open up the configuration screen.
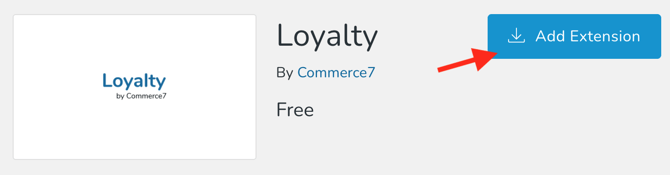
- Define your points and redemption rules to configure your loyalty program. (You can change these later if you need to.)

- Redemption Rate: This defines the number of points your customers can redeem for every $x.xx off. Examples: If you'd like your customers to be able to redeem 100 points for every $1.00 spent, enter 0.01. If you'd like them to be able to redeem 250 points for $5.00 off, then enter 0.02.
- Redemption Limit: Percentage of each order that can be redeemed with points. Example: If you want to only allow for 50% of any one order to be paid for with points, then enter 50. Likewise, if you want customers to be able to pay for an entire order with points, then enter 100.
- Points Awarded on Customer Creation: Pre-load points to a Customer's profile as an incentive for signing up on your list or placing their first order. Example: Every new customer receives 500 free points to use however they'd like.
- Define whether points are earned on Shipping and/or Taxes. If you leave these boxes unchecked, then points will only be earned on Product
- Click Set up Loyalty to save and add the extension. (This adds the extension, but it won't be active or viewable for customers yet.)
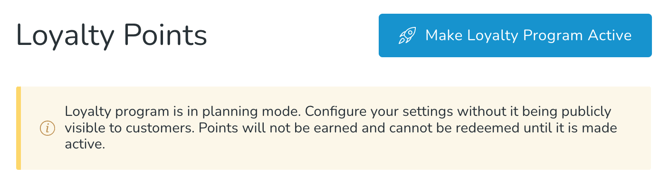
Note: Once the extension is added, you will initially be in "Planning" mode. Your program will not be viewable or live for customers until you make the program live under Settings > Loyalty Points. Do not set your program live until you have gone through all of the steps below. While you can make changes after the fact, it's not a good practice and can cause confusion for your staff and your customers.
Setting Up Loyalty Tiers and Making Your Program Live
Once you've added the Loyalty extension, you need to finish configuring your program and Loyalty Tiers before making it active.
Loyalty Tiers are used to segment groups of customers. Create different Loyalty Tiers to encourage customers to spend more with your brand, which will incentivize them to move up in the tier structure.
- Click on Settings > Loyalty Points to manage all of the settings for your Loyalty program.

- Your Loyalty program will initially be in "Planning" mode. It will not be viewable or live for customers yet. You'll see a button to "Make Loyalty Program Active". Do not click this button until you've completed all of the configuration steps below. This action cannot be undone.
- Edit the redemption and earning rules that you entered when you first added the extension if you need to.
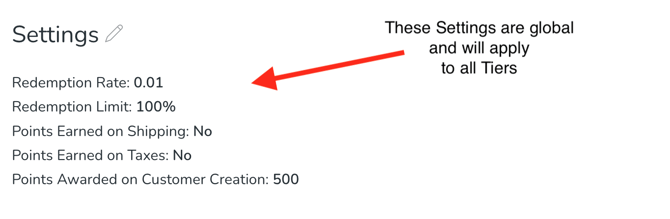
These settings are global and apply to all customers. Click here to see setting definitions. - To get started with creating your customer tiers, click Add Loyalty Tier button

- Configure your tier settings and decide how you want to run your loyalty program. Each tier you create can earn a different number of points per dollar spent.
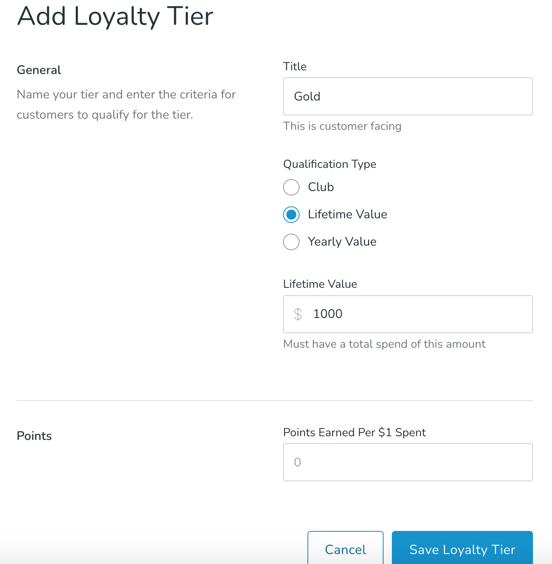
Group customers to encourage them to spend more and therefore earn more points on their purchases. For example, you might want to award customers more points if they're the member of a specific club or you might want to award based on the dollar amount each customer has spent with your brand (either their lifetime value or how much they spend in a year to encourage them to hit a dollar amount per year to maintain their tier status).
- Title: Customer-facing. Examples: Gold, Silver, Bronze
- Qualification Type:
- Club - Must be in Specific Club membership to qualify. Note: If multiple clubs are added, the customer only needs a membership to one of them to qualify, not all.
- Lifetime Value (LTV) - Must have a total spend of this amount to qualify
- Yearly Value - Must spend at least this amount in the current or last calendar year to qualify.
- Examples: Customer needs $1000 Yearly Value to qualify for the Gold Tier.
-
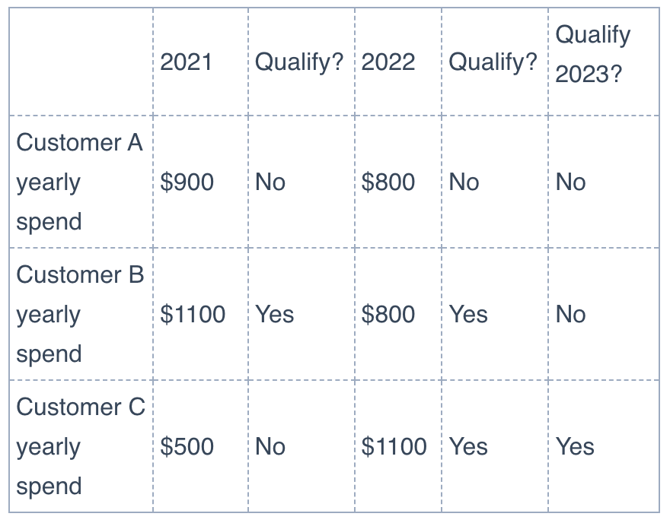
- Customer A: In 2021 the Customer spent $900. In 2022 the Customer spent $800. This Customer does NOT qualify. (Reason: Customer did not hit the $1000 threshold in either the current year or last calendar year).
- Customer B In 2021 the Customer spent $1100. In 2022 the Customer spent $800. Your Customer qualifies in 2022 (Reason: Customer hit the $1000 threshold in last calendar year), but does NOT qualify in 2023 (Reason: Customer did not hit the $1000 in the current year or last calendar year).
- Customer C: In 2021 the Customer spent $500. In 2022 the Customer spent $1100. On the day in 2022 that the Customer spent over $1000, the Customer qualifies. The Customer also qualifies in 2023. (Reason: Customer hit $1000 threshold in last calendar year).
- Examples: Customer needs $1000 Yearly Value to qualify for the Gold Tier.
- Points: Points Earned per $1.00 Spent. Example: Customer will earn 10 Points for every $1.00 spent.
- Click Save Loyalty Tier
- Repeat for as many tiers as you want.
- Click and drag your tiers on the list view to determine the hierarchy. If a customer qualifies for multiple tiers, the tier that is listed highest will prevail.
Example: If a customer is eligible for both the "Gold Tier" and another club-based tier that is lower in the list, then the customer will receive only the Gold Tier's points.
- From the list view, click into the Base Tier. This tier will contain all customers that aren't eligible for another tier. You can change the name and decide if you want them to earn any points. (You could decide that customers don't earn any points unless they are a part of one of your other tiers OR they could earn a lower amount of points.)
- Once all of your tiers are set up and you're ready to launch your loyalty program, you can click the Make Loyalty Program Active button.
This will make it viewable for customers online. Customers will not be notified, but they will start earning points and see it in their account online. This action cannot be undone. You can always remove the extension to stop offering the Loyalty program, but once it is live you won't be able to toggle it on and off from your customers.
Disabling/Enabling Points Redemption for Specific Products
- Go to the Advanced tab within a Product.
- Scroll down to the 'Redeemable with Loyalty Points' checkbox.
- It is ON by default. Toggle it off if you do not want the product to be eligible for points redemption.
- Click the Save Product button.

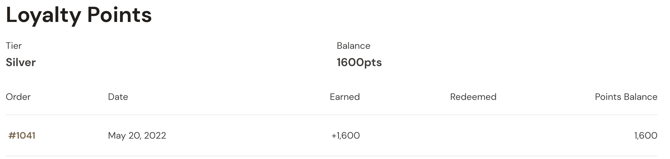
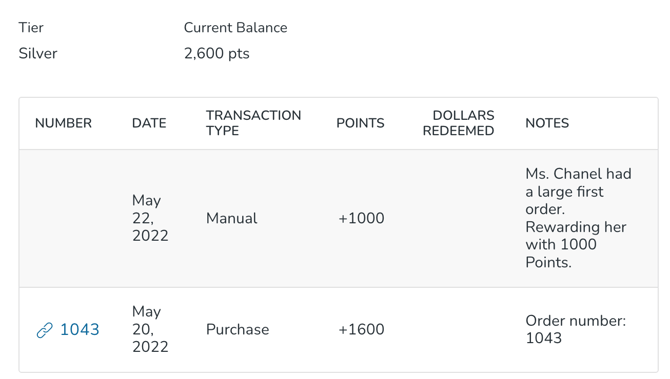
Viewing Point Balances via Admin
- From the Customer Profile, click on the Loyalty Tab.

2. From there, you'll be able to view the current balance and all Point transactions.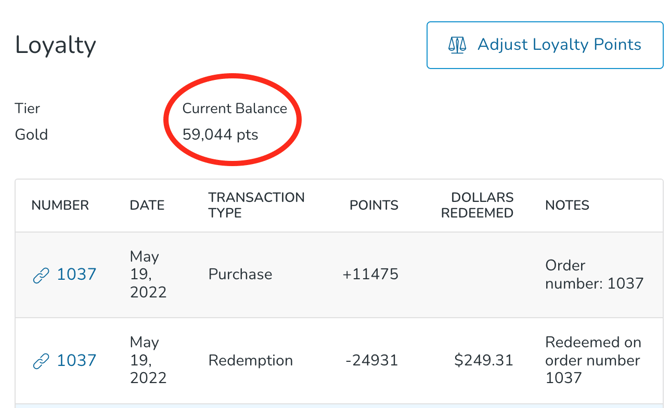
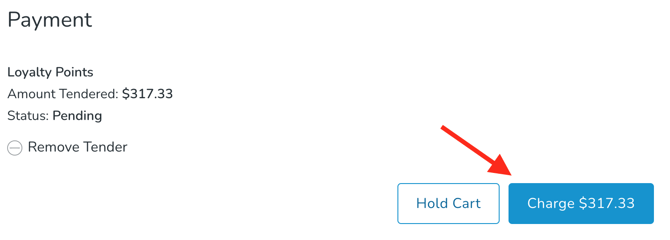
Redeeming Points for Admin Orders
Redeem Loyalty Points to use in Admin Orders.
- Add Product(s) to the Admin Order as you normally would.
- When it's time to process the order, you'll see a blue Loyalty Points flag. Click the Redeem Points link.
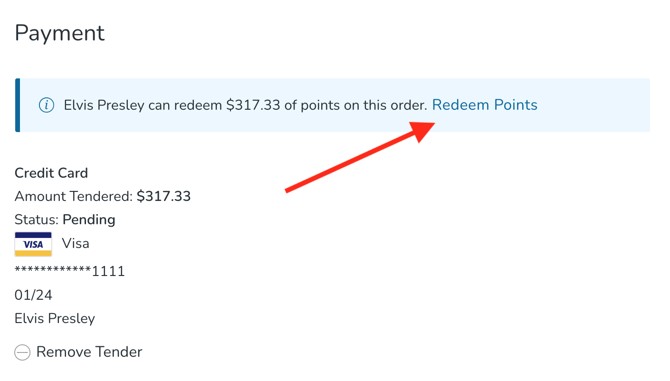
- You will have the opportunity to adjust the points to be redeemed. (Perhaps the Customer would only like to use a portion of their Points for this Order). Click Add Tender button.
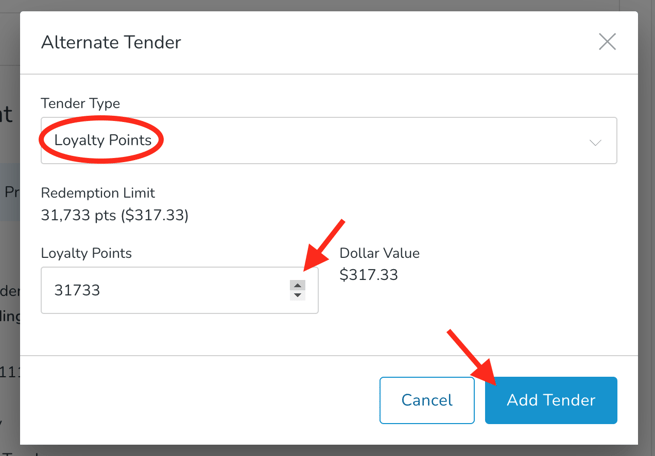
- Click Charge button to complete the Order.
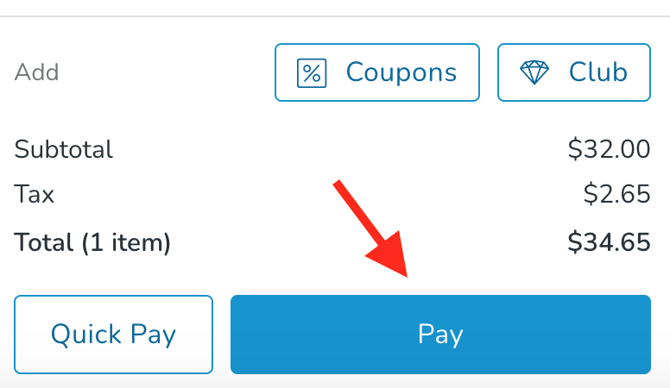
Redeeming Points Via POS
Redeem Loyalty Points for use with POS Orders.
- Add Product(s) as you would with any other Order.
- Click the Pay button.
- You'll see how many Points are available for redemption.
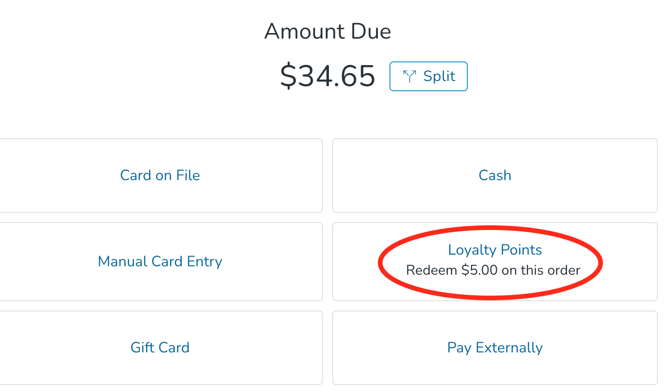
- Click the Pay with Loyalty button.
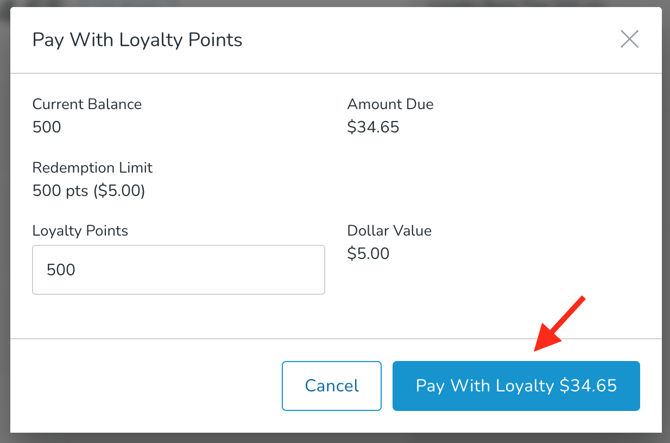
- Split Tender for difference if-needed and complete the Order as normal. If the Customer has enough Points to pay for the entire Order (and your Settings allow for 100% of Orders to be paid by Points), then you will be able to do so.
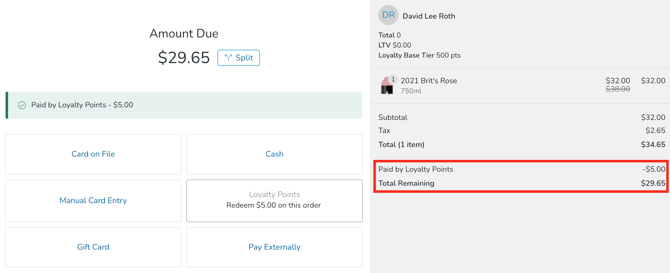
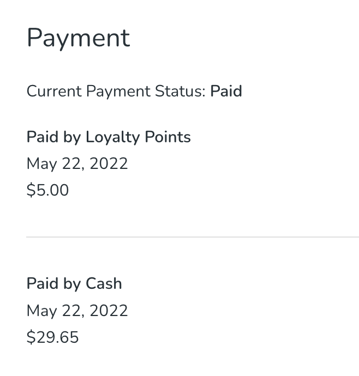
- Once the order is processed, here is how it'll look in Payment tab.
Viewing Point Balances via the Website (as the Customer)
Only available for websites using Front-end V2.
When a customer logs in on your website, on the Dashboard they will see the Loyalty Points block telling them what tier they're in, how many points they have and the equivalent dollar value.
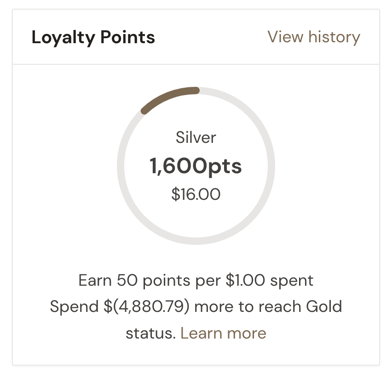
- Clicking "Learn more" will give them more information on their current tier and details on how to move up a tier.
- If they click "View history", they'll see a history of their points balance, including how many points they've earned on their transactions and if they're spent points on a purchase.
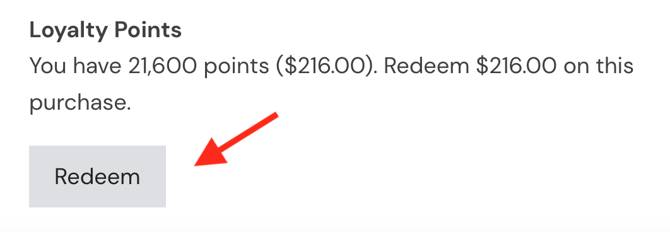
Redeeming Points via the Website (as a Customer)
Customers can use their Loyalty Point balance to purchase on your website.
- Add item(s) to Cart as usual.
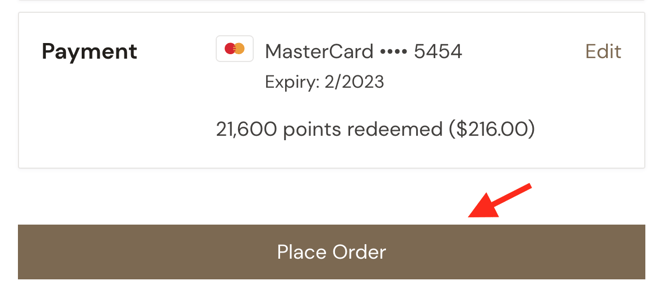
- On the Payment page, click the Redeem button.
- Enter Credit Card information for the remaining balance (if applicable) and click the Place Order button.
Adding and Subtracting Points Manually to a Customer Record
There may be scenarios where you want to add or subtract Points to a Customer manually. An example might be if a new Customer had a large first-time purchase. Perhaps you'd like to reward them with extra Loyalty Points.
- In the Customer Record, click on the Loyalty tab > Adjust Loyalty Points button.
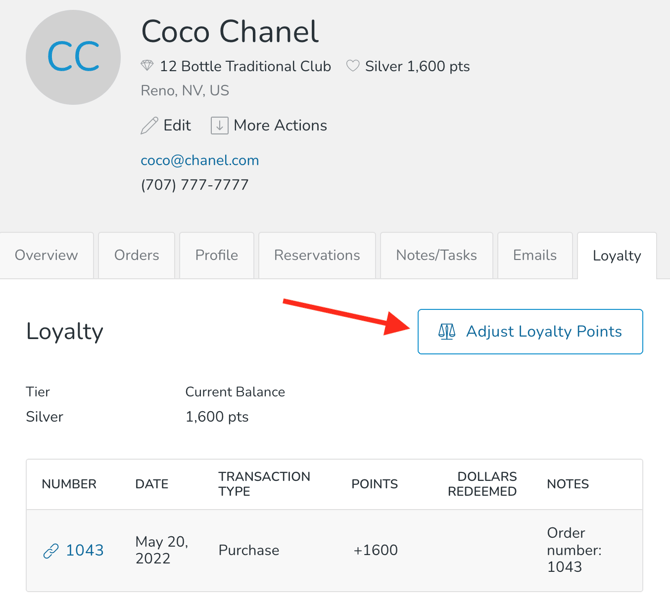
- If you are ADDING Points, enter the value (no plus-sign needed). If you are SUBTRACTING Points, enter a negative value (example: -100).
- Enter a Note indicating why the change was made. (This note is not customer-facing).
- Click Save Loyalty Points button.
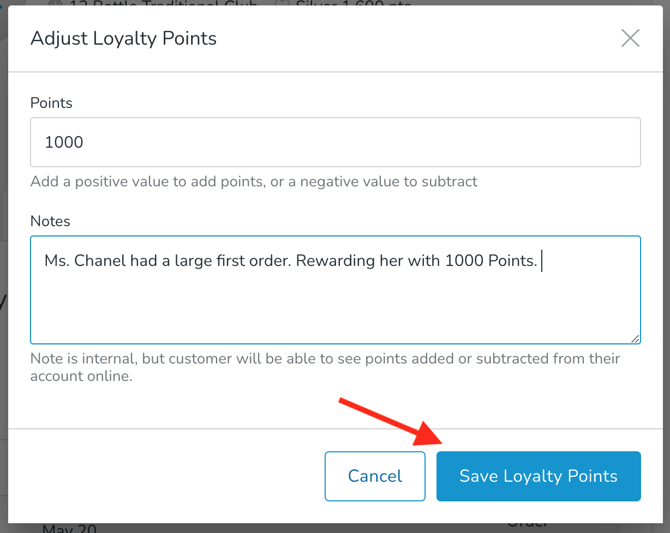
- The change takes effect immediately both in Admin and on the front-end website by the Customer.
Queries & Tags
If Loyalty is enabled, you'll see additional options for Tagging and Queries - including Loyalty Tier and Loyalty Points.
Brand New to Queries? Start here!
Querying (specific to Loyalty feature)
If you need to generate a list of Customers or Orders that relate to your Loyalty program and other data, you can utilize Queries.
- In Admin, go to Marketing > Queries
- Depending on the type of data you want, you'll use either Order or Customer Queries. If you want to pull a list of Customers, go to the Customer Queries section, for a list of Orders belonging to Loyalty Customers, go to the Order Queries section.
- Click Add Query
- Add a Title
- Property Type: Choose Customer
- Return Customers 'That match these conditions'
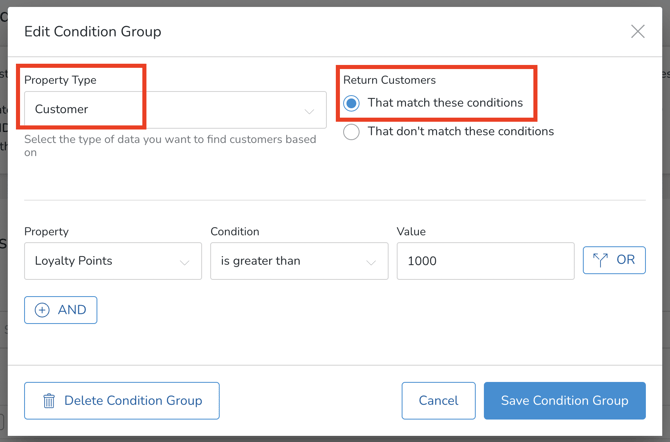
- In the Property list, you'll see options for:
- Loyalty Points: The balance of loyalty points that a customer has
- Loyalty Tier: Customers in a specific loyalty tier
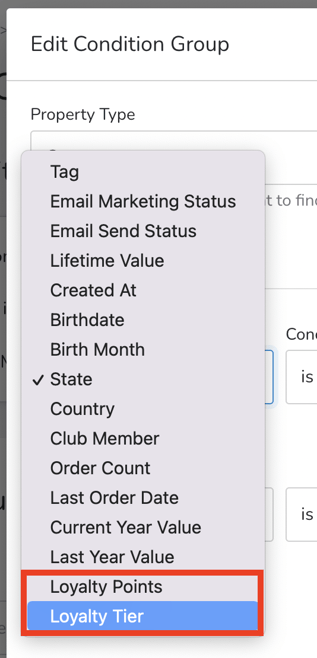
- If your tiers are based on Lifetime Value or Yearly Value, you can also use the Lifetime Value, Current Year Value, and/or Last Year Value options to filter further.
- When you're done, click Save Condition Group.
- When you're ready to get your list, make sure any/all of your conditions are saved, Click Run Query.
Learn more about how to use queries here.
Query Example: View Customers Per Tier
- In Admin, go to Marketing > Queries. Under the Customer section, click Add Customer Query
- Add a Title
- Property Type: Choose Customer
- Return Customers 'That match these conditions'
- Property: Loyalty Tier > is equal to > Tier name
- If you have more than one Tier, click 'OR' and choose as many as you have.
- When you're done, click Save Condition Group
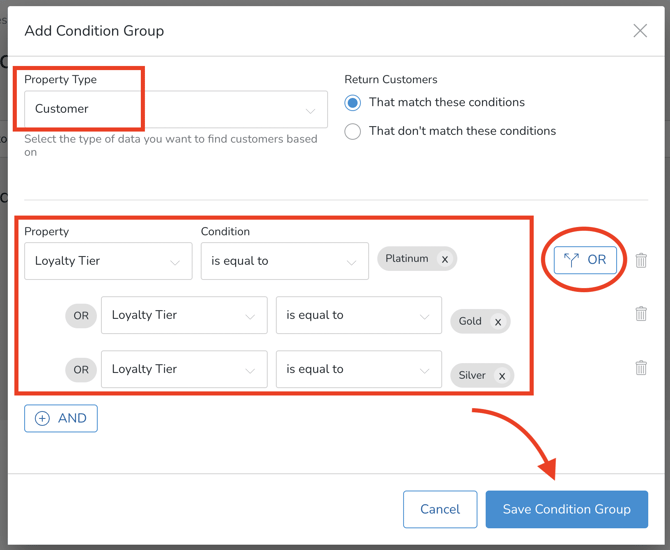
- When you're ready to get your list, make sure any/all of your conditions are saved, Click Run Query.
Query Example: View a List of Orders From Customers in a Tier
- In Admin, go to Marketing > Queries
- Under the Order section, click Add Order Query
- Add a Title
- Property Type: Choose Customer
- Return Customers 'That match these conditions'
- Property: Loyalty Tier > is equal to > Tier name
- When you're done, click Save Condition Group.
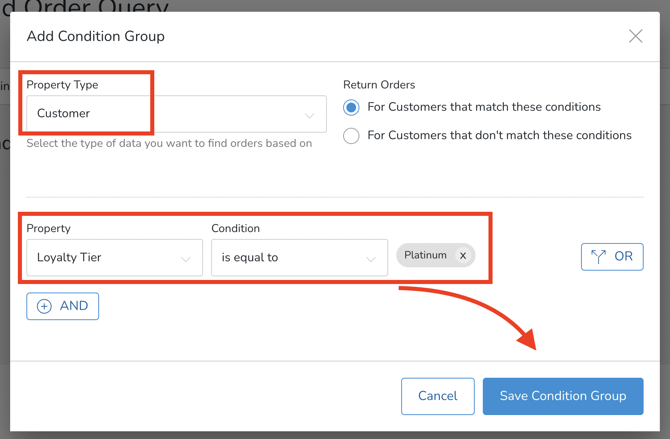
- When you're ready to get your list, make sure any/all of your conditions are saved, Click Run Query.
Tagging (specifically for Loyalty feature)
Tagging your Loyalty Customers allows you to specifically target them for various purposes such as Campaigns, Discounts, and Order Filtering. This feature enables you to create personalized experiences and rewards for your loyal customers.
- Go to Settings > Tags > Customer Tags
- Click Add Customer Tag
- Under Type select Dynamic
- You'll can dynamically tag customers by:
- Loyalty Points
- Tag by tier by using Lifetime Value, 2022 Yearly Spend, 2021 Yearly Spend, and/or Club Membership.
- Click Add Customer Tag
Learn more about how to use tags here.
Reports
There are four reports specific to the Loyalty tool. See points adjusted, redeemed and earned.
Frequently Asked Questions
- Is the Loyalty feature available in Frontend V1?
No. It's only available for Frontend V2. Learn more here. - Do Points ever expire?
No. If a customer no longer qualifies for a tier, they'll be removed from it and no longer earn those points, but they'll be able to use any existing points. - If I edit the Loyalty extension configuration (example: change the Redemption rate), will that change Point totals in Customer profiles?
No. Point totals will remain the same even if the Customer is no longer eligible for future Points due to the change in Tier structure. - Can POS Orders pay Tips with Loyalty Points?
No. Tips cannot be paid with Loyalty Points. - Can Loyalty Points be used with POS Quick Pay feature?
Yes. - Are there Reports for Loyalty transactions?
If Loyalty Points were redeemed on an Order, you'll see "Loyalty Points" as the tender type in any of your order/financial reports. To gain access to Customer information about Loyalty, see the "Reporting" section above. - Are Loyalty Points refunded when a transaction is refunded?
Yes. - Can Loyalty Points be used to pay for Club Shipments?
No. (The one exception is if you are using the 'Mark Current Order as First Shipment' in the POS. But subsequent Shipments cannot be paid via Points). - Can Loyalty Points be redeemed for Allocation Orders?
Yes. - Can the number of Points (to be redeemed) be edited by the Customer when placing an online Order? (Example: Customer would only like to use only 1000 of her 5000 points).
No. While this is a feature for Admin and POS Orders, it is not possible with online Orders. For online Orders, the maximum points (allowed by your Loyalty settings) will be applied by default. - Can I manually adjust a customer from one loyalty tier to another?
No. Customers are placed into loyalty tiers based on whether they meet the requirements set for that tier. A customer cannot be manually added to a tier if they do not meet those requirements. - Can I adjust loyalty points in multiple customers’ profiles in bulk?
No. Points cannot be manually adjusted in bulk within the admin. However, you could reach out to our Developer Partners to look into making bulk adjustments via the API. - Do wine Club Orders earn Points?
Yes. - Can I prevent Loyalty Points from being earned via specific sales channels?
No. Loyalty Points can only be turned on or off globally and will be earned on all sales channels. - Can I combine qualification types (ie. Club members with X lifetime value)?
No. Only one qualification type can be used for a given Tier. - Does using a “Club” Tier qualification include canceled Members of that Club?
No. Only active Members would qualify for Loyalty Point Tiers based on Club Membership. - How do I delete a Tier I no longer want?
Within the settings for a given tier, click on More Actions > Delete.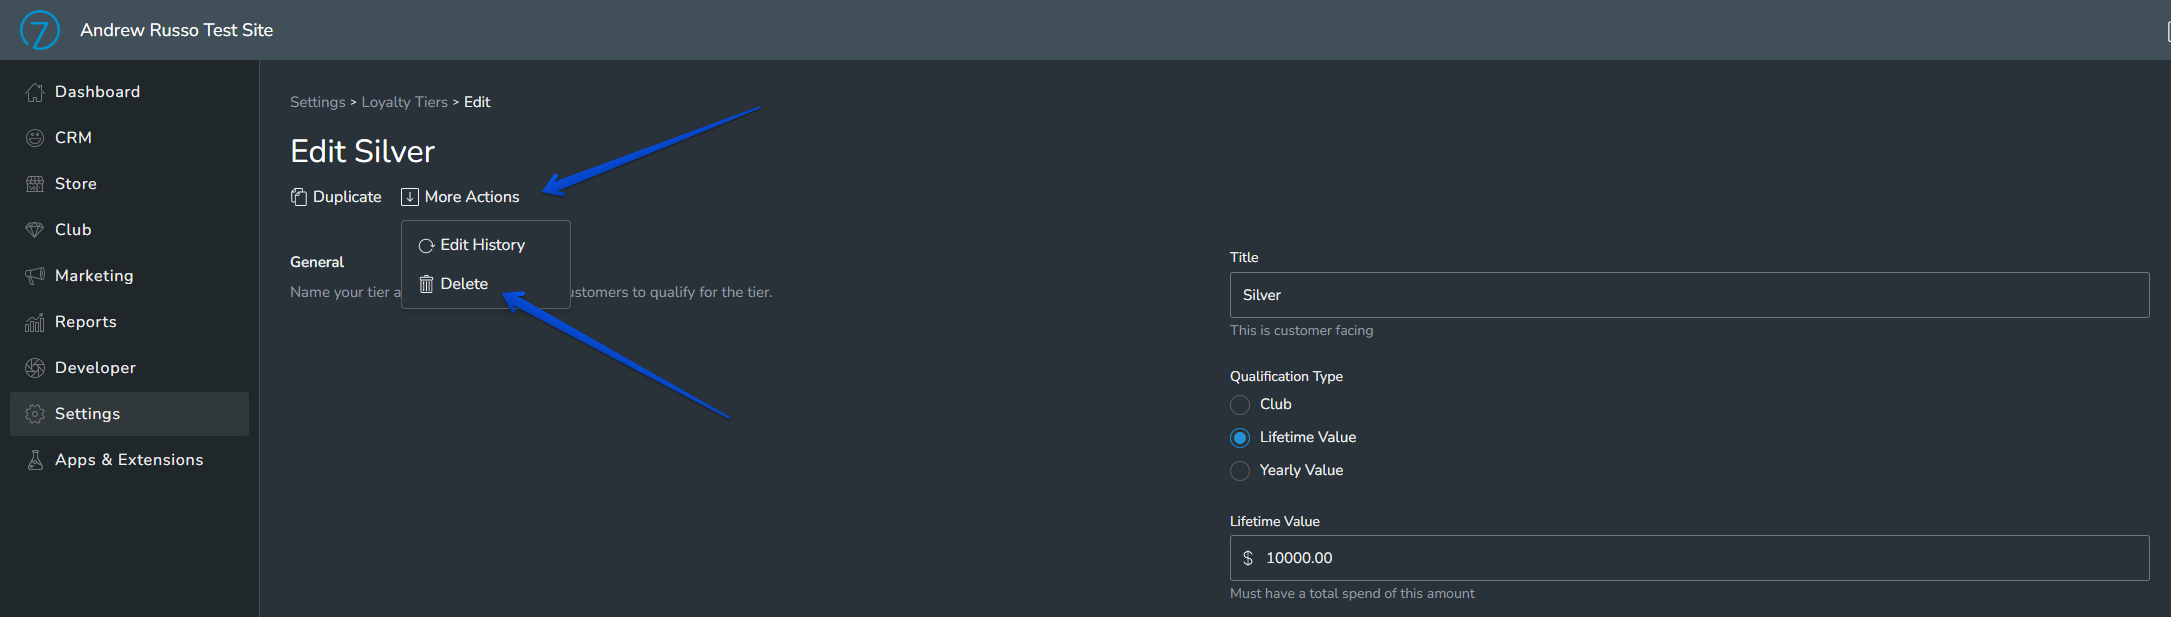
Note: The Base Tier cannot be deleted. - Can you restrict Points from being used in conjunction with a Discount?
No. - Can you restrict which Tiers can purchase Products using Points?
Yes. Click here to learn how. - Will Loyalty Points be automatically added for historic Orders when the Loyalty program goes live?
No, Points will only be awarded on Orders placed after the program goes live, but historic Orders are considered to determine if a customer qualifies for a given Tier (lifetime spend, yearly spend). - Can the system automatically add additional Points on Club Anniversary?
No. This would be done manually. - Can Loyalty Points be used during Reservation checkouts?
No. - What if a Loyalty Tier Title does not update/populate on a Customer’s Profile?
There are a couple of things to try:- Try deleting and re-adding the Tier itself, so that it populates for the correct Customers.
- Or, if you have recently added a specific Club to the Tier, try removing that Club from the Tier and save. Then re-add the Club to the Tier and save.
- Are loyalty points earned on transactions that include loyalty points being spent?
Yes, loyalty points are earned on transactions with ALL tender types. - Are loyalty points earned on transactions from External purchases such as Tock Reservations?
No they will not be earned on purchases from Tock. However, if you have 'Points earned on customer creation' active in your Loyalty Points Feature, the customer will earn the base amount.