The Query Builder is a powerful tool that allows you to organize and categorize your data effectively. If you can't find specific information using the reporting tools, the Query Builder enables you to create custom Queries tailored to your needs.
🎓 Commerce7 Academy Callout
Did you know that there's a Commerce7 Academy course all about Queries & Tagging? Click here to access concise video modules that guide you through the process step by step.
In this article:
- QUERIES OVERVIEW / BASICS - New to Queries? Start here! (VIDEO)
- Creating a Query
- Stacking Conditions
- Exporting Your Query Results
- Tagging Your Query Results
- Troubleshooting
Want to learn more about each Query type? Let's dive in!
QUERIES OVERVIEW / BASICS (New to Queries? Start here!)
Creating a Query
- Go to Marketing > Queries
- From the top tabs, select the type of query that you want to perform. (For this example, we will be building a Customer Query).
- The type of query that you select will depict the type of data that you want to find. For example, if you query "Customers", the result will be a list of customers. If you query "Orders", the result will be a list of orders, etc.

- The type of query that you select will depict the type of data that you want to find. For example, if you query "Customers", the result will be a list of customers. If you query "Orders", the result will be a list of orders, etc.
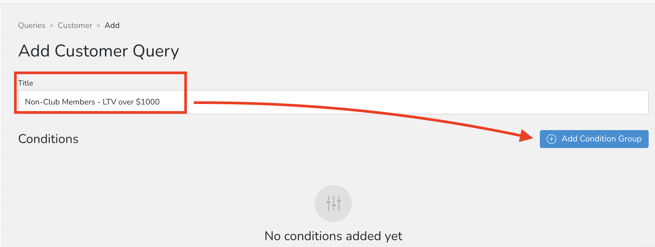
- Once you have selected the type, click Add Customer Query at the top right.
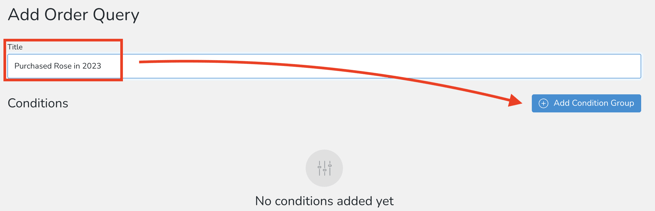
- Give your query a Title and click the Add Condition Group button.

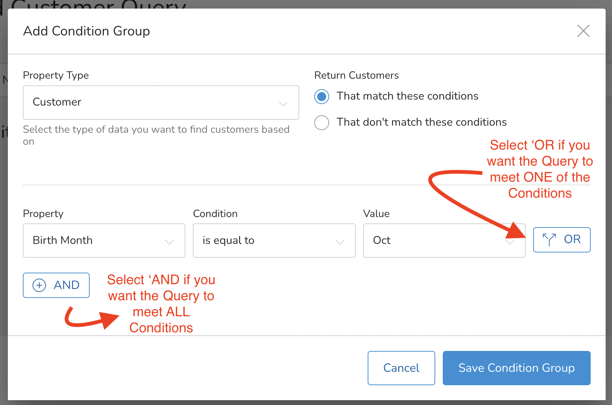
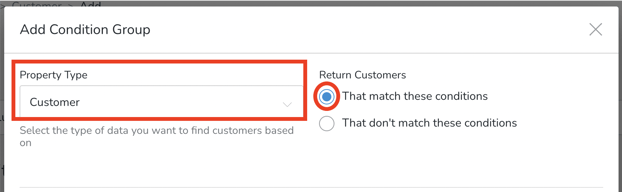
- In the popup modal, you'll set criteria for the data that you're looking for.
- Property Type: This is the type of information that you are going to filter based off of. For example, if you select "Order", you will be able to filter data based on the order related attributes such as the order date or total. If you select "Customer", you can filter off of customer related attributes like State or Lifetime Value.
What you select here will not change the type of results that you get back. In this example we are creating a "Customer" query, which means that we will always get a list of customers as our results, but we can find that list of customers based on order, club, or reservation criteria.
Note: The "Property Type" options will also differ depending on the type of Query you are creating. For this example we are using the "Customer" Property Type.
- Return Customers: Choose whether you'd like to see results that match the conditions that you add below or do not match the conditions.
- Property: Select a property from the list to start creating your conditions. This dropdown list will change depending on the "Property Type" that you selected above. In this example, we are adding a condition for "Birth Month".
- Condition: Choose "is equal to" or "is not equal to". You will also see different options here depending on the specific "Property" that you selected.
- Value: Select or enter the data for your query.
- Our current query will find all Customers with a Birth Month of Oct. If that's the only information that we want to find, we can click Save Condition Group and our query is complete.

- Property Type: This is the type of information that you are going to filter based off of. For example, if you select "Order", you will be able to filter data based on the order related attributes such as the order date or total. If you select "Customer", you can filter off of customer related attributes like State or Lifetime Value.
Add Multiple Properties/Conditions using 'OR' or 'AND'
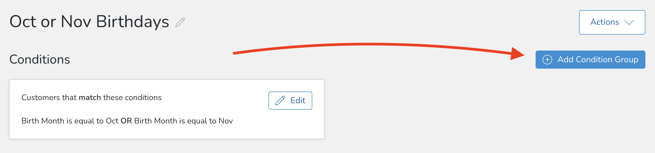
- Example 1: Customers who have an October 'OR' November birthday.
- Example 2: Customers who have an October birthday 'AND' live in California.
- Click "OR" beside the first condition if you want to add another condition, but the query only needs to meet at least one of the conditions.
- Click "AND" if you want the order query to meet all conditions you setup.
- Once you have your conditions created, click to add or Save Condition Group.
Stacking Conditions
Sometimes you need to pull data from multiple Property Types in the same Query.
Example: Find Customers who have Oct or Nov birthdays, who have also purchased your Rose.
- You'll use 'Customer' Property Type to find your Oct or Nov birthdays.
- You'll use 'Order' Property Type so that you can find those who also have purchased your Rose.
- Click the Add Condition Group button. (Button will only appear after your query is saved for the first time.)
- For example, this time we've chosen a Property Type = 'Order'. And we only want "Customers whose Orders include the Rose SKU".
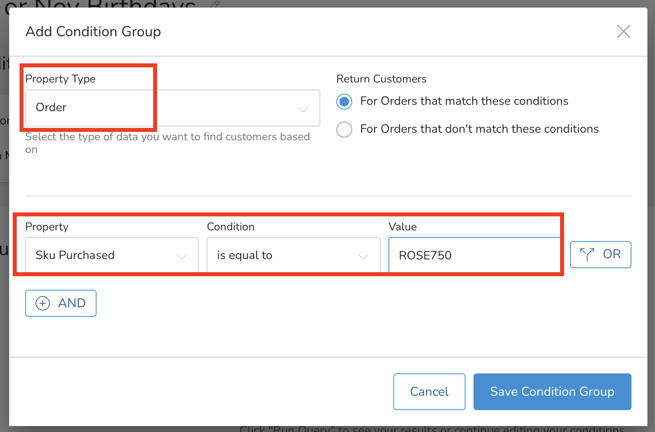
Once we save this condition group, our query will find customers who match both the the Customer conditions that we set up previously and the Order conditions that we just created. - You can condition adding condition groups or editing your existing conditions, but when you're finished, click the Run Query button.
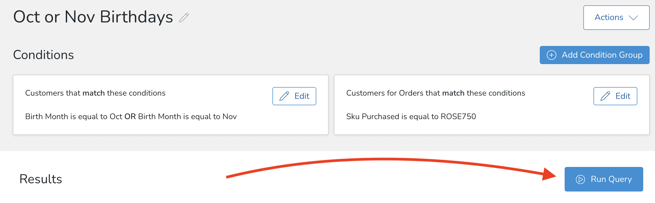
- You'll see an alert saying the query is running. (It could take a few seconds to minutes depending on how many results there are.)
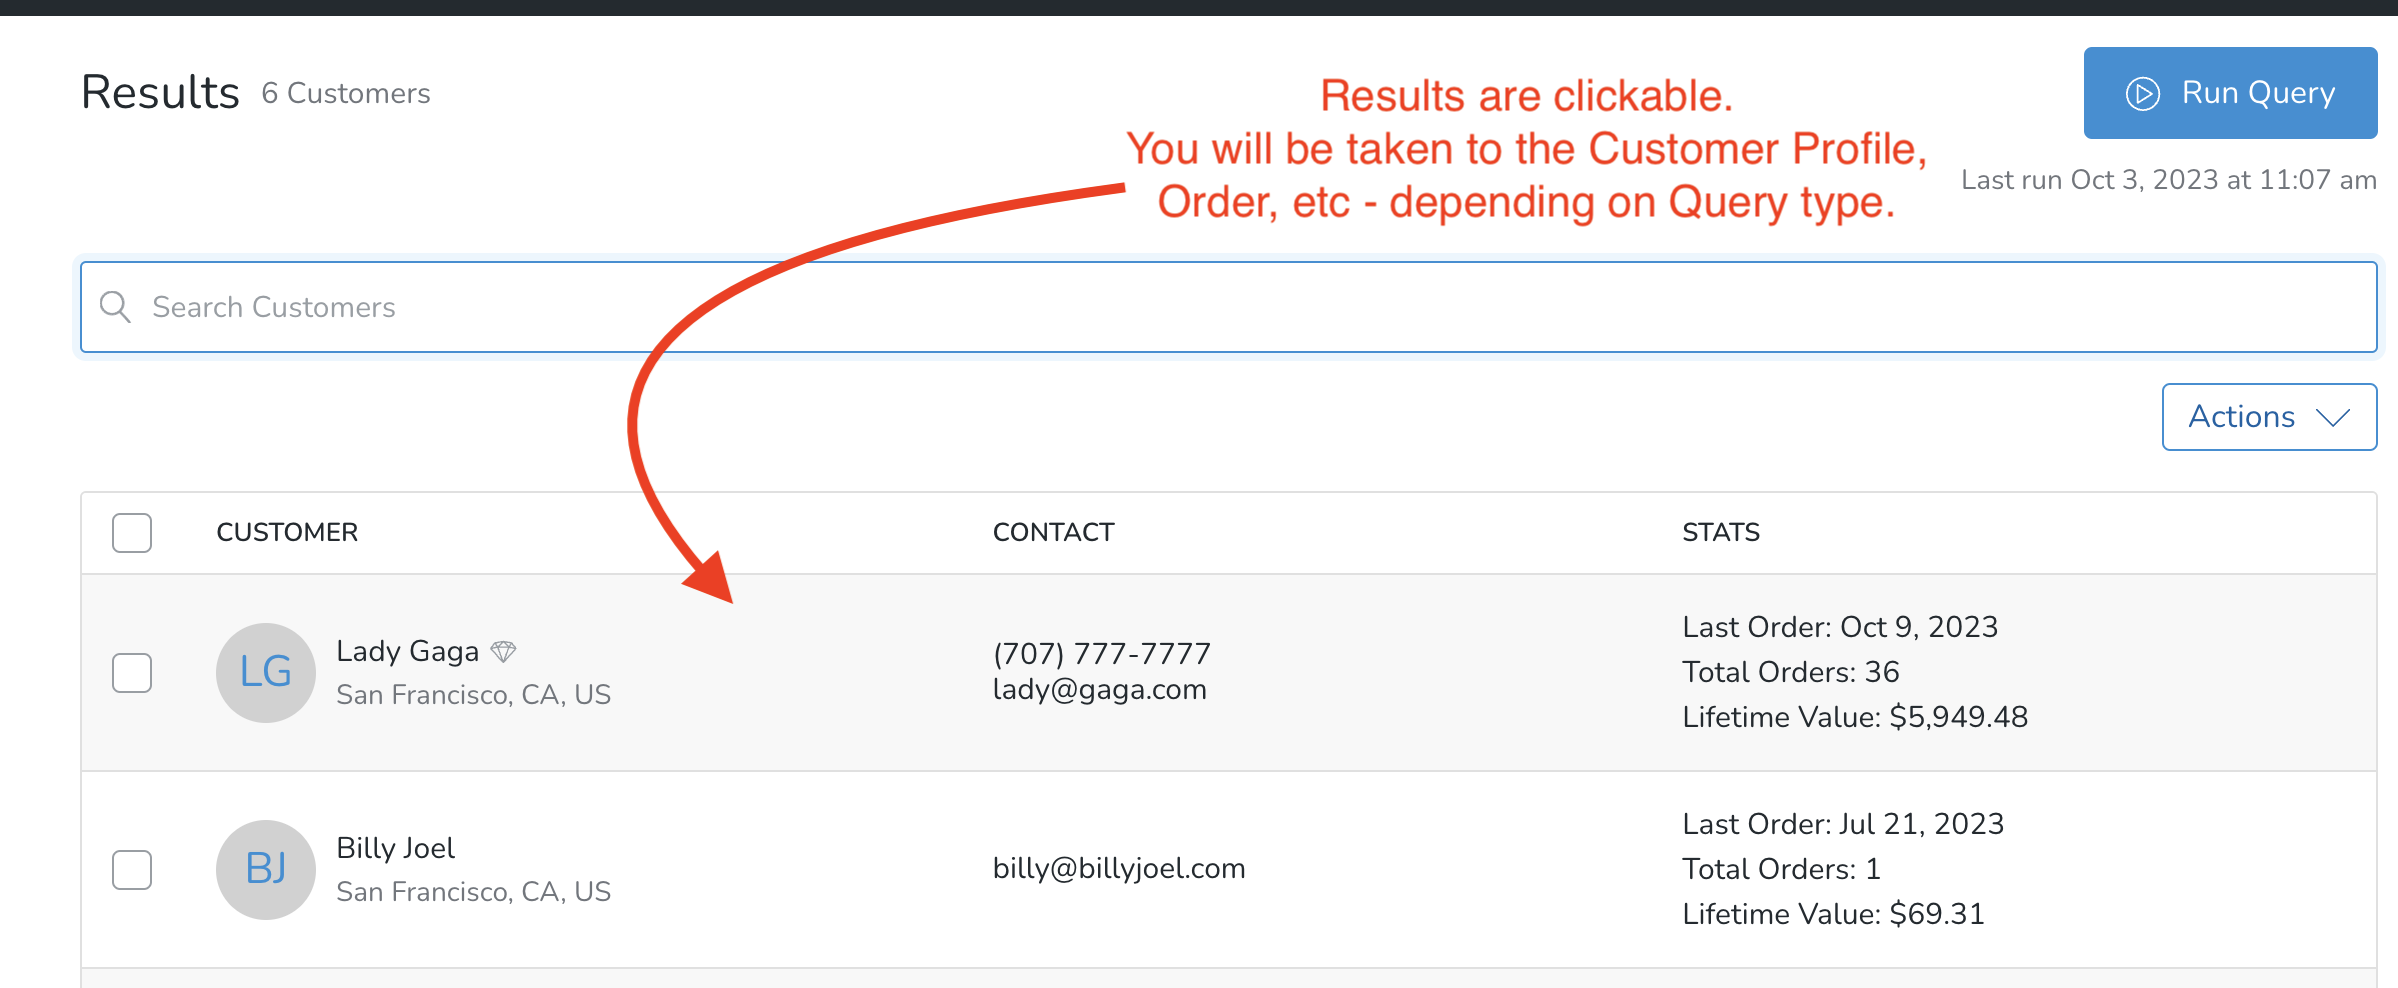
- When it's done, you will see the results on the page. You can click any of the results to go to the Customer, Order, etc.

Exporting Query Results
Once you've executed your Query at least once, you'll have the option to Export your results.
- Under the Actions button, choose the Export Customers option.
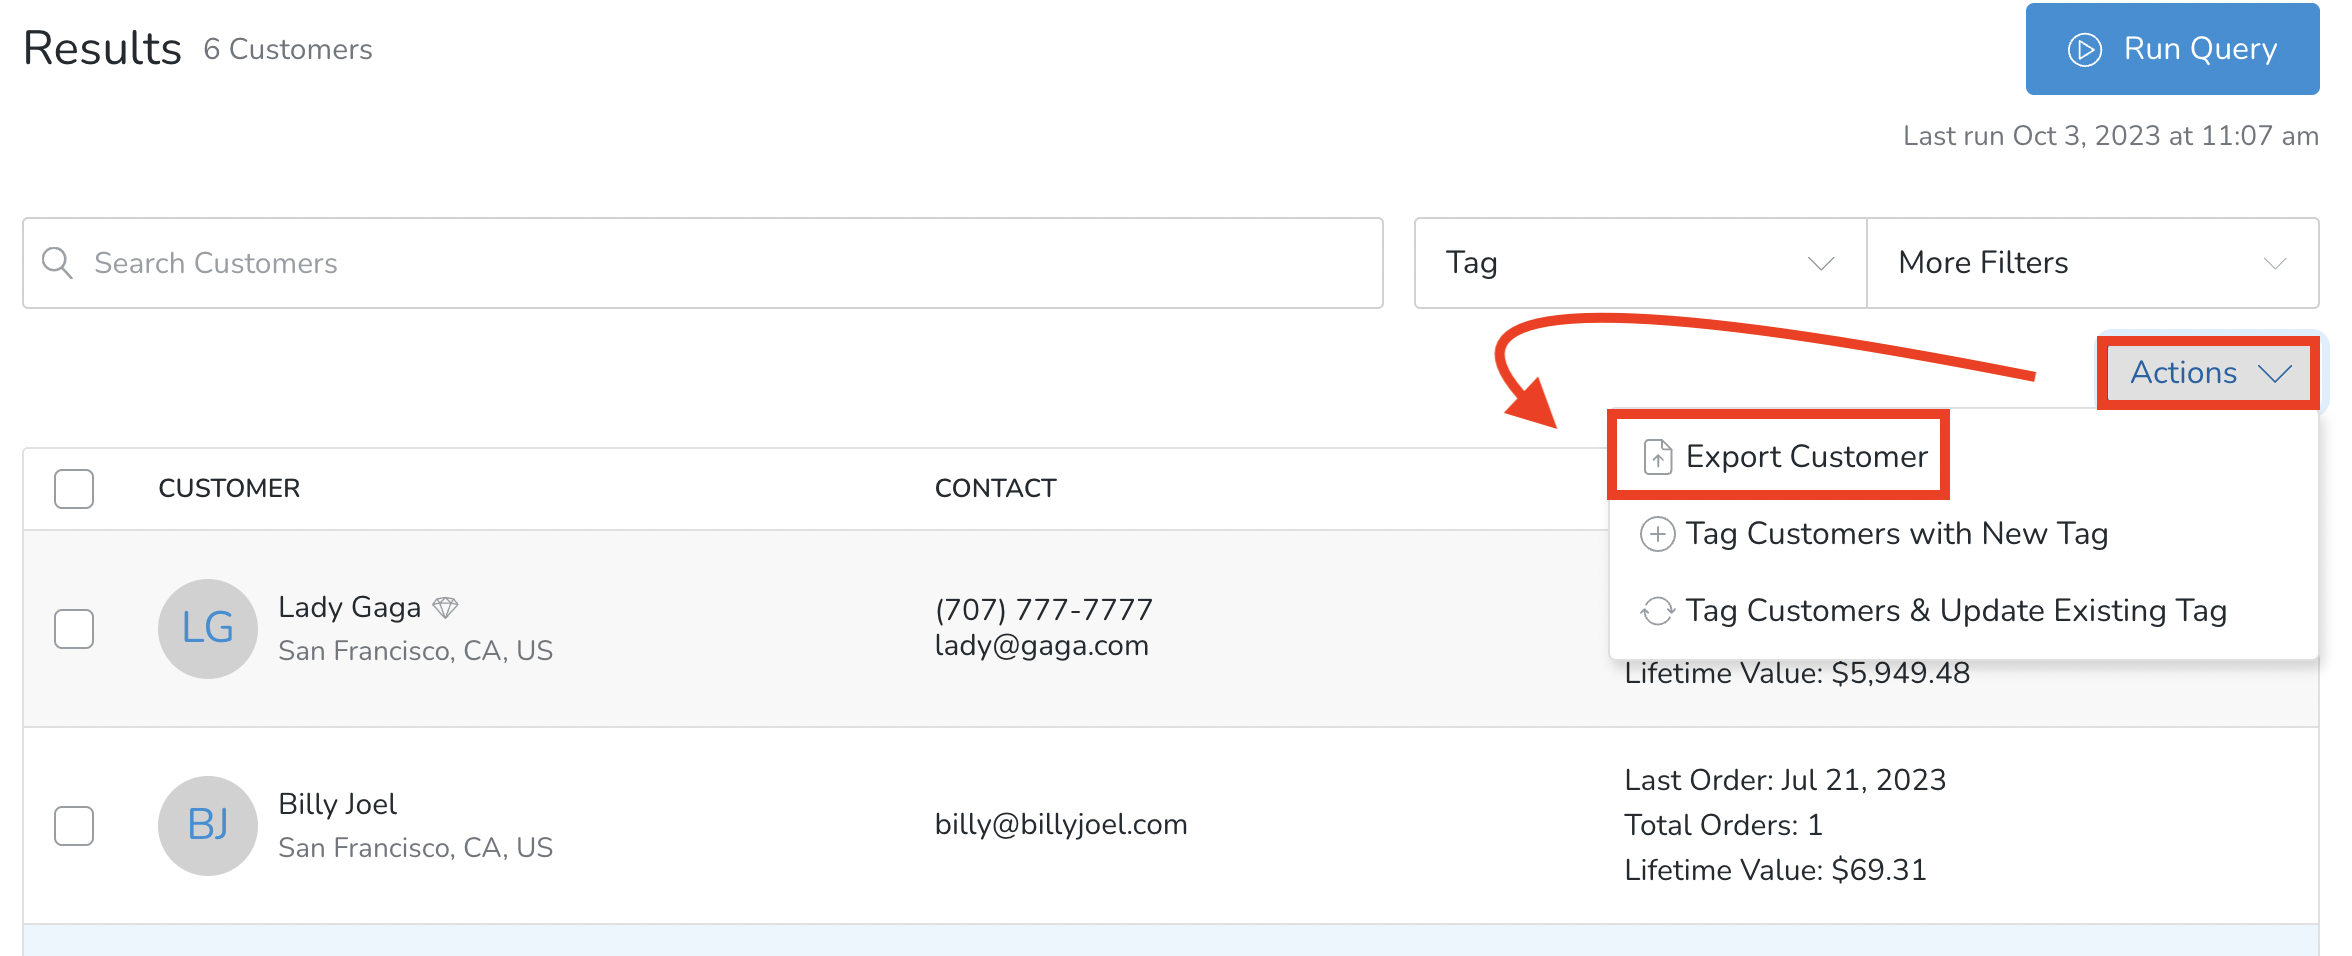
- You will be notified via email once the export is ready to download. You can also go to Settings > Bulk Actions to check status and download the CSV file.
Note that with Order Queries specifically, you will also have the opportunity to bulk export Packing Slips and Receipts or to change Orders from Pickup to Ship.
Additionally, when exporting Orders, you will find the same export options available as when exporting from the main Orders screen.
Tagging Query Results
Once you've executed your Query at least once, you'll have the option to Tag your results.
Where Can Tags be Used?
Promotions/Coupons, Personalizations, Cart Carrots, Campaigns...and more!
Learn all about Tags here.
- Under the Actions button, choose a Tagging option.
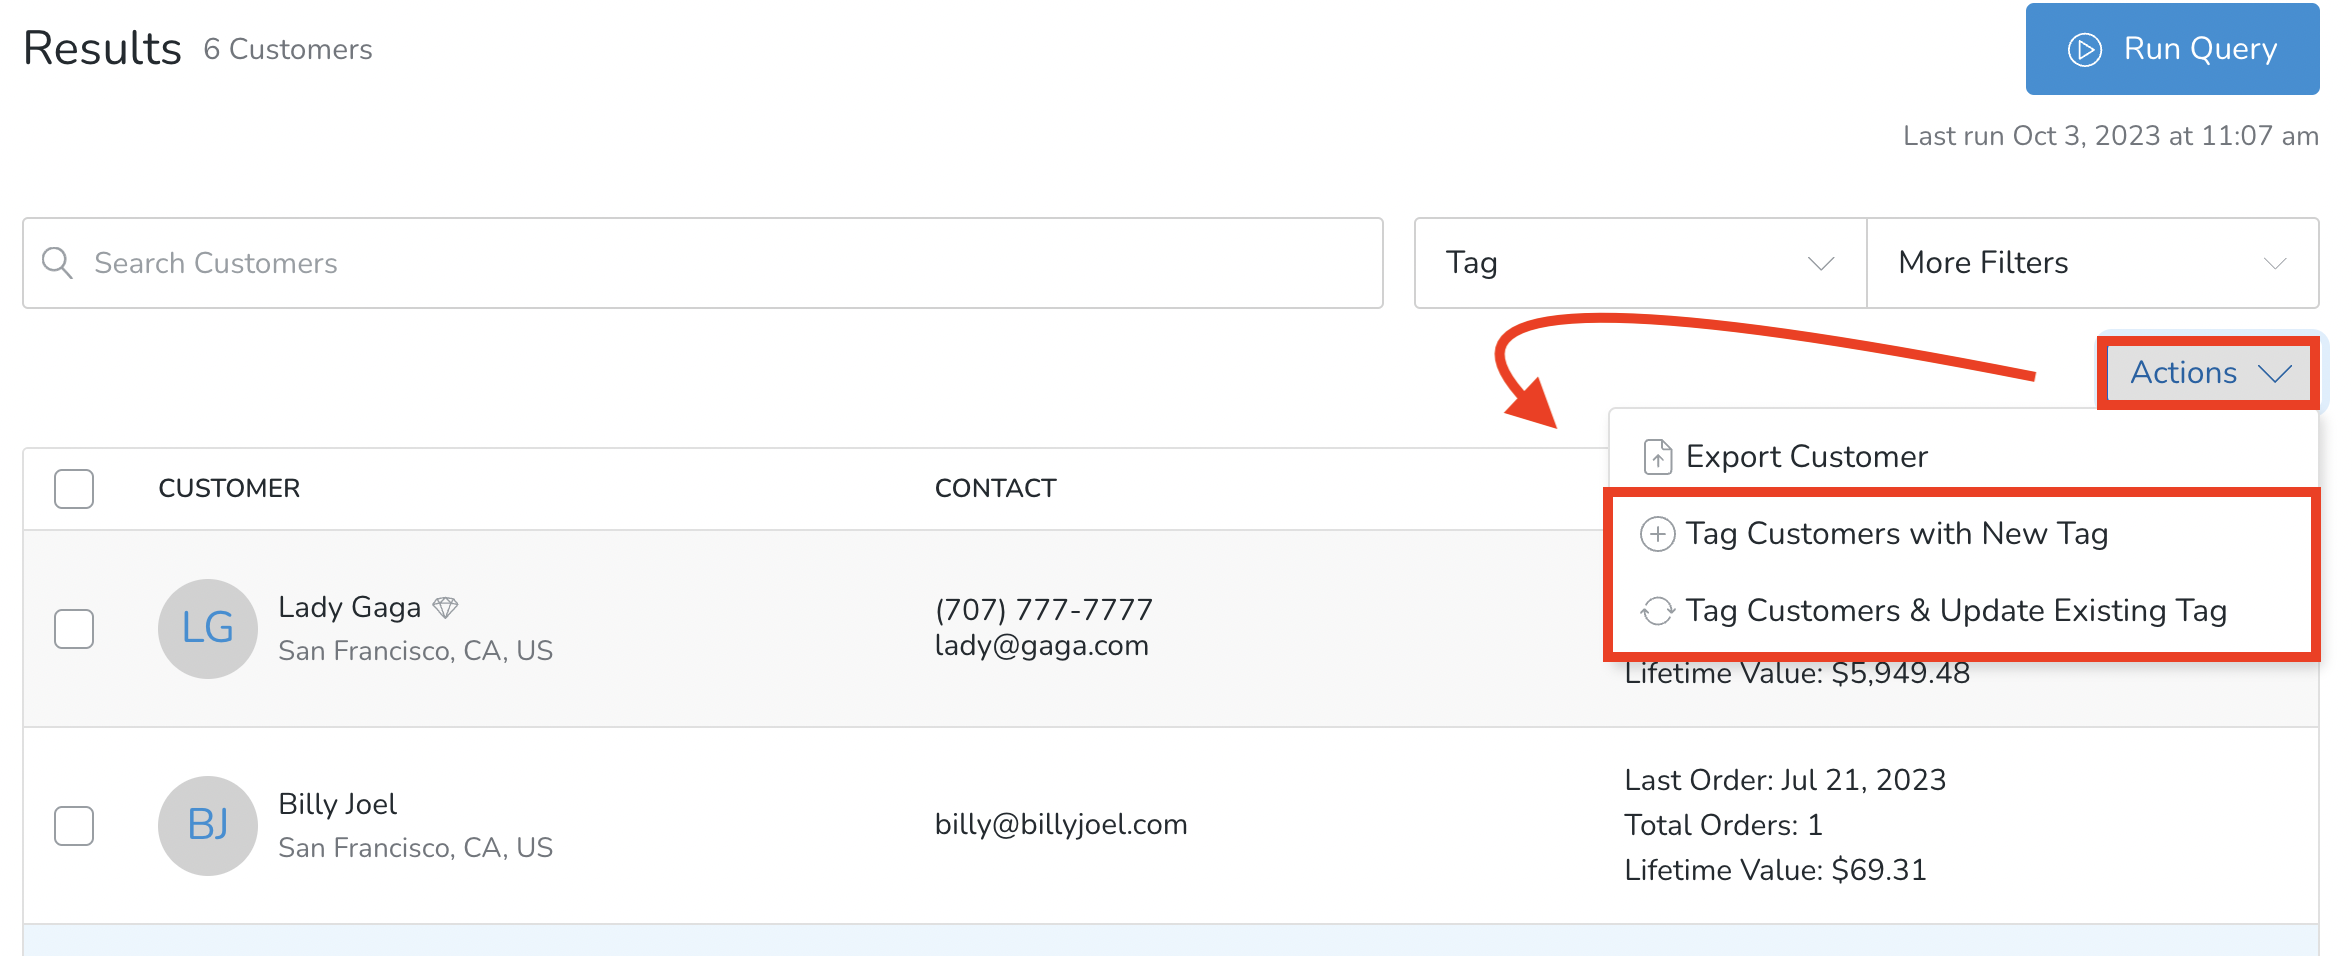
- Choose Tag Customers with a New Tag if you want to create a brand new tag for the Query results. (see instructions for using "Update Existing Tag" below.)
- Select the type of data that you want to apply the Tag to. This list will change dependent on the type of Query that you performed.
- For example: If you're using an Order Query, your options will be to Tag "Orders" or "Customers", if you're using a Reservation query, your options will be to tag "Reservations" or "Customers", etc.
- Tip: Make sure to select "Customers" if you want to use the list for any of the Marketing tools (examples: Campaigns, Personalizations, etc., or if you're building Allocation Tiers).
- Once you confirm a new tag will be created under Settings > Tags and the results from your query will be tagged.
- Select the type of data that you want to apply the Tag to. This list will change dependent on the type of Query that you performed.
- Choose Tag Customers & Update Existing Tag to replace the contents of an existing Tag.
- Select the type of Tag that you want to update and search for. This list will change dependent on the type of Query that you performed.
- Once you confirm, your existing Tag be updated to the results of your current Query.
Note: You cannot use the same tag for multiple Queries to combine results.
Note: Tags will not dynamically update. If you want to update the Tag to be current, you'll need to first Run the Query again - and then choose to Tag Customers & Update Existing Tag.
Customer Queries
The Query Builder allows you to create lists of Customers based on certain criteria such as what SKUs Customers have purchased, where they live, whether or not they have a Club Membership and more.
- Go to Marketing > Queries
- For customer queries make sure that Customer is selected at the top, then click Add Customer Query at the top right

- Give your query a Title and click the Add Condition Group button.
- In the popup modal, choose the configurations for your Query.
- Property Type: (Note that Property Type options will differ depending on the Query type). For this example, we are using 'Customer'.
- A Customer meeting the subsequent conditions you setup.
- A Club Membership, with the subsequent conditions you setup.
- An Order, with the subsequent conditions you setup.
- A Reservation, with the subsequent conditions you setup.
- Return Customers: Choose whether you'd like to see results that match the conditions or do not match the conditions.
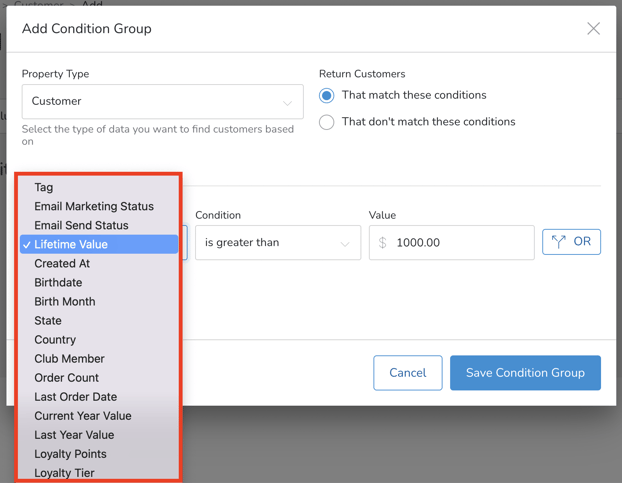
- Property: (Note that Property options will differ depending on the Query type): In this example, we are choosing the 'Lifetime Value' property.
- Condition: (Note that Condition options will differ depending on Property chosen): In this example, we are choosing 'is greater than'.
- Value: (Note that Value options will differ depending on the Property and Condition chosen). In this example, we are choosing '$1000'.
- If that is the only condition, click the Save Condition Group button.
- Property Type: (Note that Property Type options will differ depending on the Query type). For this example, we are using 'Customer'.
Need to add another parameter?
Add Multiple Properties/Conditions using 'OR' or 'AND'. Learn how here.
Stacking Conditions
Now that your first set of conditions is complete, you can finish here and "Run Query" or you can optionally "stack" these conditions with another type of conditions - and here's how. Learn how here.
Results
Once you've clicked the Run Query button, you'll see an alert saying the query is running. It could take a few seconds to minutes depending on how many results there are. (You can refresh the page to see if it's still loading).
You will see the results on the page (note that the results are clickable - they will take you to a Customer, Order, etc). You will also be emailed when the results are available for view in Commerce7.
Once you've executed the query at least once, you can also Export or Tag your results or Customers included in these results.
Learn more about exporting results or tagging results here.
Need some inspiration? See commonly used example Customer Queries here.
Order Queries
The query builder allows you to create lists of Orders based on certain criteria such as SKU purchased, Orders by POS profile, Order history and more.
- Go to Marketing > Queries
- For customer queries make sure that Order is selected at the top, then click Add Order Query at the top right.

- Give your query a Title and click the Add Condition Group button.
- In the popup modal, choose the configurations for your Query.
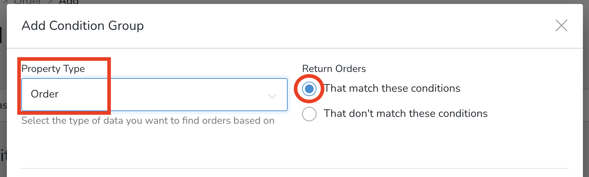
- Property Type: (Note that Property Type options will differ depending on the Query type). For this example, we are using 'Customer'.
- A Customer meeting the subsequent conditions you setup.
- An Order, with the subsequent conditions you setup.
- Return Customers: Choose whether you'd like to see results that match the conditions or do not match the conditions.
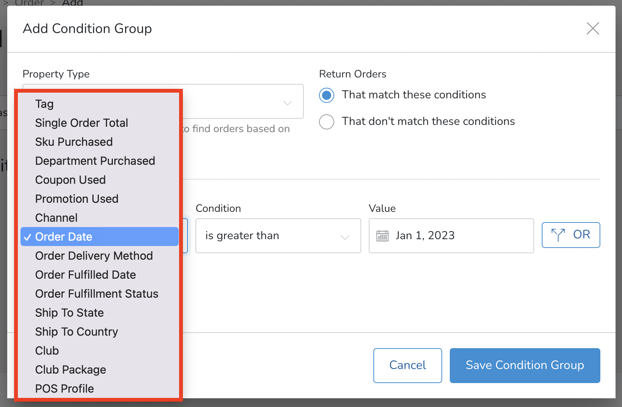
- Property: (Note that Property options will differ depending on the Query type): In this example, we are choosing the 'Order Date' property.
- Condition: (Note that Condition options will differ depending on Property chosen): In this example, we are choosing 'is greater than'.
- Value: (Note that Condition options will differ depending on Property chosen): In this example, we are choosing 'Jan 1, 2023'.
- If that is the only condition, click the Save Condition Group button.
- Property Type: (Note that Property Type options will differ depending on the Query type). For this example, we are using 'Customer'.
Need to add another parameter?
Add Multiple Properties/Conditions using 'OR' or 'AND'. Learn how here.
Stacking Conditions
Now that your first set of conditions is complete, you can finish here and "Run Query" or you can optionally "stack" these conditions with another type of conditions - and here's how. Learn how here.
Results
Once you've clicked the Run Query button, you'll see an alert saying the query is running. It could take a few seconds to minutes depending on how many results there are. (You can refresh the page to see if it's still loading).
You will see the results on the page (note that the results are clickable - they will take you to a Customer, Order, etc). You will also be emailed when the results are available for view in Commerce7.

Once you've executed the Query at least once, you can also Export or Tag your results or Customers included in these results. You will also have the opportunity to bulk export Packing Slips and Receipts or to change Orders from Pickup to Ship.
Learn more about exporting results or tagging results here.

When choosing the 'Export Orders' option you will have the same options as when you export from the main Orders screen.

Club Membership Queries
The query builder allows you to create lists of Club Members based on certain criteria such as length of time in Club, Order history and more.
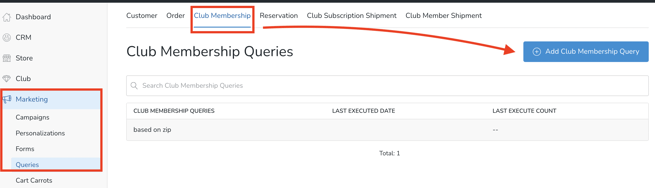
- Go to Marketing > Queries
- For customer queries make sure that Order is selected at the top, then click Add Club Membership Query at the top right.
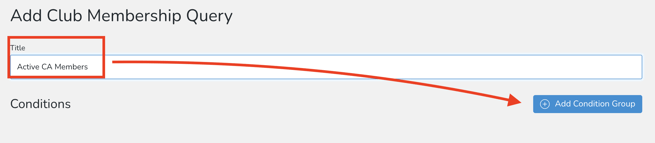
- Give your Query a Title and click the Add Condition Group button.
- In the popup modal, choose the configurations for your Query
-
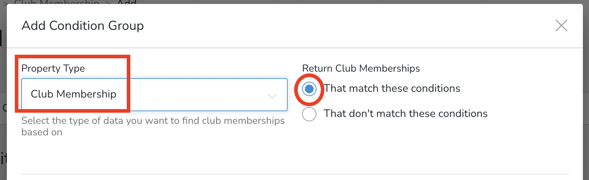
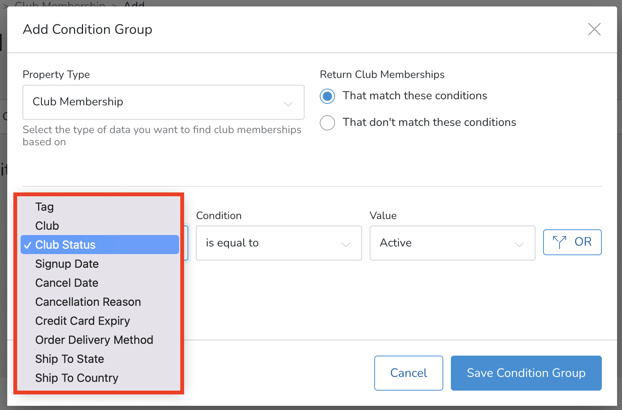
- Property Type: (Note that Property Type options will differ depending on the Query type). For this example, we are using 'Club Membership'.
- A Club Membership meeting the subsequent conditions you setup.
- A Customer meeting the subsequent conditions you setup.
- Return Customers: Choose whether you'd like to see results that match the conditions or do not match the conditions.
- Property: (Note that Property options will differ depending on the Query type): In this example, we are choosing the 'Club Status' property.
- Condition: (Note that Condition options will differ depending on Property chosen): In this example, we are choosing 'is equal to'.
- Value: (Note that Condition options will differ depending on Property chosen): In this example, we are choosing 'Active'.
- If that is the only condition, click the Save Condition Group button.
- Property Type: (Note that Property Type options will differ depending on the Query type). For this example, we are using 'Club Membership'.
Need to add another parameter?
Add Multiple Properties/Conditions using 'OR' or 'AND'. Learn how here.
Stacking Conditions
Now that your first set of conditions is complete, you can finish here and "Run Query" or you can optionally "stack" these conditions with another type of conditions - and here's how. Learn how here.
Results
Once you've clicked the Run Query button, you'll see an alert saying the query is running. It could take a few seconds to minutes depending on how many results there are. (You can refresh the page to see if it's still loading).
You will see the results on the page (note that the results are clickable - they will take you to a Customer, Order, etc). You will also be emailed when the results are available for view in Commerce7.

Once you've executed the query at least once, you can also Export or Tag your results or Customers included in these results.
Learn more about exporting results or tagging results here.
Reservations Queries
The Query Builder allows you to create lists of Reservations based on certain criteria such as Experience Type, Reservation, etc.
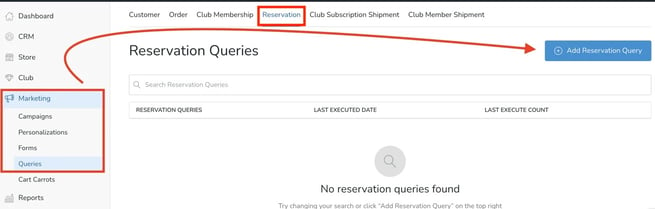
- Go to Marketing > Queries
- For customer queries make sure that Order is selected at the top, then click Add Reservation Query at the top right.
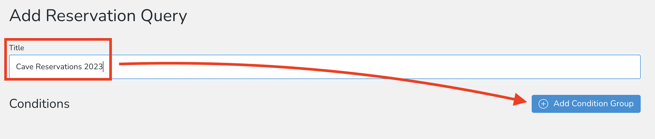
- Give your Query a Title and click the Add Condition Group button.
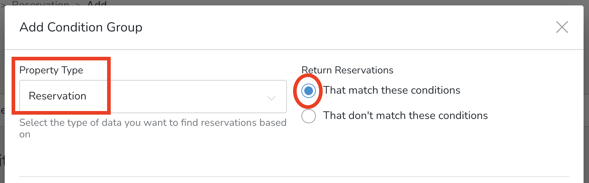
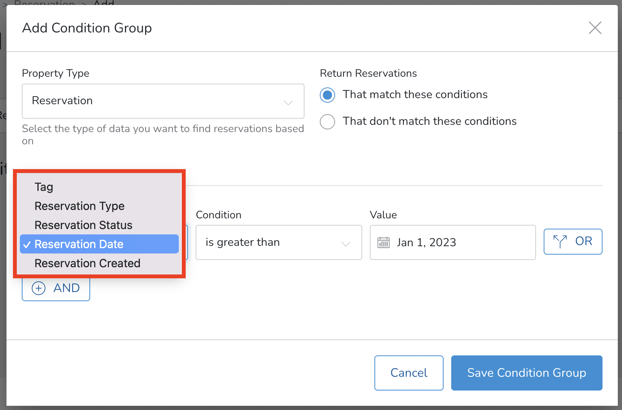
- Property Type: (Note that Property Type options will differ depending on the Query type). For this example, we are using 'Reservation'.
- A Reservation meeting the subsequent conditions you setup.
- A Customer meeting the subsequent conditions you setup.
- Return Customers: Choose whether you'd like to see results that match the conditions or do not match the conditions.
- Property: (Note that Property options will differ depending on the Query type): In this example, we are choosing the 'Reservation Date' property.In the popup modal, choose the configurations for your Query.
- Condition: (Note that Condition options will differ depending on Property chosen): In this example, we are choosing 'is greater than'.
- Value: (Note that Condition options will differ depending on Property chosen): In this example, we are choosing 'Jan 1, 2023'.
- If that is the only condition, click the Save Condition Group button.
- Property Type: (Note that Property Type options will differ depending on the Query type). For this example, we are using 'Reservation'.
Need to add another parameter?
Add Multiple Properties/Conditions using 'OR' or 'AND'. Learn how here.
Stacking Conditions
Now that your first set of conditions is complete, you can finish here and "Run Query" or you can optionally "stack" these conditions with another type of conditions - and here's how. Learn how here.
Results
Once you've clicked the Run Query button, you'll see an alert saying the query is running. It could take a few seconds to minutes depending on how many results there are. (You can refresh the page to see if it's still loading).
You will see the results on the page (note that the results are clickable - they will take you to a Customer, Order, etc). You will also be emailed when the results are available for view in Commerce7.

Once you've executed the query at least once, you can also Export or Tag your results or Customers included in these results.
Learn more about exporting results or tagging results here.
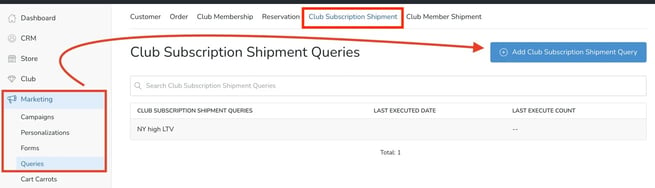
Club Subscription Shipment Queries
The Query Builder allows you to create lists of Subscription Club Shipments based on certain criteria such as Shipment Status, Order history, etc.
- Go to Marketing > Queries
- For customer queries make sure that Order is selected at the top, then click Add Club Subscription Shipment Query at the top right.
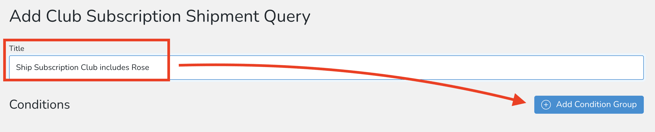
- Give your Query a Title and click the Add Condition Group button.
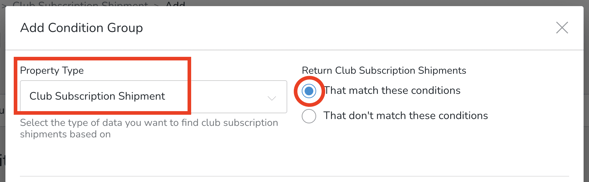
- In the popup modal, choose the configurations for your Query.
- Property Type: (Note that Property Type options will differ depending on the Query type). For this example, we are using 'Reservation'.
- A Club Subscription Shipment meeting the subsequent conditions you setup.
- A Customer meeting the subsequent conditions you setup.
- Return Customers: Choose whether you'd like to see results that match the conditions or do not match the conditions.
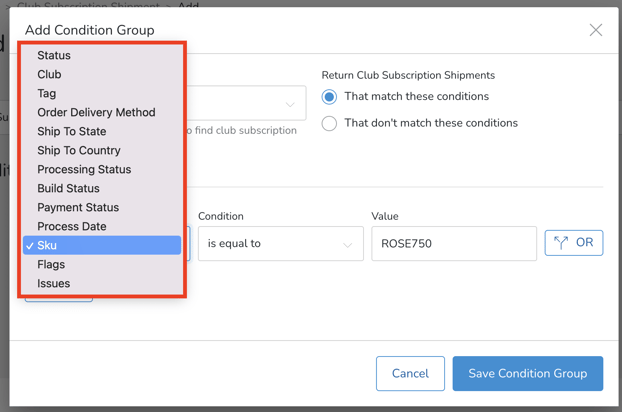
- Property: (Note that Property options will differ depending on the Query type): In this example, we are choosing the 'SKU' property.
- Condition: (Note that Condition options will differ depending on Property chosen): In this example, we are choosing 'is equal to'.
- Value: (Note that Condition options will differ depending on Property chosen): In this example, we are choosing 'ROSE7'.
- If that is the only condition, click the Save Condition Group button.
- Property Type: (Note that Property Type options will differ depending on the Query type). For this example, we are using 'Reservation'.
Need to add another parameter?
Add Multiple Properties/Conditions using 'OR' or 'AND'. Learn how here.
Stacking Conditions
Now that your first set of conditions is complete, you can finish here and "Run Query" or you can optionally "stack" these conditions with another type of conditions - and here's how. Learn how here.
Results
Once you've clicked the Run Query button, you'll see an alert saying the query is running. It could take a few seconds to minutes depending on how many results there are. (You can refresh the page to see if it's still loading).
You will see the results on the page (note that the results are clickable - they will take you to a Customer, Order, etc). You will also be emailed when the results are available for view in Commerce7.

Once you've executed the query at least once, you can also Export or Tag your results or Customers included in these results.
Learn more about exporting results or tagging results here.
Traditional Club Shipment Queries
The Query Builder allows you to create lists of Club Shipments based on certain criteria such as Shipment Status, Order history, etc.
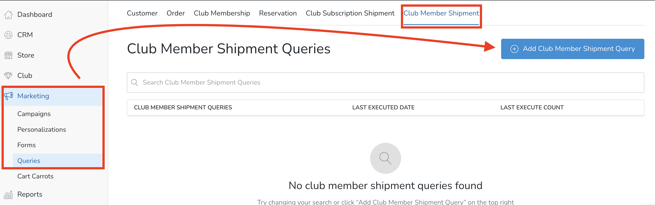
- Go to Marketing > Queries
- For customer queries make sure that Club Member Shipment is selected at the top, then click Add Club Member Shipment Query at the top right.
- Give your Query a Title and click the Add Condition Group button.

- In the popup modal, choose the configurations for your Query.
-
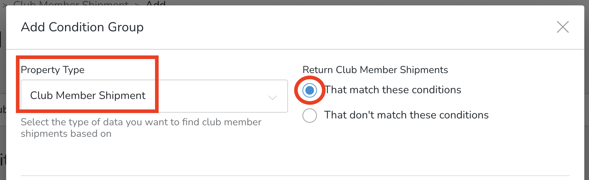
- Property Type: (Note that Property Type options will differ depending on the Query type). For this example, we are using 'Reservation'.
- A Club Member Shipment meeting the subsequent conditions you setup.
- A Customer meeting the subsequent conditions you setup.
- Return Customers: Choose whether you'd like to see results that match the conditions or do not match the conditions.
- Property: (Note that Property options will differ depending on the Query type): In this example, we are choosing the 'Ship To State' property.
- Condition: (Note that Condition options will differ depending on Property chosen): In this example, we are choosing 'is equal to'.
- Value: (Note that Condition options will differ depending on Property chosen): In this example, we are choosing 'California'.
- If that is the only condition, click the Save Condition Group button.

- Property Type: (Note that Property Type options will differ depending on the Query type). For this example, we are using 'Reservation'.
Need to add another parameter?
Add Multiple Properties/Conditions using 'OR' or 'AND'. Learn how here.
Stacking Conditions
Now that your first set of conditions is complete, you can finish here and "Run Query" or you can optionally "stack" these conditions with another type of conditions - and here's how. Learn how here.
Results
Once you've clicked the Run Query button, you'll see an alert saying the query is running. It could take a few seconds to minutes depending on how many results there are. (You can refresh the page to see if it's still loading).
You will see the results on the page (note that the results are clickable - they will take you to a Customer, Order, etc). You will also be emailed when the results are available for view in Commerce7.
Once you've executed the query at least once, you can also Export or Tag your results or Customers included in these results.
Learn more about exporting results or tagging results here.
Troubleshooting
Is your Query "stuck" or otherwise will not execute?
Try re-running your Query. This will often clear the issue. If this does not work, feel free to reach out to Support.