Do you sell t-shirts, corkscrews or food? These are examples of non-wine Products that should use the General Merchandise Product Type.
In this Article
- Adding Title, Content and Image
- Adding Variants & Pricing
- Defining Status, Collections & Security
- Product Tabs (Summary, Advanced, Modifiers, Compliance, Meta Data)
- Viewing the Product on your website
Creating a General Merchandise Product
- Go to Store > Products.
- Click the Add Product button.
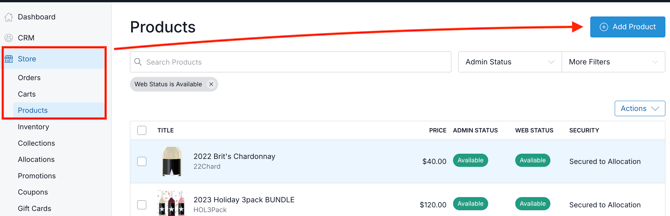
- Select the General Merchandise Product Type.

- This brings you to the Product details page. Note: The required fields that you'll need to complete are Title, Variant Title, SKU, Price, Tax Type, Cost of Good and Weight.
-
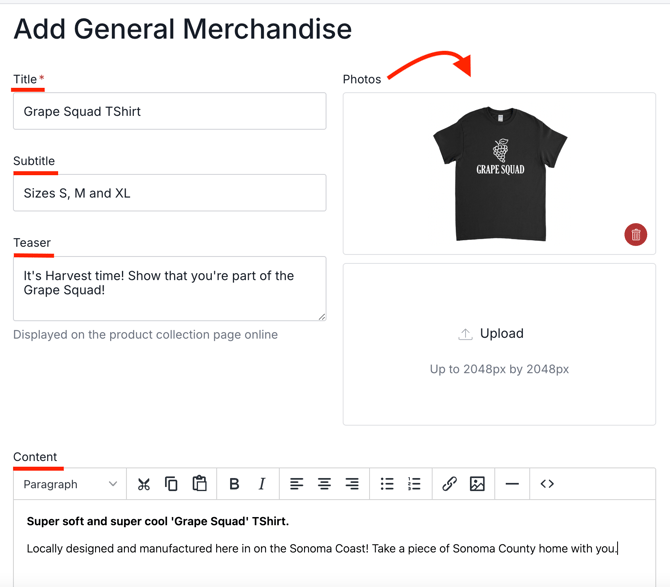
- *Title: Product name used across admin, your website and POS.
- Subtitle: Product subtitle.

- Teaser: A short description of the product that will appear when viewing the Collection page on your website. Here's an example of what it will look like on your website:

- Content: Details and description of the Product. This information is displayed on the details page of your website when you click into a product. Use the WYSIWYG editor to style the content or to add images or links.
Product details page example:
- Photos: Image for the product. Add one or multiple. (To learn more about image sizes, click here).
- *Variant Title: Enter the variant title(i.e. 'Small'). If your product is going to have multiple variants (different sized TShirts like 'Medium', 'Large', etc., you can use Variants to segment your single Product by different properties.
- Add Additional Variant: NOTE: Multiple variants can be added after the product is created. If you are setting up multiple sizes of this product, add an additional variant for the new size, complete the details for the additional variant, and save the variant details.
- *SKU: Enter in your SKU number (if you're connected with ShipCompliant, your SKU in Commerce7 must match with your SKU in ShipCompliant).
- UPC Code: If using an integrated bar code scanner in your tasting room, click on the "UPC Code" field, and scan a product's barcode to automatically populate the product's UPC Code. You must click on the actual field in order to scan in the code. If you are on a product page and have not clicked on the UPC Code, scanning a barcode will not populate the product's UPC Code.
- If you use the same UPC code multiple times, only the first Product that was saved with that UPC code will come up when scanned. It is recommended to have a unique UPC code per product or variant.
- The UPC code must start with a number not a letter.
- *Price: Price of the product
- Compare at Price: This is an optional field that display the retail price to compare the savings(if a discounted price has been entered in the price field.
- *Tax Type: Choose the way this product will be taxed. The options are Wine, General Merchandise, Food, and NonTaxable. (In this case, you'll choose General Merchandise).Enter in the SKU details.

- Status, Collections & Security (located on the right column of the screen)

- Web Status: This is the status of the product on your website.
- Available - Available on website for purchase (regular product).
- Retired - The product will not show on the category list but will be available as a detailed page for SEO and there will be no 'Add to Cart' (this is more for marketing).
- Not Available - Will not be visible on the website
- Read more about the differences of Available, Retired, and Not Available statuses here.
- Admin/POS/Club Status: Choose whether this product is available for orders in the Admin Panel, POS, and/or Club.
- Available - Visible on Admin/POS/Club as a product you can 'Add to Cart'.
- Not Available - Not visible and can not 'Add to Cart' on the Admin/POS/Club.
- Manual Collections: If using manual product collections to assign products to collections on website or POS, choose the collection that you want your product to be displayed on and click "Add". A product can be displayed on multiple collections. (Dynamic Collections: If using dynamic collections, their assignment will be displayed in this section).

- Security: Products can be secured to Public, Club, Tags, Allocation or Loyalty Tiers.

- If you choose any option but Public, you will be presented with the options to display the Product (or not) and to add a message to Customers when they are not logged in. In this scenario, the Allocation should be set up before you adjust the "security" field.

- Click the Save Product button.

- Web Status: This is the status of the product on your website.
Additional Tabs
- Now that you've saved the Product, you will see tabs displaying at the top of the Product screen.

- Summary: Main Product page.

- Advanced Tab: Additional wine properties.

- Department: Choose the department that your product belongs to. These are set up under Store > Departments. Read more about departments here.
- Vendor: This is an optional field where you can assign a vendor to your product (for personal reference if you need to keep track of who supplies this product to you. If tracking vendors in Commerce7, set theses up under Settings > Vendors.
- Product Template: If a custom template has been createded by your designer for your Product Collections, make sure to select the appropriate one.
- Modifiers Tab: Modifiers are customizable options that can be added to items in your POS. (Example: Modifiers for a standard burger might include: extra cheese, no onions and a side of fries). It's rare that Modifiers would be added to a Wine Product. To learn more about Modifiers, click here.

- Compliance Tab: Once the product has been saved, you can add an override to the Operating Countries/States for this product on the Compliance tab. This is used if the compliance settings for this product are different than what is set up under your Settings > Operating Countries and States area.
If you need to set up an override, go to Compliance tab of the product, and select Override Operating Countries/States. Select the Pencil edit icon next to the country that you want to add an override for this product. Learn more about how this override feature works here.
- Meta Data Tab: You have the option to add a Custom Field for this Product. Read more about setting up Product Custom Fields here.

- Summary: Main Product page.
Want to See What Your Product looks Like Online?
Scrolling down to the bottom of the Summary page, you'll come across the SEO section. Click on the URL to preview how your product will appear to Customers.
