Brief Intro to Product Modifiers
New to Product Modifiers? Take a look at this video for a brief introduction.
Modifiers are customizable options that can be added to items in your POS. (Example: Modifiers for a standard burger might include: extra cheese, no onions and a side of fries).
This feature eliminates the need to create separate Products for each option. Instead, all of these options (Modifiers) live within the main Product itself.
Quickly create POS Orders + send the Orders to the kitchen with just a few clicks.
Before You Begin
Technically, Modifiers can be added to any Product other than Rebate, Collateral, or Bundle - but the main use-case is food - and that is the focus of this article.
Be sure the following are in place prior to creating your Modifiers. (Note that it's not required to create the Collection and Department, but it makes the organization of your Food items much more intuitive, so we recommend it):
- Create a FOOD COLLECTION (VIDEO)
- Add the Collection to your POS PROFILE (VIDEO)
- Create a FOOD DEPARTMENT (VIDEO)
- Create a FOOD PRODUCT for Restaurant Use (VIDEO)
Adding Modifiers & Prefixes
Creating POS Orders + Sending Orders to the Kitchen
- Create POS ORDERS (VIDEO)
- Send ORDERS TO THE KITCHEN (VIDEO)
- PAYING for the Order (VIDEO)
- Compatible Thermal PRINTERS for Kitchen Tickets (VIDEO)
- FAQ
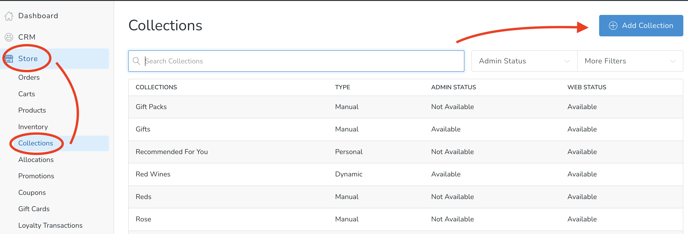
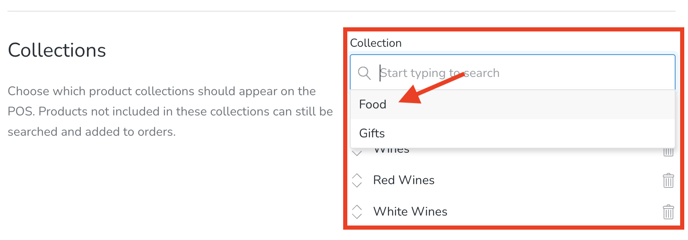
Creating a Food Collection
- Go to Store > Collections and click the Add Collection button.
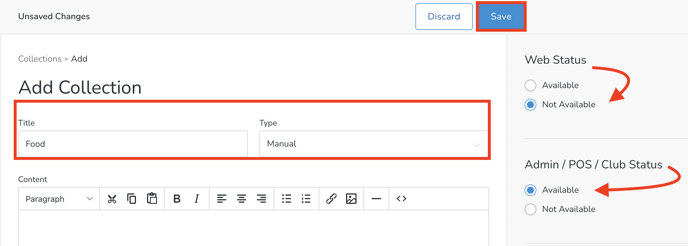
- Configuration
- Title: Food
- Type: Manual
- Web Status: Not Available
- Admin/POS/Club Status: Available (note that these food Products will only be available/viewable in the POS).
- Click the Save button.
Adding a Food Collection to your POS Profile
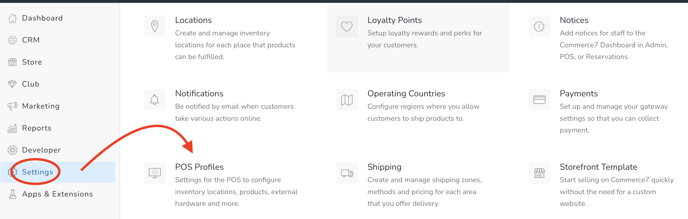
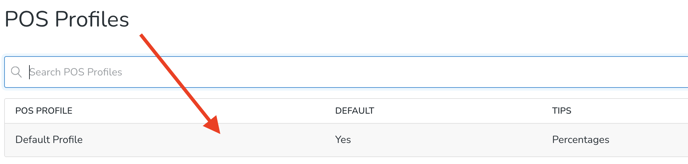
- Adding the Collection to your POS Profile. Next, you'll need to add this Collection to the applicable POS Profile(s) so that it'll show up in your POS. Go to Settings > POS Profiles.
- Click into the applicable Profile.
- Scroll down, choose the Food Collection and Save.
New to Collections? Learn more about them here.
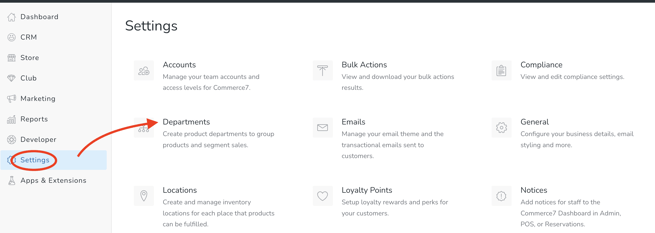
Creating a Food Department
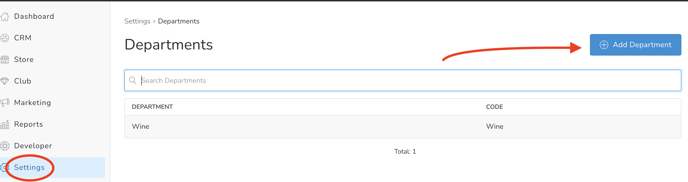
- Go to Settings and click the Departments section
- Click the Add Department button
- Enter a Title and Code of 'Food' and Save.
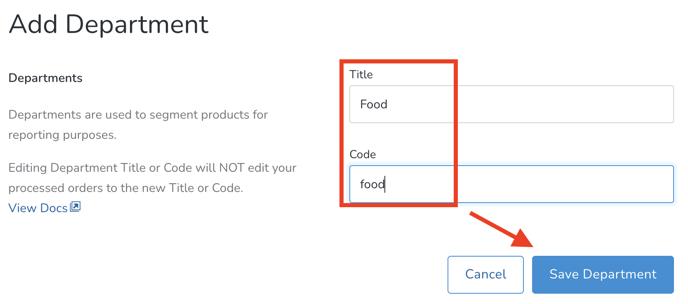
- Now you will see this Department as an option in the Product itself.
New to Departments? Learn more about them here.
Creating a Food Product for Restaurant Use
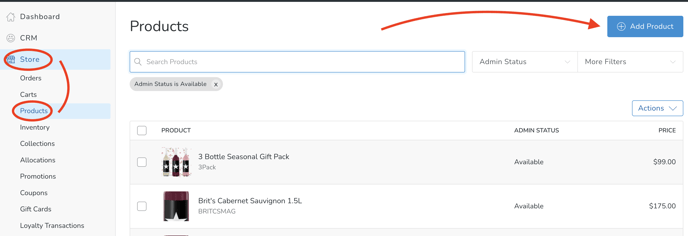
- Go to Settings > Store > Products and click the Add Product button.
- Choose General Merchandise in the modal.

- Configuration
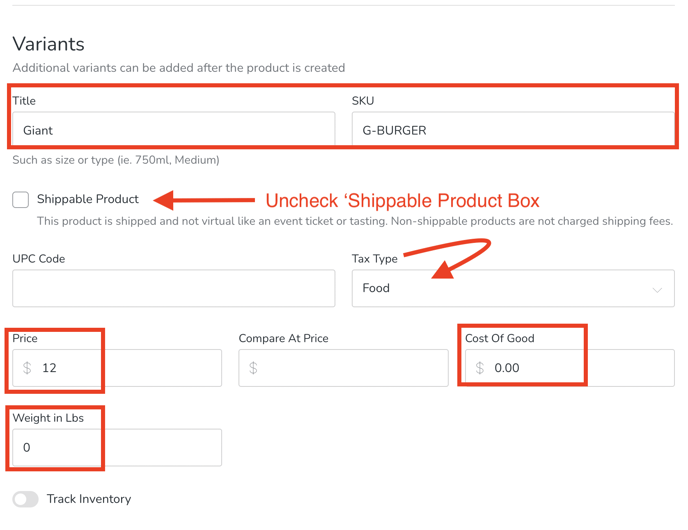
- In the Variants section, enter a Title and SKU.
- UNCHECK the Shippable Product box
- Choose Tax Type: Food
- Enter Price, Cost of Good and Weight in Lbs (these are required fields and you enter zeroes if you'd like).
- Choose an image. (This will be used as a thumbnail in your POS). No need to be concerned with the SEO section, since this Product will not be displaying online.

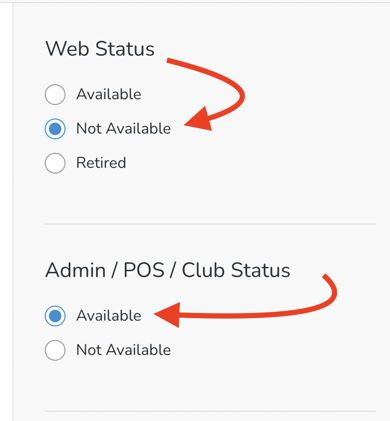
- Web Status: Set to Not Available. (Note that if, for some reason you do want this Product to display online, you could potentially set it to 'Available' - and although the Product would show, any Modifiers would not).
- Admin/POS/Club Status: Available (note that these food Products will only be available/viewable in the POS).
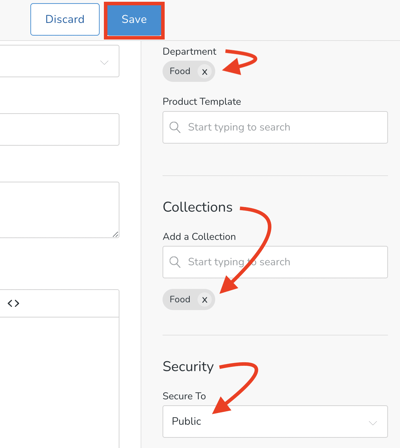
- Choose Department: Food
- Choose Collection: Food
- Choose Security: Public
- Click the Save button
Now that your Product is saved, it's time to create the Modifiers.
Adding Modifiers and Prefixes to Food Products
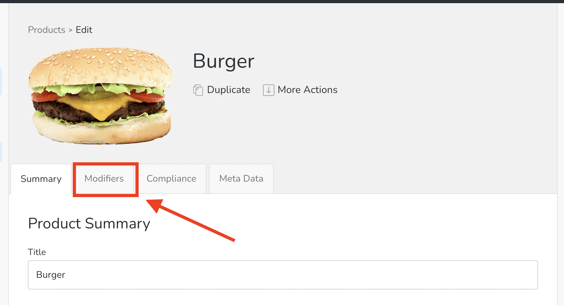
- Choose the Modifiers Tab.
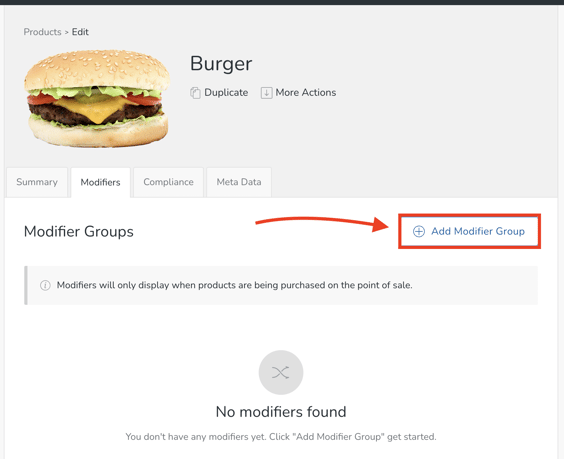
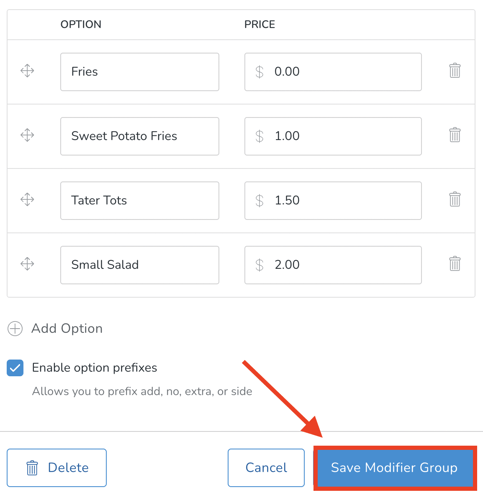
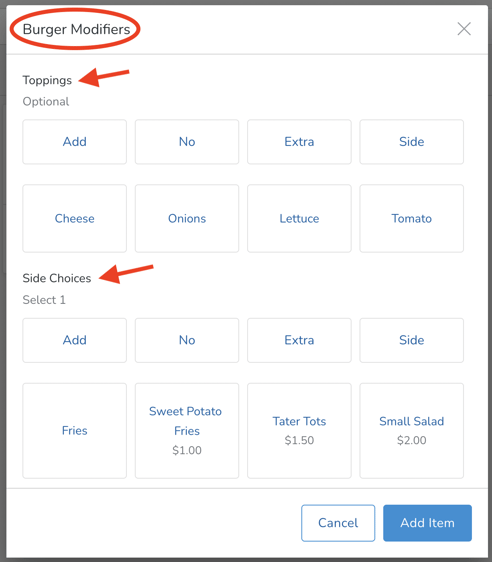
- Click Add Modifier Group. A Modifier Group is a collection of items that can be added to a particular food Product (example: Side Choices or Coffee Adds).
- Configuration
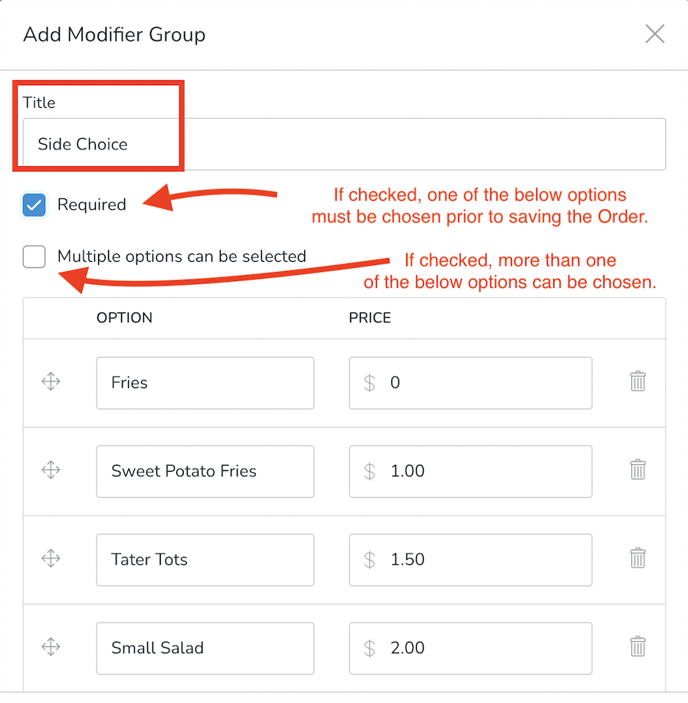
- Title your Modifier Group (examples: Side Choice, Coffee Adds, etc)
- Required box: If checked, staff will be required to choose one of the options prior to saving the Order.
- Multiple options can be selected box: If checked, more than one option can be added to the Order. (example: cheese AND onions can be added to a burger)
- Create your Options and add prices for each. (add more options by clicking the 'Add Option' link at the bottom).
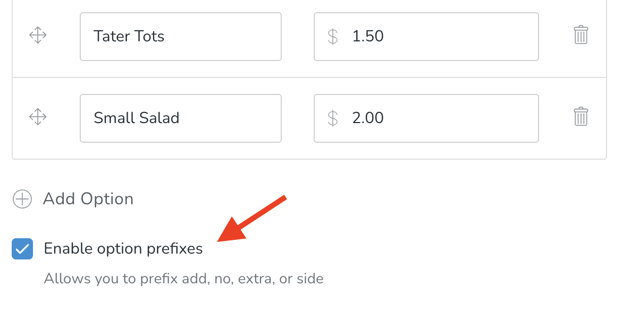
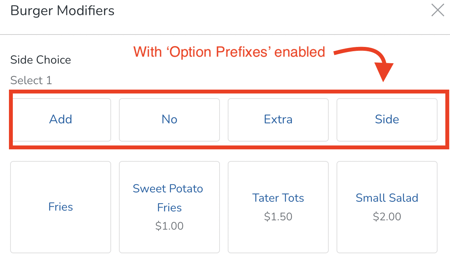
- Enable Option Prefixes box: If checked, Prefixes can be added to the Modifier options in the POS (Prefixes include: 'Add' 'No', 'Extra' or 'Side'). Example: Instead of creating both a 'Tomato' and a 'No Tomato' Modifier option, staff can simply add the 'No' Prefix to the 'Tomato' option.
- Here's what the Prefixes look like in the POS:
- Here's what the Prefixes look like in the POS:
- Click Save Modifier Group button.
Note: Create as many Modifier Groups as you need to. For example, you may want to create an additional Group for Burgers called, 'Toppings'.
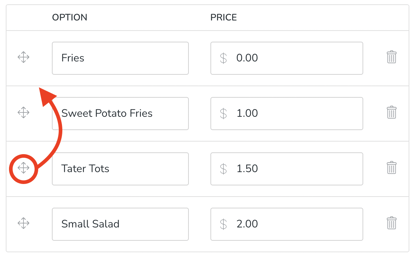
Note: You can change the display order of these options by clicking and dragging the move icon to the left of each option.
Creating a POS Order with Food Items
- Go to the POS Panel and be sure your Food Collection is displaying.
- An 'M' this means that there are modifiers for that item.
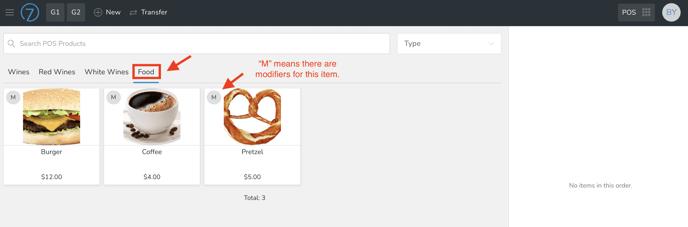
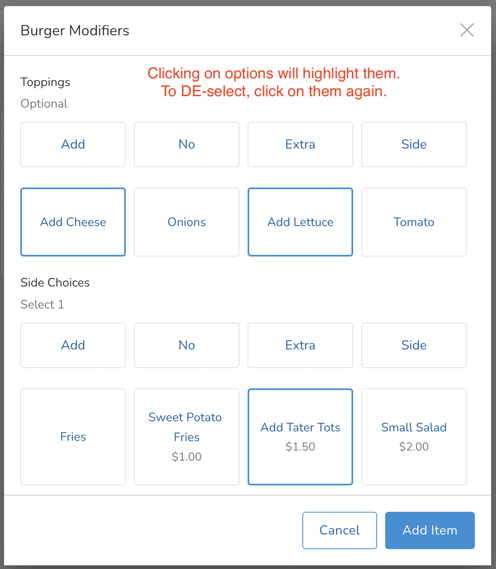
- Click on an item to add it to the Cart. A modal will popup with all modifiers.
- Click to select the requested options. (To de-select, click again).
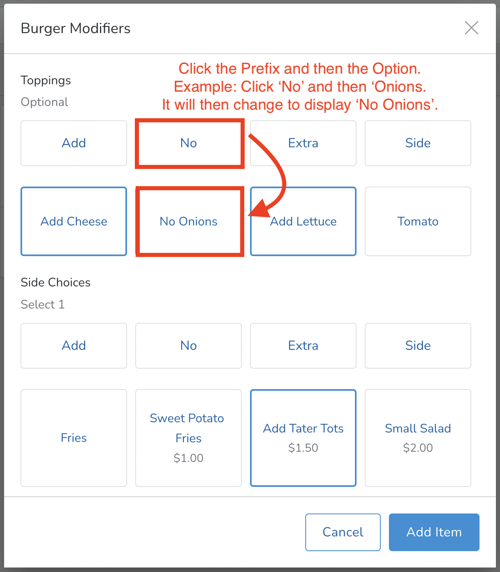
- To use the Prefixes, click the Prefix, and then the option. Example: Click 'No' and then click 'Onions'. The option will then change to display 'No Onions'.
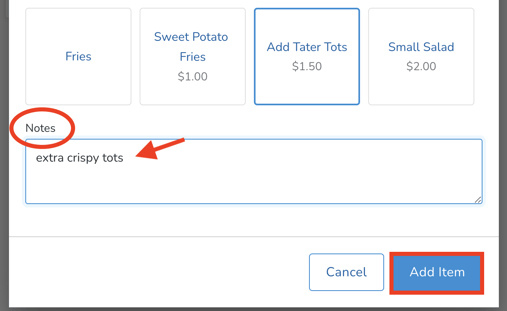
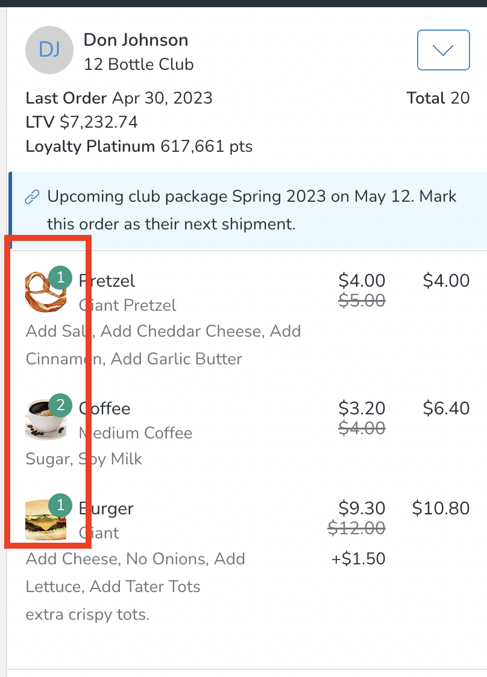
- Scroll down, and you'll see a Notes field. Use to add notes for the kitchen. Once the modifiers are complete, click the Add Item button. Note: although Customers will see modifiers detailed on their Order History online, they will not see Notes. Notes are for the kitchen only.
- Once added, you'll see a running item total on the right. This will include all modifiers (along with associated extra cost) + notes.
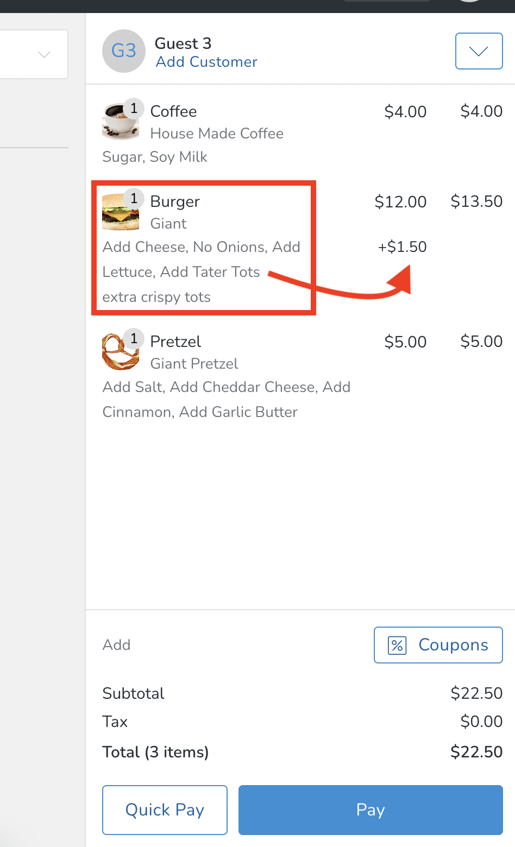
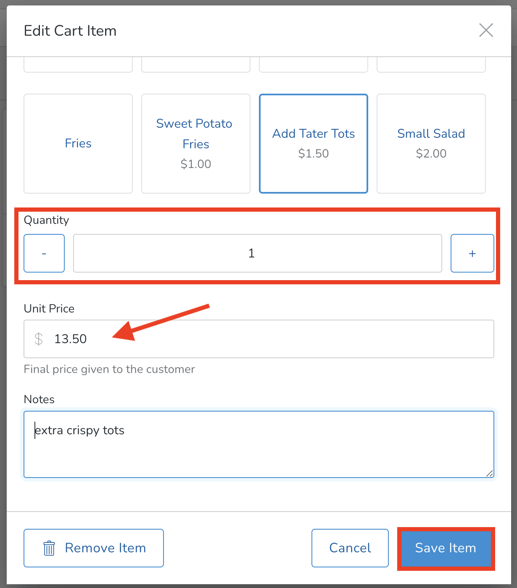
- If you would like to increase the quantity of this item with the exact same modifiers, click on the the item in the cart to open it back up. And then you will see a quantity box. Additionally, you can edit the per-item price on the fly.
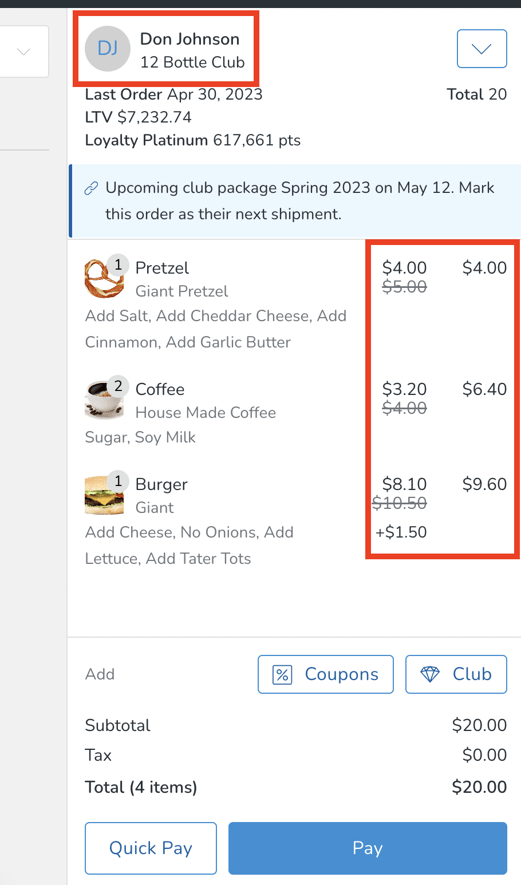
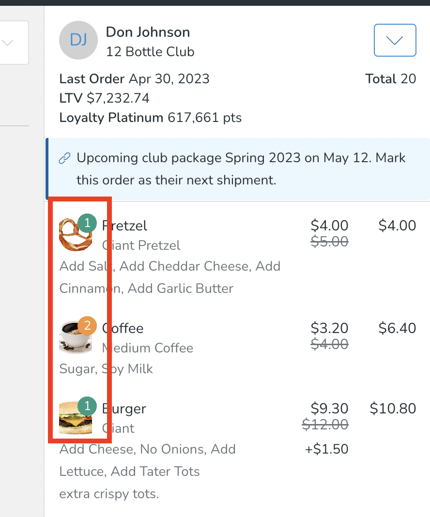
- If your Customer is eligible for a discount (say, a Club Member), you will see that accounted for in the pricing. (Note that although you do not see the modifier prices crossed out, the discount on the modifier IS being calculated in the item total).
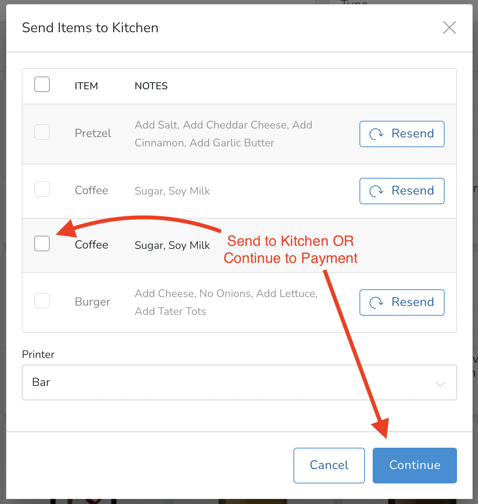
Sending Orders to the Kitchen
- When the Order has been taken, click the down arrow in upper right and choose Send to Kitchen.
0 - Choose the items to send and the Send Item to Kitchen button. Only items that require prep will be displayed in this window. (Learn more about this here.)

- You will see color coding on the Cart to indicate send status.
- Grey: Item does not require preparation.
- Blue: Item requires prep and has not been sent to the kitchen.
- Green: Item, and all quantities, have been sent to the kitchen.
- Orange: Item, but not all quantities, have been sent to the kitchen.
- When the remainder of the item(s) are ready to be sent, click on the 'Send to Kitchen' choice in the drop down again and choose the final item. Click Send Item to Kitchen button.
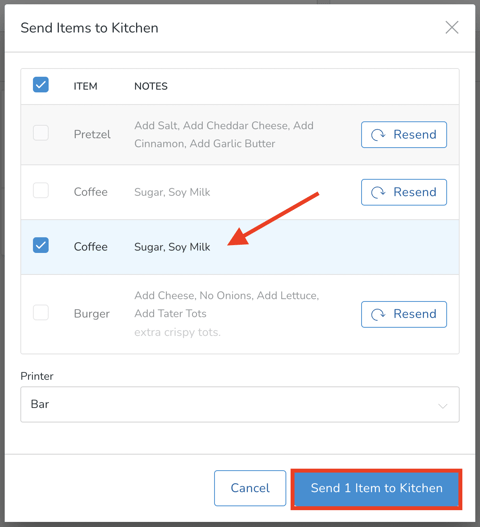
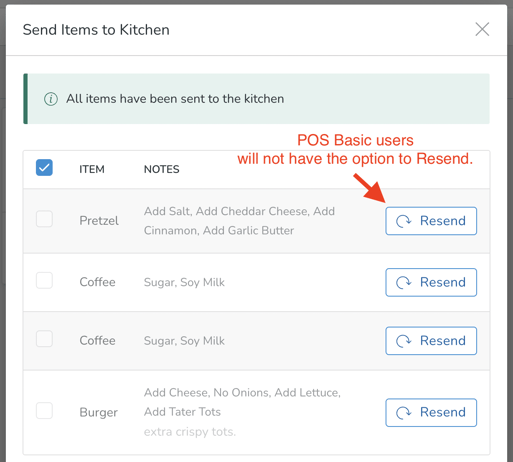
- Once all is green, all items have been sent.
- If something needs to be RESENT (for instance, the dish is incorrect), click on the Send to Kitchen choice in drop-down and click 'RESEND' for the applicable item. Those with POS Basic privileges will not see the Resend button.
- Additionally, if an item has already been sent to the kitchen, users with a Basic permissions level will not be able to remove it from the cart. Users with Standard or Admin permissions will need to remove the product on their behalf.
- Additionally, if an item has already been sent to the kitchen, users with a Basic permissions level will not be able to remove it from the cart. Users with Standard or Admin permissions will need to remove the product on their behalf.
- Once Orders are sent to the kitchen, they will be printed out for the kitchen staff to use for preparation. Learn about compatible kitchen ticket printers here.
Paying for the Order
- Click the Pay button in lower left.
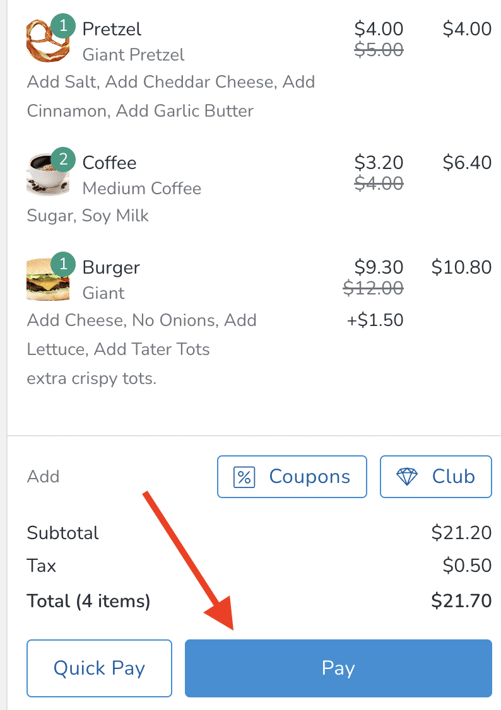
- Complete Order as you normally would and choose applicable receipt printer.
Alert staff of unsent items before taking payment
- Go to Settings > POS Profiles.
- Click into applicable Profile. Scroll down to the Advanced section and click on the 'Open Sent Items to Kitchen modal before taking payment' and Save.
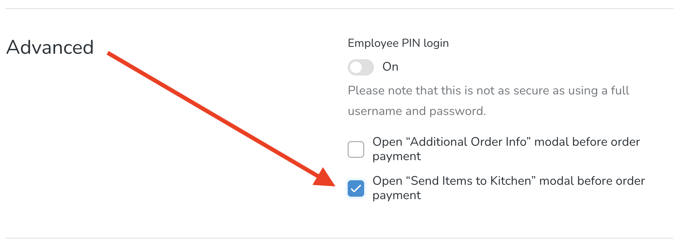
- Now if there are unsent items in the Cart, staff will be prompted to either send the item(s) to the kitchen, or continue with payment without sending.
Compatible Thermal Printers (for kitchen tickets)
A couple of steps go into the Printer portion of this process. First, you need to choose, purchase and set up a compatible thermal Printer. Then you need to add that Printer to the applicable POS Profile(s).
Choose, purchase and set up your thermal kitchen Printer
Add the Printer to your POS Profile
Choose, Purchase and Set up the thermal kitchen Printer
There are two thermal kitchen printer options that we recommend:
- Epson Printer (Cloud and Local options)
- Star Printer (Cloud option only)
Learn about the options, and how to purchase/set up here.
Adding the Printer to your POS Profile
When you are ready to set up the Printer, you'll need to add it to the applicable POS Profile(s):
- Go to Settings > POS Profiles

- Scroll down to the Printers Section. Name it (example: Kitchen) - and choose the applicable Printer.
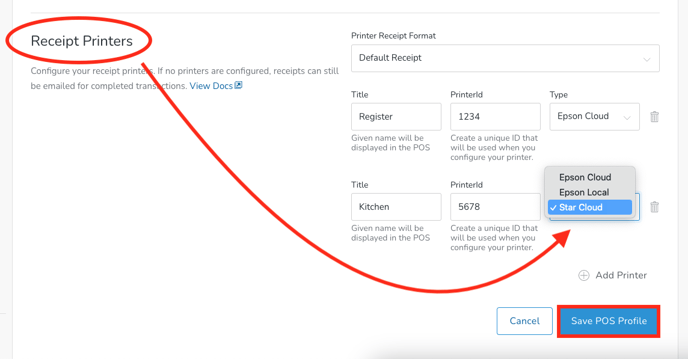
- Once you add it, you will see it as an option in the POS when you send Orders to the kitchen.

- Here is an example of what the kitchen will see:

FAQ
- Can I change modifiers after the items have been sent to the kitchen?
Yes - however, you can only change modifiers if the payment hasn’t been processed yet/order isn’t complete. NOTE that the Order may already be in process in the kitchen. Staff should verbally alert the kitchen so that the edit isn't missed. - Can I delete/cancel an individual item from a Cart after it's been sent to the kitchen?
You can delete it in the Cart, BUT there is no way to UNSEND an item to the kitchen. Staff should verbally let the kitchen know that it's been cancelled. - Can I delete/cancel an entire Cart after it's been sent to the kitchen?
You can delete it in the Cart, BUT there is no way to UNSEND the Order to the kitchen. Staff must manually let the kitchen know that it's been cancelled. - Is there a way to alert staff of unsent items before taking payment?
Yes. You can set this requirement in your POS Profile. Learn how here. - Can I sent items to the kitchen after completing payment?
No. You'd need to create a new Order. - What are compatible kitchen printers?
Learn about the options here.