Customer Tags are used to create and identify customized groupings of customers that can be used for functions such as quickly filtering/exporting, building lists for marketing emails, building allocations and building discounts.
Some examples of common customer tags are "Friends and Family", "Gold Tier Customers", "Employees", etc.
In this article:
- Manual Customer Tags: Customer tags which are added manually to the customer record.
- Dynamic Customer Tags: Customer tags which are added automatically to Customers.
- Filtering/Exporting by Customer Tag
- Marketing with Customer Tags
- Discounting with Customers Tags
- Allocations with Customer Tags
🎓 Commerce7 Academy Callout
Did you know that there's a Commerce7 Academy course all about Customer Tags? Click here to access concise video modules that guide you through the process step by step.
Manual Customer Tags
- To create a manual Customer Tag, go to Settings > Tags

- Then select the Customer tab > and then click the Add Tag button.

- In the modal, choose Customer.

- Give your customer tag a title such as 'Friends & Family." Then, use the drop down menu to select manual. Click Add Customer Tag to save the tag.
- Now that you have created a manual customer tag, you can now use the tag and add it to customers to segment them.
Applying the Tag
You can either apply the tag one-by-one on a customer record or you can apply them in bulk from the list view.
- Go to CRM
- To apply in bulk
- Use the checkbox in the table to select one or more customers
- Then click Actions to the top right of the table, then Tag Customers
- Search for any manual customer tags
- Click Tag Customers
- To apply individually
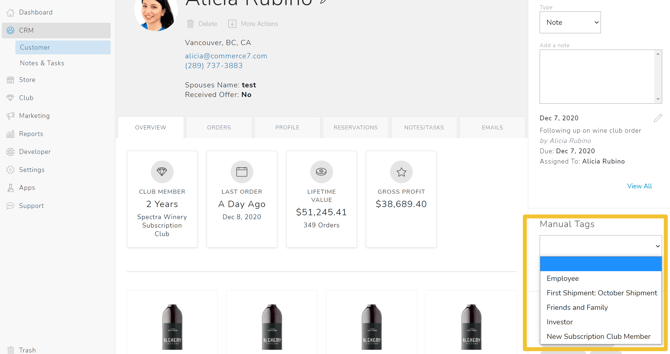
- Select a customer
- On the right-hand side, under Manual Tags, search to add one or multiple tags to the customer.
Dynamic Customer Tags
- To create a dynamic Customer Tag, click on Settings > Tags
- Select the Customer tab > and then click Add Customer Tag
- Start with adding a title and then use the drop down menu to select a Type of Dynamic
- When you choose the dynamic tag option, additional fields will appear where you can specify "Conditions" that each customer must meet in order for them to be tagged automatically.
- Use the drop down menus to build the criteria/conditions for your dynamic customer tag. Customer must meet the criteria/conditions you set in order to be automatically tagged. Click Add Another Condition to add more than one criteria. (See list of available conditions below)
- You can also choose if customers need to match "All conditions" that you've set or if they just need to match at least one ("One or more conditions").
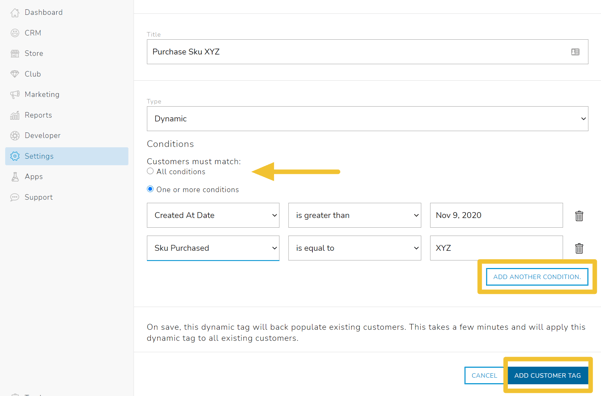
- Once you're done, click Add Customer Tag
- Customers will now be automatically tagged based on the criteria that you've set. The system will also back-populate customers, meaning it'll go through all existing customers to add them to the tag if they qualify.
Dynamic Tag Conditions/Criteria
- Lifetime Value - this can be used to segment customers by how much they've purchased from you.
- Lifetime value greater than ____
- Lifetime value less than ____
- Last Order Date - this can be used to segment customers by how long ago their previous order was.
- Last order date is greater than ____
- Last order date is less than ____
- Birth Date - this can be used to segment customers by age.
- Birth date is less than ____
- Birth date is greater than ____
- Birth Month - this can be used to segment customers by birth month.
- Birth month is equal to ____
- Birth month is not equal to ____
- State - this can be used to segment customers by the state they're located in.
- State is equal to ____
- State is not equal to ____
- Country - this can be used to segment customers by the country they live in.
- Country is equal to ____
- Country is not equal to ____
- Email marketing status is equal to (subscribed/unsubscribed/blank).
- Email marketing status it not equal to (subscribed/unsubscribed/blank).Email Marketing Status - this can be used to segment customers into groups that are subscribed, not subscribed, or have a blank status.
- Order Count - this can be used to segment customers by how many orders they have placed with you.
- Order count is greater than ____
- Order count is less than ____
- Created At Date - this can be used to segment customers by the date their record was created.
- Sku Purchased - this can be used to segment customers who have purchased a specific product.
- Sku purchased is equal to ____
- Sku purchased is not equal to ____
- 2022 or 2021 Yearly Spend - this can be used to segment customers based on total spend in the 2022 or 2021 calendar year
- Spend value less than ____
- Spend value greater than ____
- Loyalty Points - this can be used to segment customers based on the number of Loyalty Points they have
- Loyalty Points value less than ____
- Loyalty Points value greater than ____
- Loyalty Tier - The current loyalty program tier for the customer
- Loyalty Tier is equal to ____
- Loyalty Tier is not equal to ____
- Club Membership - this can be used to segment customers based on Club affiliation
- Club Membership is equal to ____
- Club Membership is not equal to ____
- Club Membership Signup Date - Date the customer signed up for a new membership.
- Club Signup date is less than ____
- Club Signup date is greater than ____
- Meta Data - this can be used to segment customers that have meta data on their customer record. The options for meta data criteria will be based on what you have setup under your customer meta data. Learn more about creating custom attributes/meta data for customers here.
Filtering/Exporting By Customer Tag
- To filter/export by Customer Tag, navigate to CRM
- Click the the filter option called Tag

- Choose the tag you want to filter by and click Apply Filter
- Once you have applied the filter you want, you can click Actions > Export to export a spreadsheet of your customers that have that tag applied.
Marketing with Customer Tags
- To send an email to a list of Tagged Customers, click on Marketing > Campaigns
- You can either create a new campaign, or select from an existing draft
- In a campaign edit screen, give your campaign a Title
- Then, click on the Tags field select the customer tag that you wish to send your email to
Customer Tags can also work with either of the Commerce7 Mailchimp integrations. For more information on how customer tags work with your Mailchimp integration, we recommend you contact the company you are working with (Digimatic, Vintools or WineGlass Marketing).
Discounting with Customer Tags
- To create a promotion or coupon based on Customer Tag, click on Store and then neither Promotions or Coupons, depending on what type of discount you are creating.
- Click Add Promotion or Add Coupon in the top right corner of the screen
- Select whether this is a Product Discount or Shipping Discount
- Now, under the Customers section, tTo make a discount available to only customers with a specific customer tag, select Available To > Specific Tags
- Then search for the customer tag that you want the discount to apply for (manual or dynamic)
- Now you can complete the fields to set up your discount and make sure to save!
Creating Allocations For Customer Tags
- To create an allocation for a specific Customer Tag, click on Store > Allocations
- Complete Steps 1 and 2 of your allocation setup
- In Step 3 ("Available To"), you will be asked to specify who the allocation is open to
- Under Tag, search for one or more of your customer tags.
- If a customer is in any of the tags that you've added they'll be able to purchase in the allocation on the specified dates.