In This Article
Connecting the Device to Commerce7
Changing Date and Time Settings
Disconnecting from Merchant Track (for troubleshooting purposes)
Obtaining a MAC address (if-needed)
Setting Up Your Device
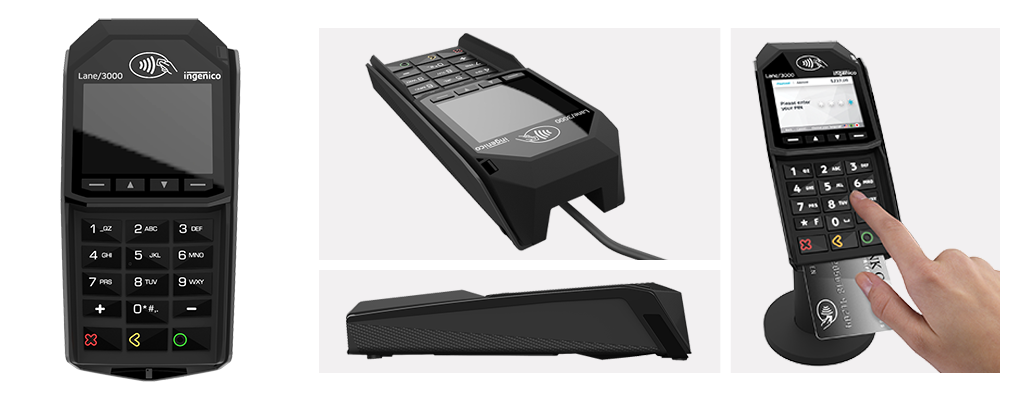
What's in the box?
- Lane 3000 device
- Ethernet/Power connection splitter
- Power cord
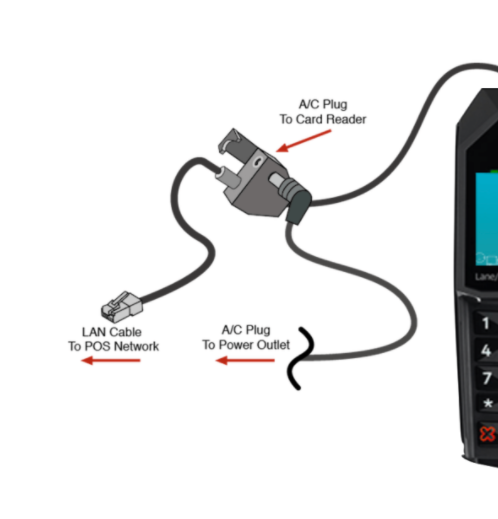
- Connect the Pinpad cable to the back of your Ingenico Lane 3000 device.
- With the same Pinpad cable, connect the ethernet portion into your router/switch and then connect the included power supply into the Pinpad cable (Next to the ethernet cable) and plug the power supply into an available wall outlet.
- If this is a first time setup the device will display an activation code once connected to the network.
- This terminal should now be connected.
If you see nothing- this means your terminal is set up properly. If you see a screen with a red bar across the top, you will need to check the firewall and network connection to verify connectivity.
Note: If you have a firewall, ensure that the following ports are open to allow traffic on your firewall. Otherwise this device will NOT communicate correctly.
| Port | Domain |
| 9001 | device.tripos.vantiv.com |
| 443 | device.tripos.vantiv.com |
| 7003 | temterminalsnar01.icloud.ingenico.com |
| 443 | prodssl.protectedtransactions.com |
Testing to confirm the ports are open
Run the following tests from Windows command prompt or Mac terminal to confirm these ports are open.
Port 9001 device.tripos.vantiv.com
curl -vLI telnet://device.tripos.vantiv.com:9001
You should see this response:
* Trying 40.83.221.118:9001...
* Connected to device.tripos.vantiv.com (40.83.221.118) port 9001
(note: the IP address may be different)
Port 443 device.tripos.vantiv.com
curl -vLI https://device.tripos.vantiv.com
You should see this response:
* Trying 40.83.221.118:443...
* Connected to device.tripos.vantiv.com (40.83.221.118) port 443
(note: the IP address may be different)
Port 7003 temterminalsnar01.icloud.ingenico.com
curl -vLI temterminalsnar01.icloud.ingenico.com:7003
You should see this response:
* Trying 34.86.9.39:7003...
* Connected to temterminalsnar01.icloud.ingenico.com (34.86.9.39) port 7003
Port 443 prodssl.protectedtransactions.com
curl -vLI https://prodssl.protectedtransactions.com/AUTH
You should see this message:
* Trying 64.57.149.110:443...
* Connected to prodssl.protectedtransactions.com (64.57.149.110) port 443
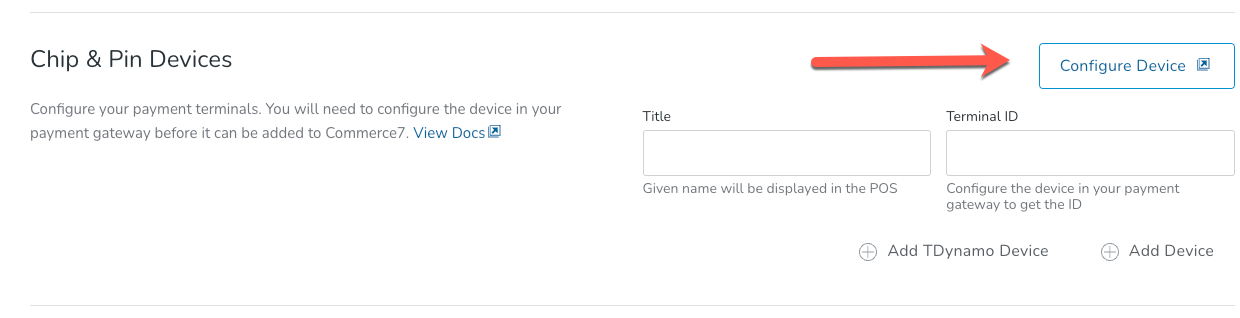
Setting up the Device in Commerce7
- In the Commerce7 admin panel under Settings > POS Profiles
- Click Configure Device - this will take you to Merchant Track > Terminals > Activate
- If you receive a "The PhoneNumber field is required" error, it just means that you need to add a phone number to your User Profile. Click here to learn how to do that.
- Enter the activation code, and click Activate
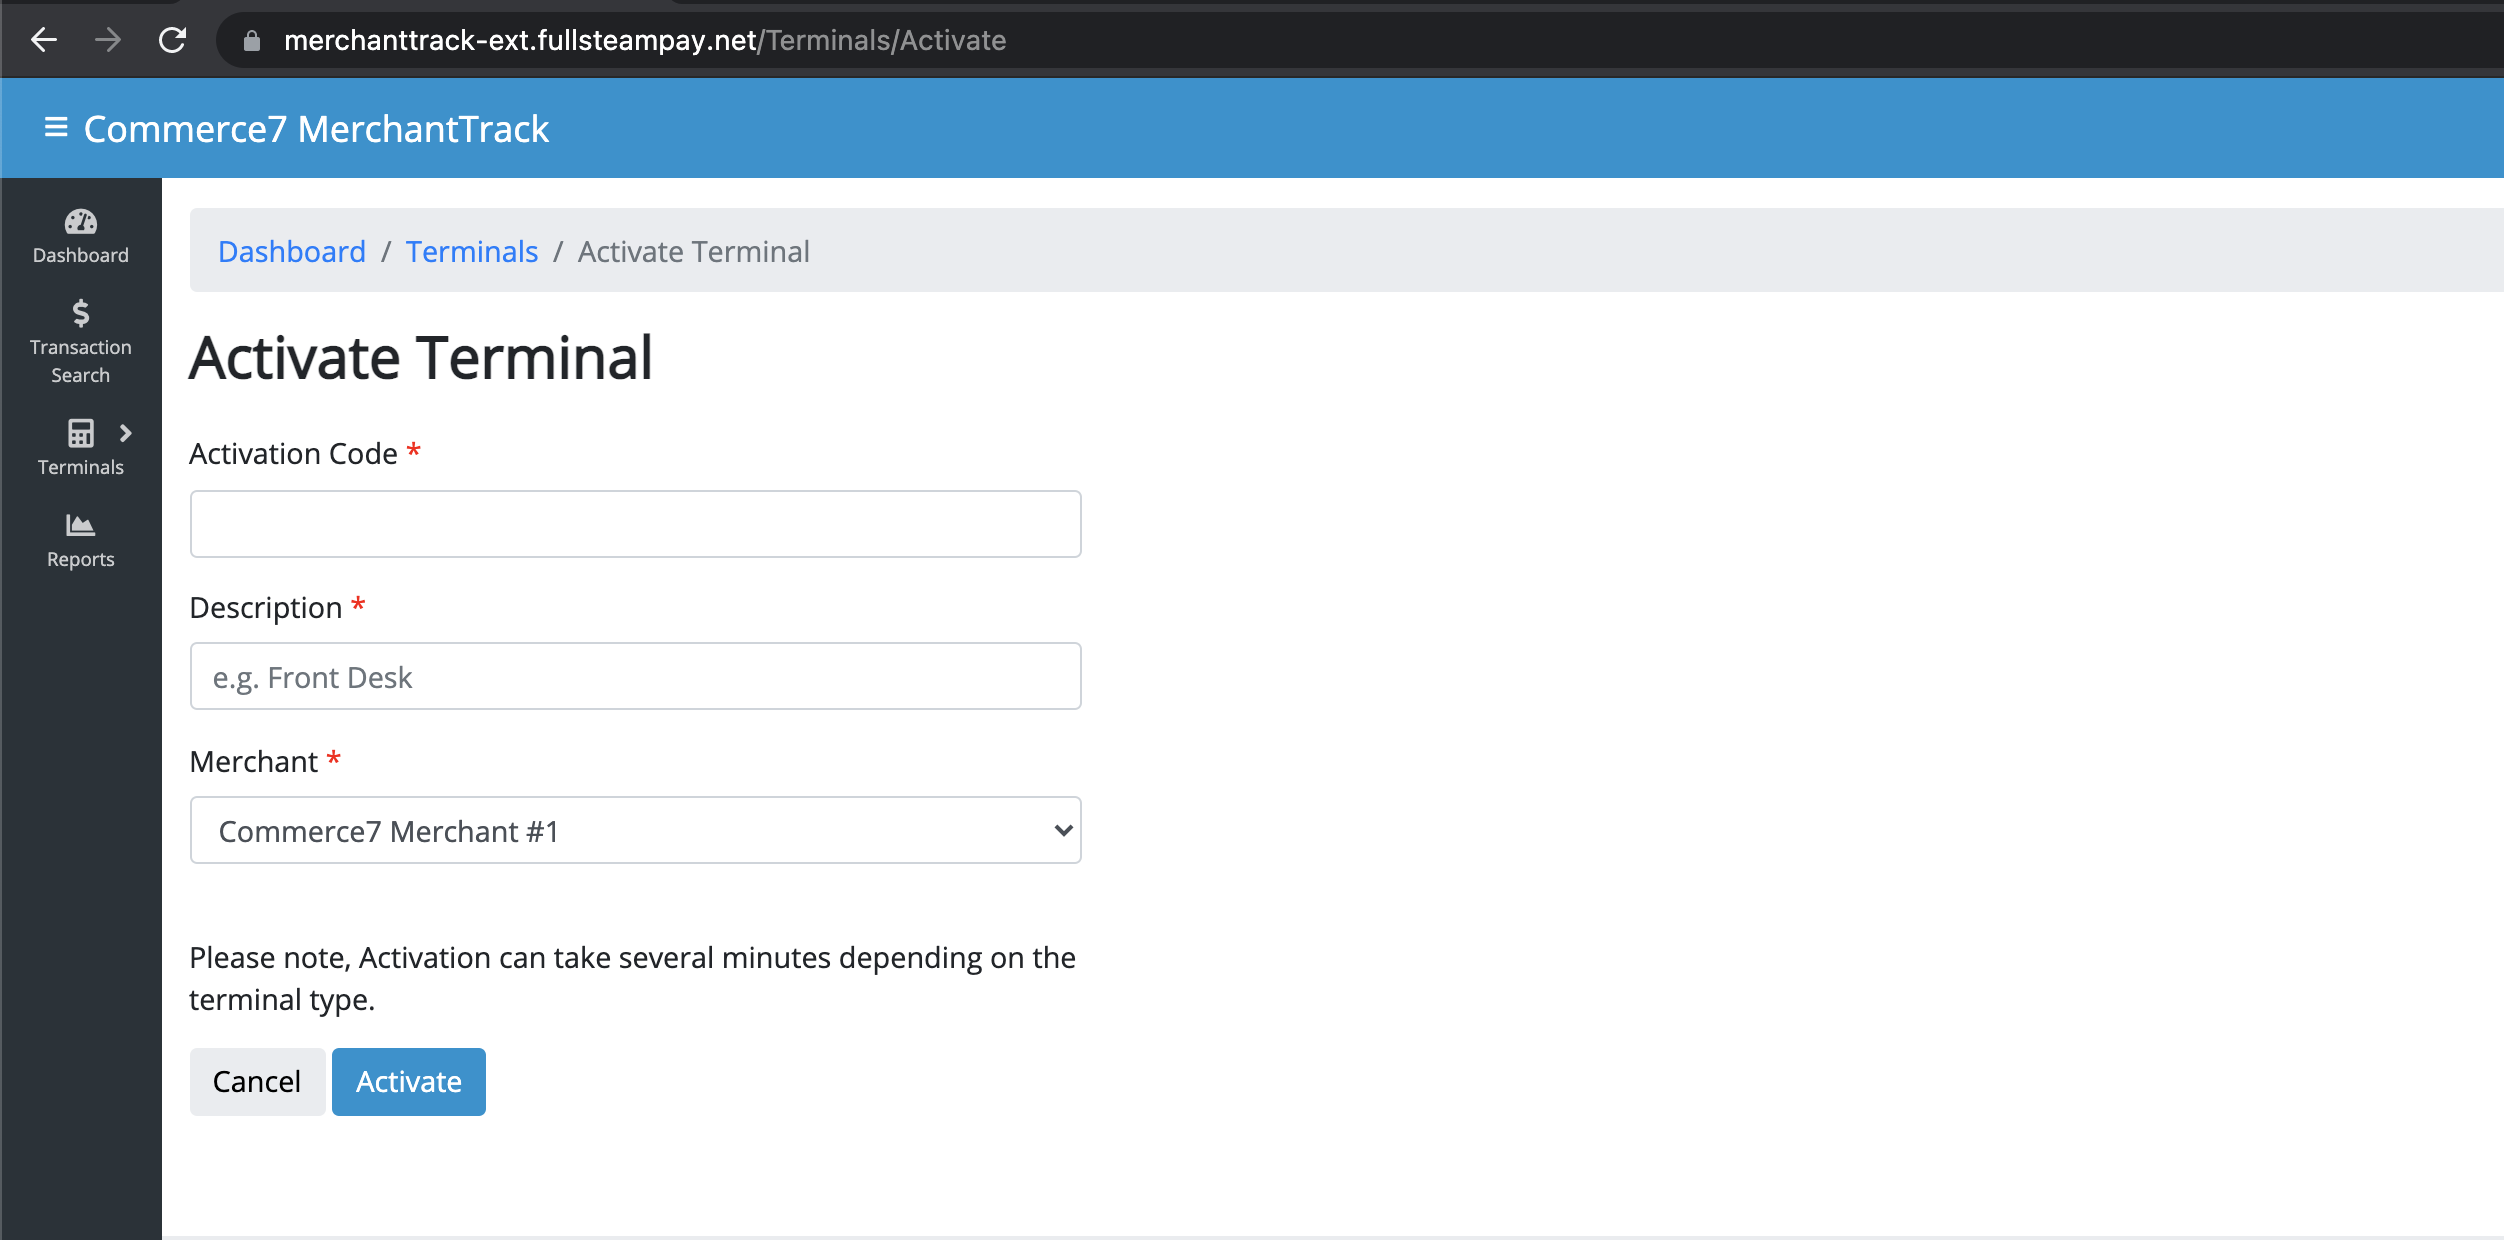
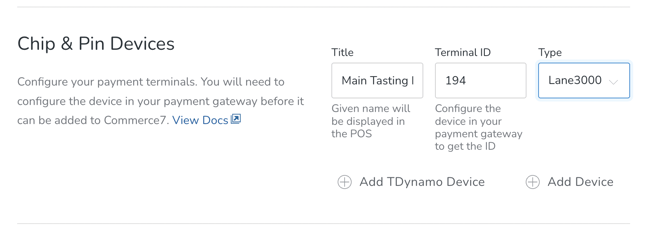
- Then you will see the Terminal ID to enter into Commerce7 below
- Write down the Terminal ID(s) from above and click back in your browser to get back to Commerce7 Pos Profile > Chip and Pin Devices and enter the Terminal ID(s), the Title is the name displayed in the POS when selecting the terminal. If you have more than 1 terminal click Add Device to add additional terminals.
Change Date & Time Settings on Ingenico Lane 3000
- Once the terminal is on the TriPOS screen you can enter 2-6-3-4 once prompted Press F for menu
- On the next screen select Tetra Admin
- On the next screen select date and time to enter the correct information
Using the Device (Workflow)
If you have it enabled to do so in the POS Profile, the Tipping prompt is sent to the device along with the transaction. Learn how to enable that setting here.-
- Are you using POSTrack Software? The Customer can insert the card at any point in the EMV process and choose their tip. (You will know that you are using POSTrack if you see 'FullSteam' as the background on the device).
- Are you using TriPOS Software? When the Customer inserts their card, they will choose the tip - and then they will be prompted to remove the card. They will then be prompted to re-insert the card again prior to the transaction being complete. (You will know that you are using TriPOS if you see 'TriPOS' as the background on the device).
- When your Customer is ready to checkout, click the Pay button in the POS.

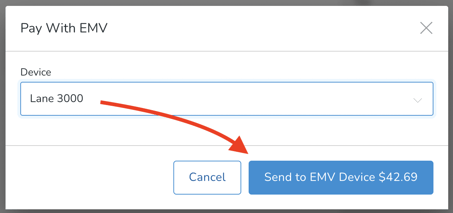
- On your POS device, click 'EMV'.

- Choose Lane 3000 and click the 'Send to EMV Device' button. You'll see a progress screen as it connects. (Note that the system will remember the last device that was used, so it will be automatically selected for you. In other words, you will not need to actively choose it each time).
- This will bring up a Tip screen on the Lane 3000.
- Make the device accessible to your Customer so that they can choose an applicable tip.

- The Customer will be prompted to insert, tap or slide the card into the Lane 3000 to complete the transaction.
- They will see a 'Do not remove card' message while the transaction is processing.
 |
 |
8. Once the card is processed, the card can be removed.
9. Click the Yes prompt or the green button.
 |
 |
10. You will see an Approved message and then the main Tri POS screen.
|
|
 |

Extra Tips:
- If the device is plugged in, it will turn on automatically.
- Only Wifi Networks that are password-protected will appear in the available Networks list.
Disconnecting from Merchant Track (for troubleshooting purposes)
Sometimes (as a last resort) we will recommend that you remove and re-add your device to your Merchant Track account and POS Profile. Here's how:
-
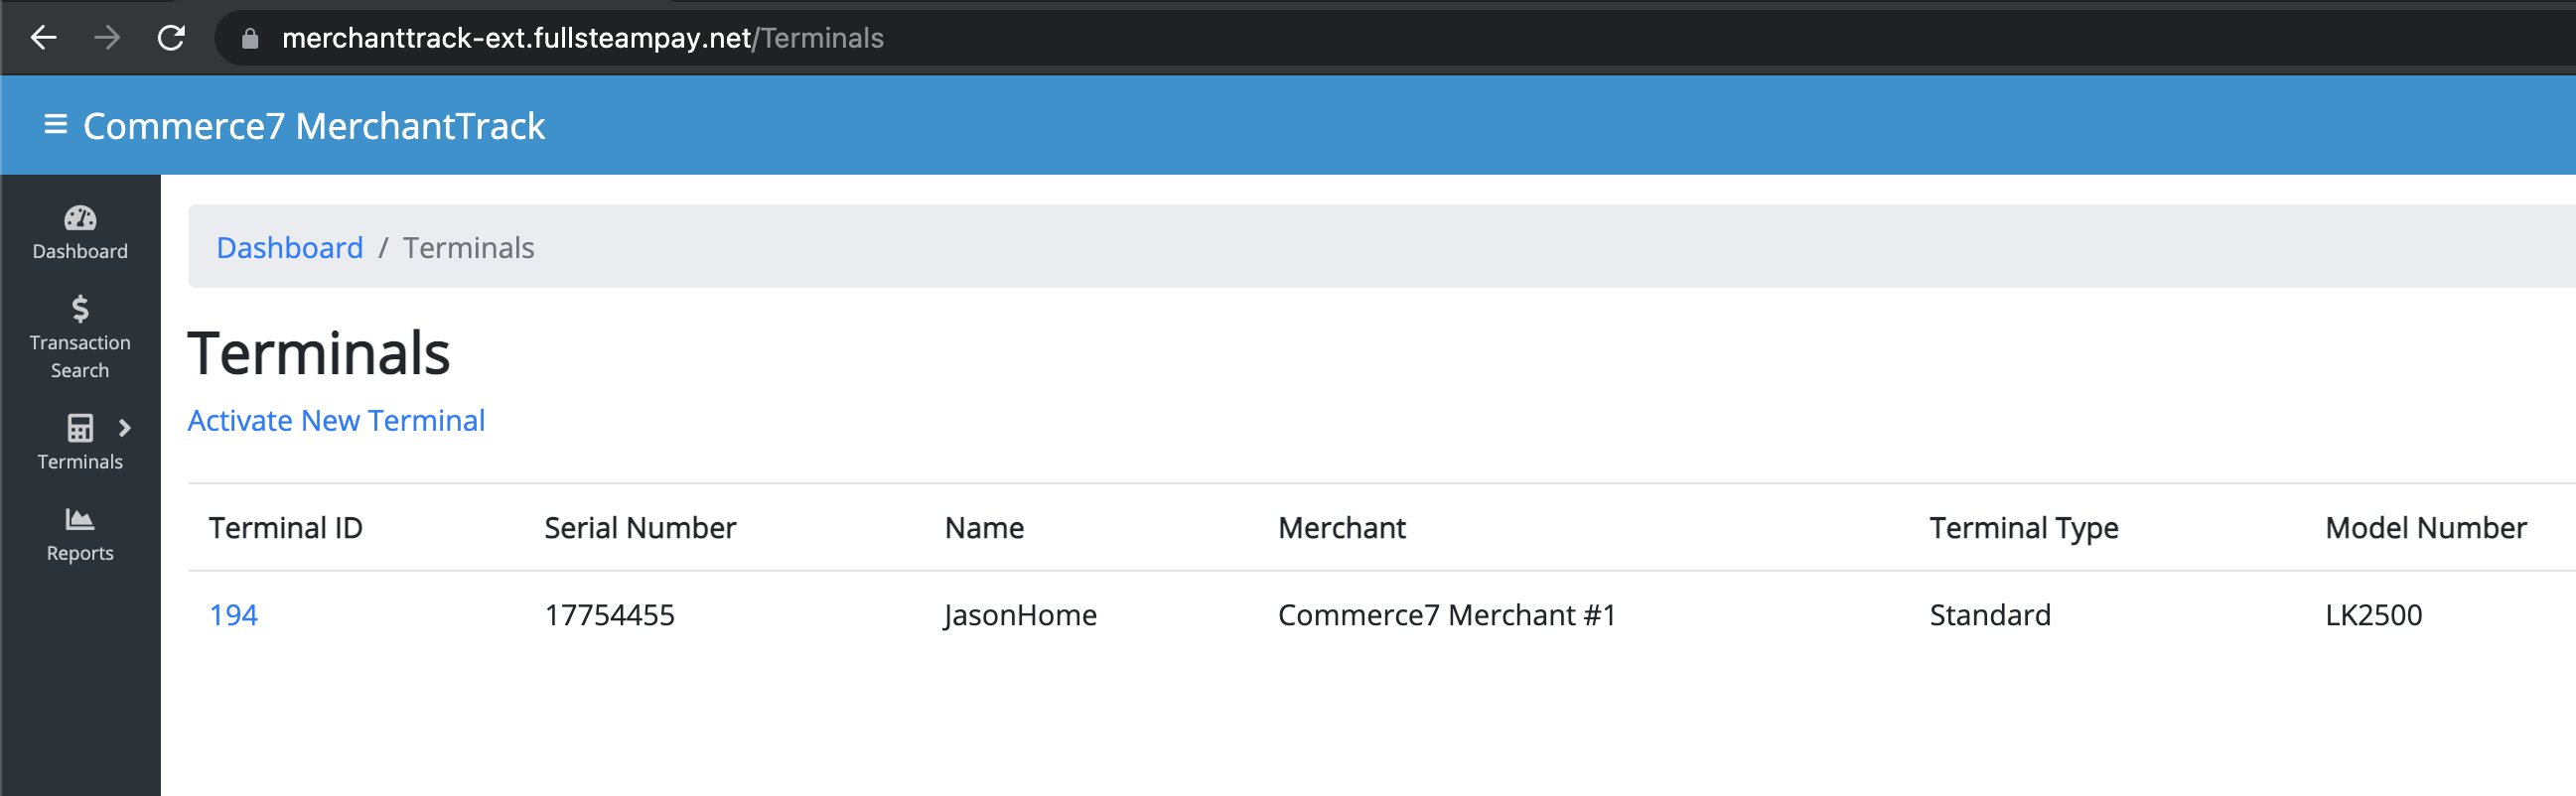
- Access your Merchant Track Dashboard
- Go to Terminals > View Terminals.

- Click the Terminal ID that you are troubleshooting.

- Click Edit in the bottom right.

- Click the Remove button.

- Now that it's removed, begin the device setup process from the top here.
Obtaining a MAC address (if-needed)
- From the Fullsteam screen. Press 2-6-3-4.
- Once prompted press the "F" Key above the Red "X".
- Select "Control Panel" -> "Terminal Settings" -> "Communication Means" -> "Ethernet"
- The MAC address should be displayed.