Personalizing your Customers' online experience is incredibly powerful. (Think about your own 'recommended' suggestions on Amazon, Spotify and Netflix).
Personalization Blocks enable you to tailor and present unique content to your customers online, based on specific criteria that you define.It's Easy!
Step 1: Create the Personalization Blocks (no Designer required)
Step 2: Enter the Content into each Personalization Block (no Designer required)
Step 3: Engage with your Designer to insert a small piece of code
In this article:
- Brief Overview: What are Personalizations & Why are they Important? (VIDEO)
- Step 1: Create your Personalization Block(s) (VIDEO)
- Step 2: Adding Content to your Personalization Block(s) (VIDEO)
- Step 3: Engage with your Designer to insert the Code (VIDEO)
- Personalization Examples - Customer View
- Customer Personalization Definitions of Terms
- Personalization Templates - Examples for Content
- FAQ
- From the Blog: The Ultimate Guide to Personalizations
- Free Training Friday Webinar: Personalizations
🎓 Commerce7 Academy Callout
Did you know that there's a Commerce7 Academy course all about Personalizations? Click here to access concise video modules that guide you through the process step by step.
Brief Overview: What are Personalizations & Why are They Important?
Personalization Blocks allow you to display different content to your Customers online based on criteria that you set. For example, if the Customer has never purchased from you in the past, you can display an introduction to your winery on the Homepage. Conversely, if they're a Club Member, you can customize the messaging and display their upcoming Shipment instead.
Step 1: Creating your Personalization Block(s)
A Personalization Block simply represents an area where you'd like your personalized content to display (ie. "Homepage" or "Footer").
- Go to Developer > Personalization Blocks

- Click Add Personalization Block
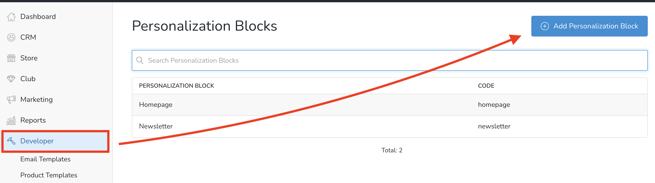
- Add a Title (Title is for internal purposes only and will not display to customers).
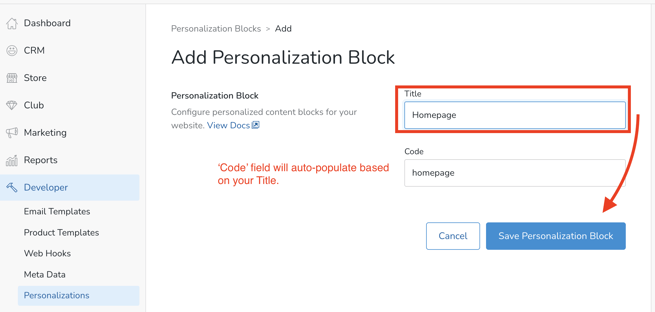
- Add a Code
This code will ultimately be used by your Designer when the widget is being installed on your site. It will auto-populate based on the Title (but can be customized if you'd like). Note that once the code is created, it cannot be changed.
Step 2: Adding Content to your Personalization Block(s)
Once you've added your Personalization Blocks, you're now ready to start adding your content.
- Under Website > Personalizations, you'll see a list of the Personalization Blocks set up by your designer.
- Select the applicable Personalization Block.

- Add a Title.
This Title is for internal purposes only. We recommend adding a Title that describes who the content is for such as "First Time Visitor" or "Club Member".
- Select the Type of content you want to display.
- General Content
Content editor where you can add text or images - Product Collection
You'll be able to select any of your Collections to display - Club Shipment
Displays a member's upcoming shipment (if there is an active shipment). If there is no active shipment, then the next option in the personalization sequence will be shown instead. - Subscribe Form
A basic subscribe form. When the customer submits this form, their "Email Marketing Status" will update to "Subscribed". - Set the Sort Order
For each Personalization, only one "Option" will display at a time to your customer. The sort order determines what content to display if a customer matches the criteria for multiple "Options". (We'll add the criteria next.)
- General Content
- Add in any general Content to display to the customer
- Add in name variables if you want to personalize the content even further.
Note: First and Last Name will only display if the customer is logged in.
 {{customer.firstName}}
 {{customer.lastName}}
The variables are case sensitive so we recommend copying and pasting the variables into your personalization block.

- Set the Conditions for who the Personalization Option should display for.
Content can be set to trigger when any specific conditions or met, or when all conditions are met.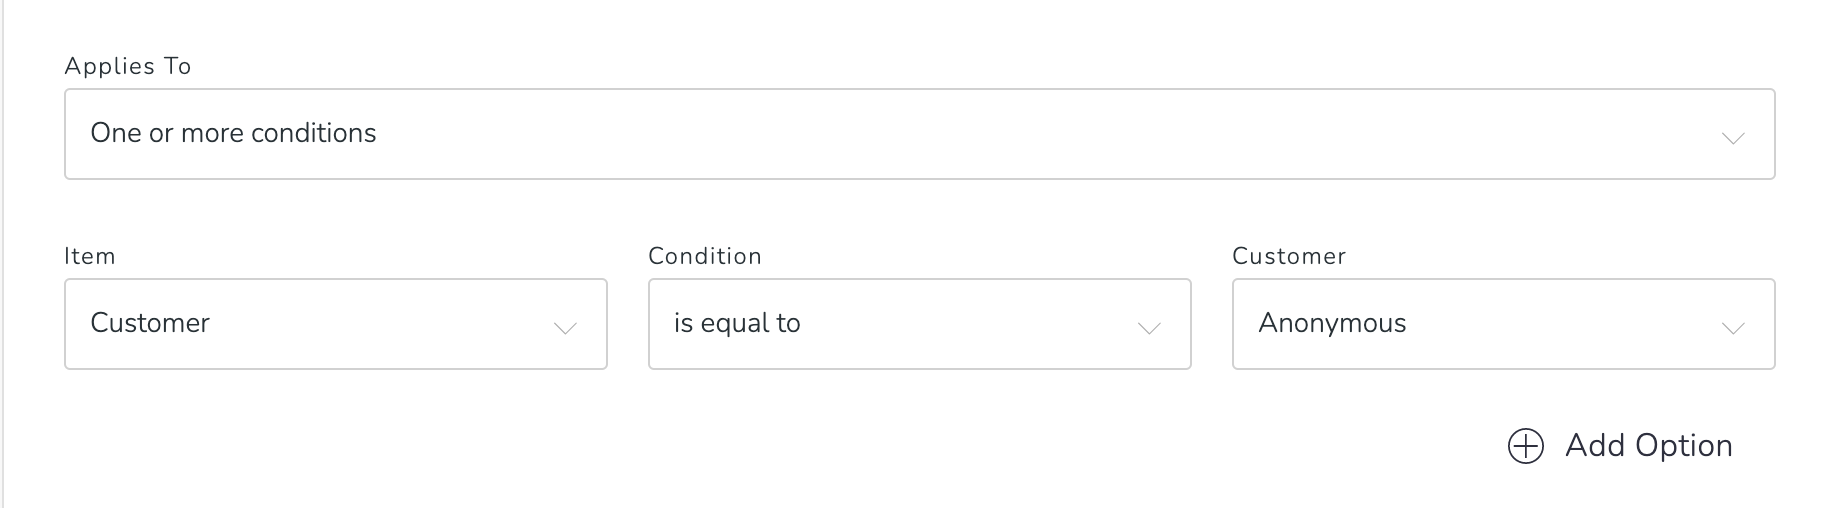
- Customer is or is not a subscriber, first time customer, repeat customer, club member, anonymous, or a known contact who has never purchased
- Lifetime Value greater than or less than a specific dollar value
-
- Last Order Date that is greater than or less than a specific date
- Club Member or not, for any specific club
- Customer Tag
- You can optionally set multiple criteria for a single Personalization Option.
For example, you could have content that triggers if a visitor's Tag is defined OR if a visitor's lifetime value is above a specific dollar value. - Click Save Option
- Create an Option for as many variations of content you want.

Step 3: Engaging with your Designer
Now it's time to engage with your Designer, who will be adding a small bit of code to your website. Your Designer can find instructions here.
Personalization Examples
The following screenshots are all from the same Homepage viewed from Customers at different phases of the Customer journey.
- Anonymous visitor
Likely their first time to the site - so we share our story.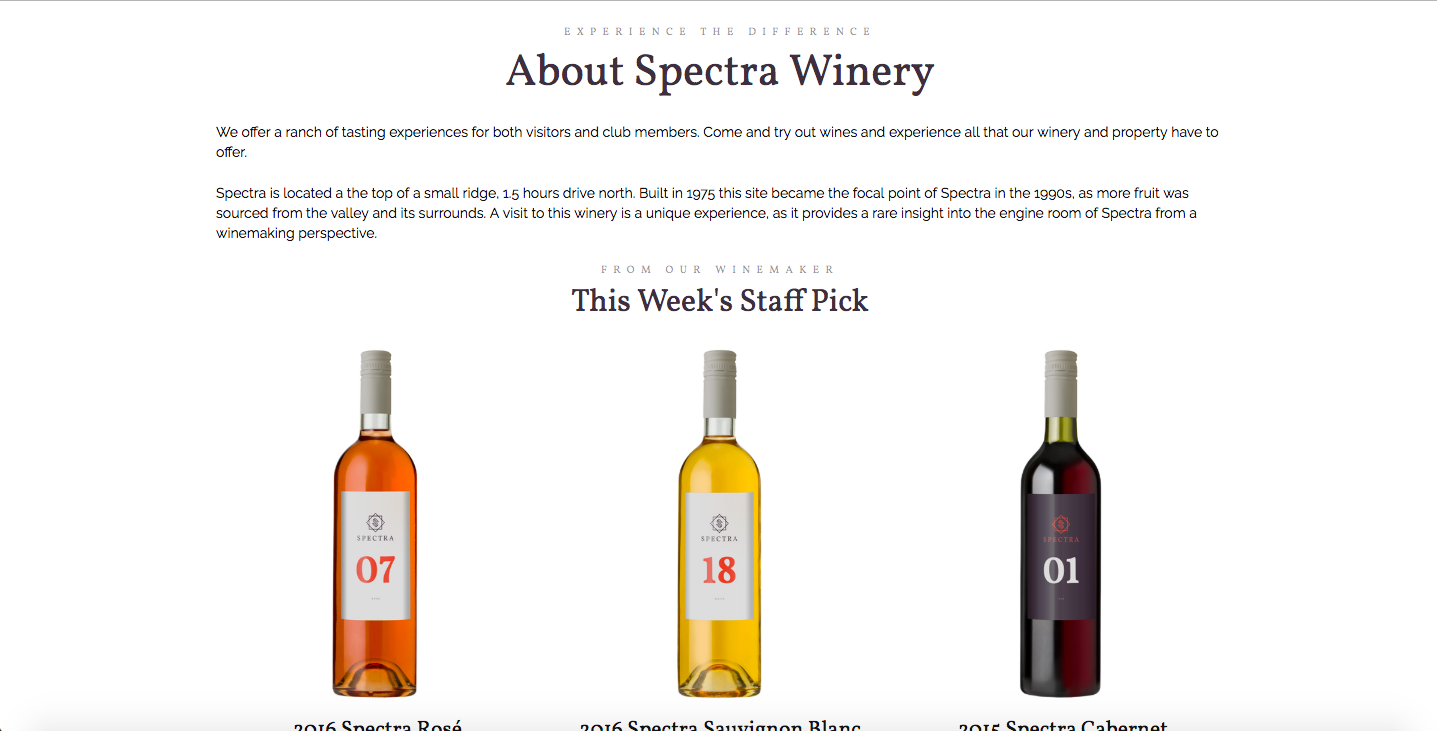
- First-Time Customer (They've purchased one time)
We want them to buy again so we serve up personal recommendations right up front to entice them. These recommendations are based off their initial purchase history.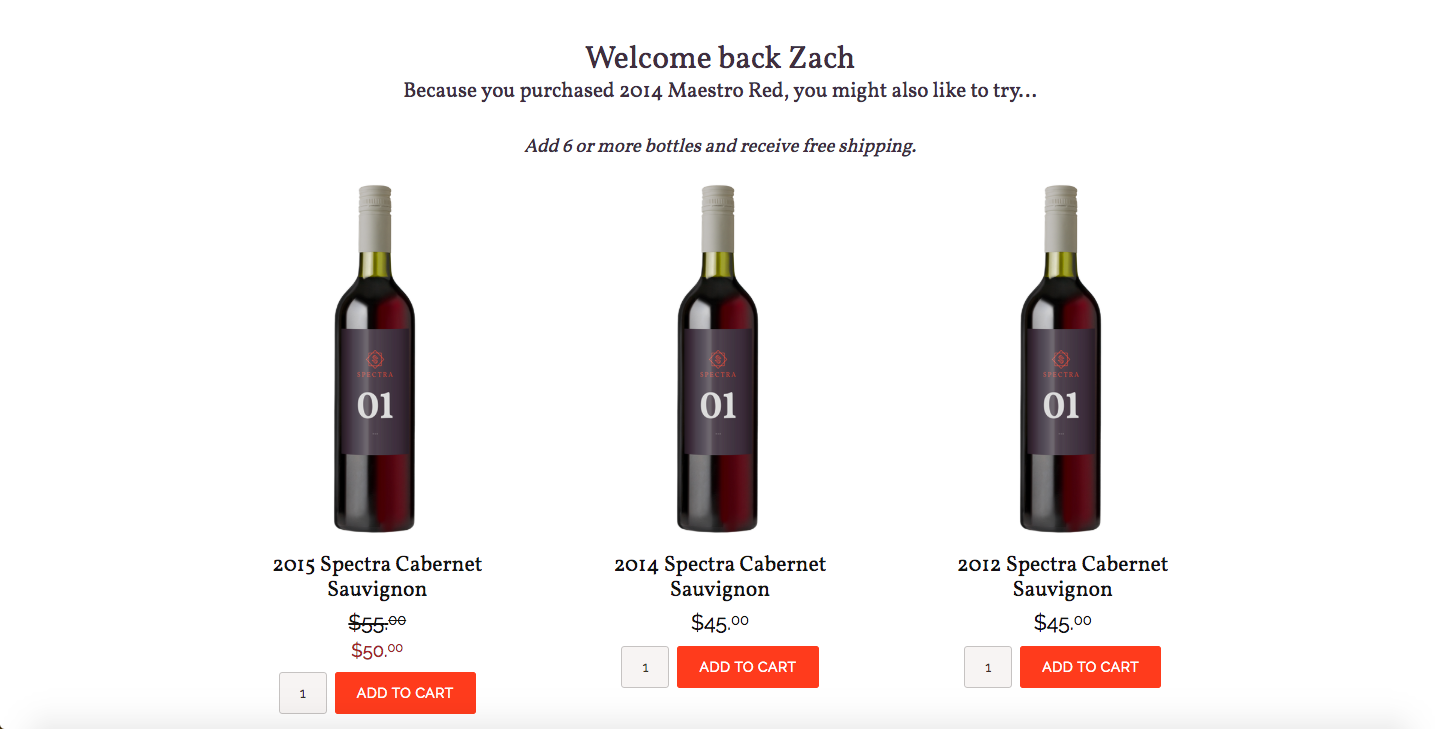
- Repeat Buyer (they've purchased more than one time)
We know they like the wines, so we want to upsell them into the club. This is a great way to present the benefits of joining as an enticement.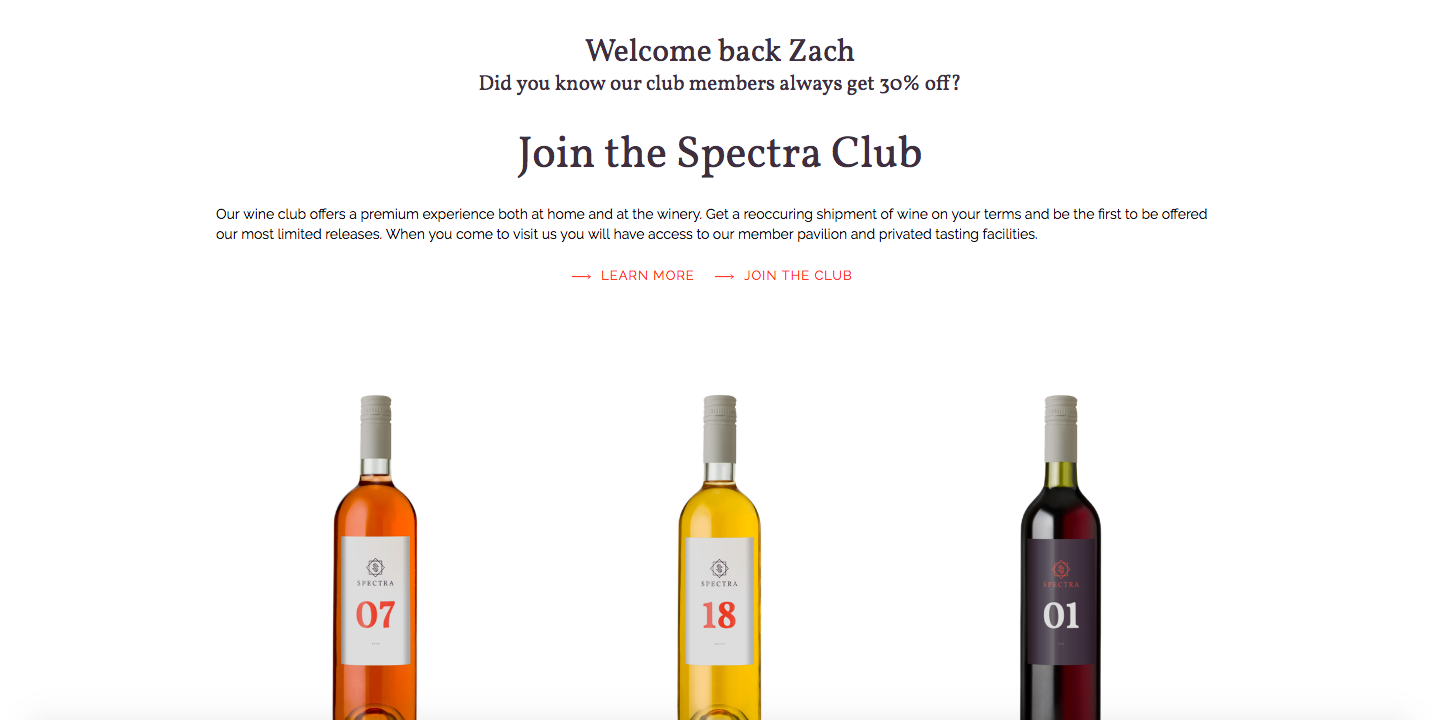
- Club Member
We want them to customize their package as easily as possible - so we show it to them right up front.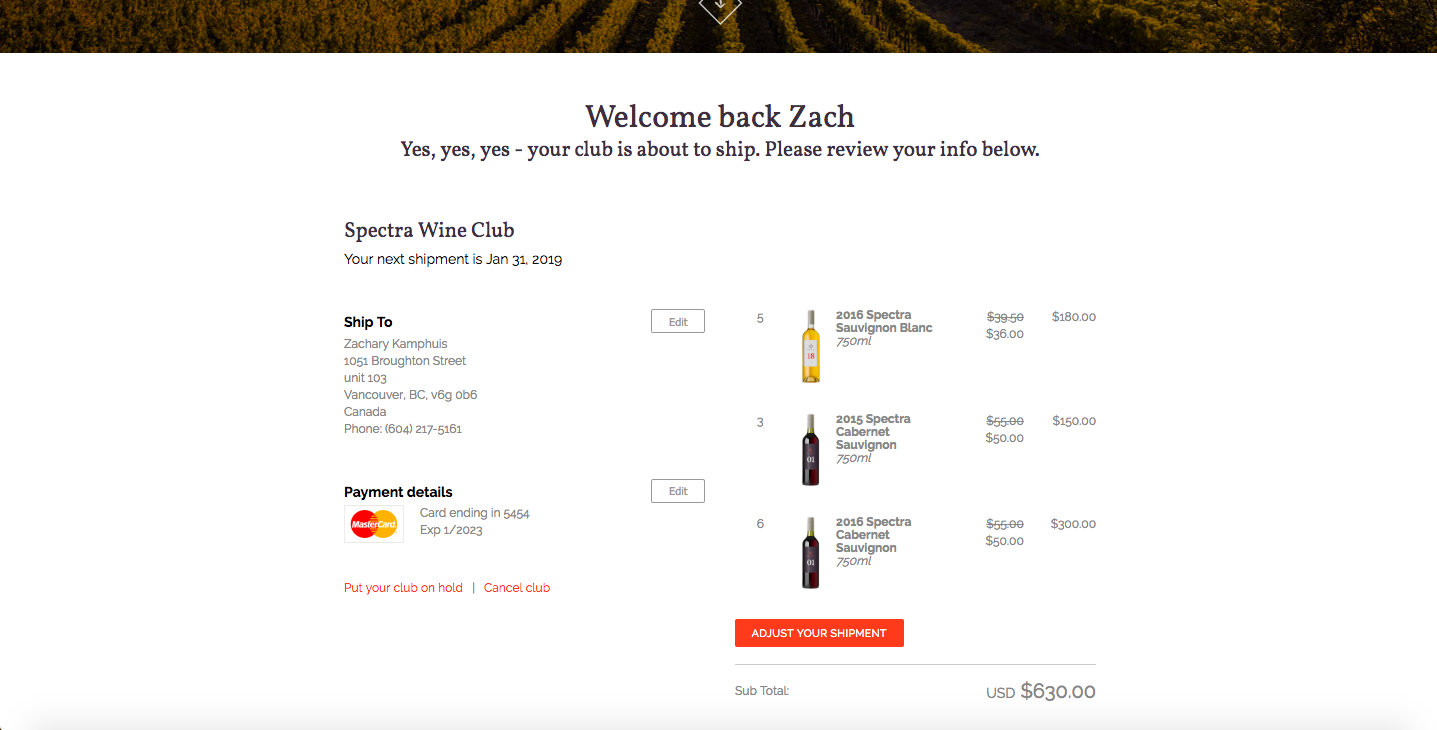
Customer Personalization Definitions
- Subscriber - A subscriber is a Customer who has filled out the subscribe form widget on your website, or has an existing Customer record with the "email marketing status" field set to "subscribed".
- First Time Customer - A first time Customer is a Customer who has completed one Order (on any sales channel) with your brand.
- Repeat Customer - A Repeat Customer is someone who has completed two or more Orders (on any sales channel) with your brand.
- Never Purchased - A Customer in this category has an existing Customer Record, but has never made a purchase.
- Club Member - A Customer in this category belongs to one or more of your Clubs.
- Anonymous - This is a website visitor who is not logged in (either because they do not have an Account, or they have an Account but are viewing your website from a new device). When a visitor comes to your website, if they have ever made a purchase before or ever logged in before on the device they are visiting with, they will automatically be logged in when they return (this is a cookie based login). For this reason, it is possible that an anonymous visitor may have an existing customer record but is visiting your site from a new device. The most likely scenario is that an anonymous visitor does not have an existing Customer Record.
- Everyone - All website visitors.
- Customer Birthday - This variable allows you to dynamically show content to Customers who have their birthday today, or birthday within the current month.
- Customer LTV - Customer Lifetime Value based on DTC orders made through all sales channels.
- Customer Last Order Date - The last date the Customer made a purchase.
- Club Membership - Clubs the Customer belongs to.
- Group - Groups the Customer belongs to.
FAQ
- Why is my Personalization Block displaying the error message: "Collection does not exist"?

- This occurs when the selected Collection for display has been deleted in the Store > Collections section. Here's how to fix it:
- Navigate to Website > Personalizations.
- Click into the Personalization Block.
- If the grey bubble under the 'Collection' title is empty, that means the Collection has been deleted.

- The fix? Click the Collection toggle and choose the Collection (from the dropdown menu) you'd like to display.
