In this Article:
- What is Influencer Marketing and Why Should you Consider It?
- Creating a Shareable Cart or Checkout Link (with Product Pre-Populated) (VIDEO)
- Creating a Shareable Coupon Code Link (that automatically applies to the Cart) (VIDEO)
- Reporting on Influencer Sales
What is Influencer Marketing and Why Should you Consider It?
Social media Influencers/personalities upload content on various digital platforms (Instagram, TikTok, YouTube) - and (as you likely know) this is where a lot of people spend their time.
By partnering with trusted social media Influencers, wineries and others in the craft beverage space can reach new audiences and build rapport with potential Customers.
A skilled Influencer comes across as authentic and real - and that authenticity and realness translates into relatability. And we tend to trust (and take suggestions from) those who we find relatable.
Influencer marketing can also be particularly effective in reaching younger audiences. Younger generations (Gen Z and millennials) are more likely to believe the opinions of their peers and social media Influencers than from traditional advertising. This is because they view Influencers as genuine, authentic and unscripted.
Additionally, partnering with Influencers who have a sizeable following among younger audiences can also help to modernize the image of the wine industry and make it more appealing to this demographic. Wineries and wine brands that are able to connect with younger audiences in this way will be more likely to create - and build - lasting relationships with these Consumers.
Finding the Right Influencer
Finding the right Influencer to partner with is crucial.
It's important to keep in mind that not all Influencers are created equal.
- The Influencer does not need to be a world-renowned sommelier! But it's important that they have a keen interest in the subject and can speak intelligently about it. (Perhaps they come from hospitality and therefore have knowledge/appreciation for wine).
- The Influencer should have a thorough understanding for the specific Product(s) they are promoting.
- Confirm that the Influencer's values align with your own.
- Be sure that the Influencer's target audience is the same audience you are trying to reach.
Don't get caught in the 'follower trap'. Just because an Influencer has millions of followers does not necessarily make them the best partner for you.
Maybe a potential Influencer has just a few hundred followers. If those followers are actively engaged and are the right target audience for you - then you very well may have a winner.
Creating a Shareable Cart or Checkout Link (with Product Pre-Populated)
Share an Add to Cart URL for a particular Product so the Influencer can share a direct link to purchase.
Step 1: Where do you want the Customer to land?
- Do you want to lead the Customer directly to the Checkout page? OR
- Do you want to lead the Customer directly to a Cart where they can edit quantity?
You can only have one "?" in your URL - so when using custom fields in the URL you'll want to remove the second "?" to ensure this information is populating correctly on the orders placed through these links!
Here are your 3 options:
- Option A: This will take the Customer directly to the Cart with the SKU chosen - but Customer can choose their quantity.
- Add this to the end of your Store URL: ?addToCart=sku-goes-here
- Here's what the full URL would look like with a 'BB750' SKU:
https://britney-demo-account.v2-template.commerce7.com/?addToCart=BB750
- Option B: This will take the Customer directly to the Cart with 6 items chosen for them.
- Add this to the end of your Store URL: ?addToCart=sku-goes-here&quantity=6
- Here's what the full URL would look like with a 'BB750' SKU:
https://britney-demo-account.v2-template.commerce7.com/?addToCart=BB750&quantity=6
- Option C: This will take the Customer directly to the Checkout page with 6 items chosen
- Add this to the end of your Store URL: ?addToCart=sku-goes-here&quantity=6&checkout=true
- Here's what the full URL would look like with a 'BB750' SKU:
https://britney-demo-account.v2-template.commerce7.com/?addToCart=BB750&quantity=6&checkout=true
Step 2: Adding a Custom Field (formerly Meta Data) to the Cart Link to Track Influencer Sales
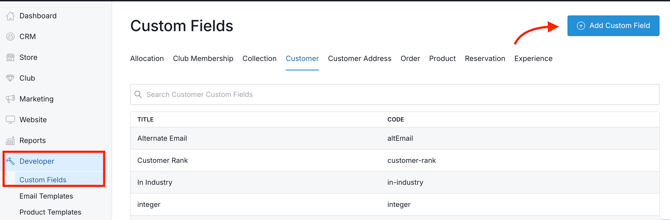
To automatically add a Custom Field to a Cart (ie for tracking of Influencer sales), first setup the Custom Field by navigating to Developer > Custom Fields and click the Add Custom Field button. To learn more detail about Order Custom Fields, click here.
When choosing 'Data Type', be sure to choose Select as your Type. Then add your Options below that. These could be Influencer names, or it could be social media sources like Instagram, Facebook and TikTok.
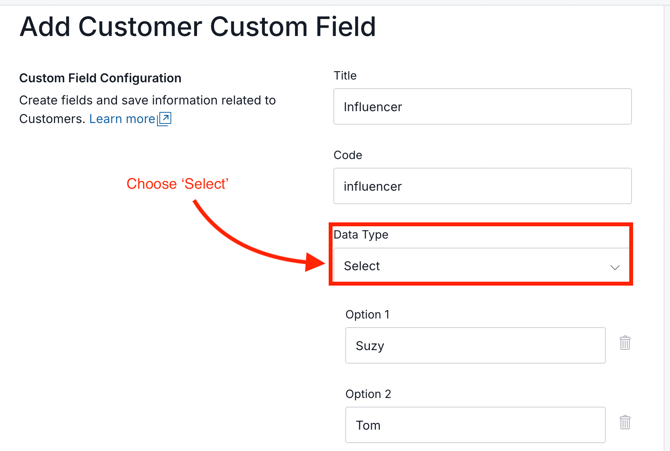
Once you setup the Custom Field ensure you get the code. Let's assume you setup Influencer and the code is 'influencer', use the following to configure the shareable link:
- This will take the customer directly to the Cart with specific SKU pre-populated in their cart, and will attribute the campaign to a particular Source/Influencer
- Add this to the end of your Store URL: ?meta-meta-data-code=value-goes-here
- Here's what the full URL would look like with a 'BB750' SKU + 'Suzy' as the attributed Influencer:
https://britney-demo-account.v2-template.commerce7.com/?addToCart=BB750&meta-influencer=suzy
Create a Shareable Coupon Code Link (that automatically applies to the Cart)
Step 1: Create a shareable link that automatically adds a Coupon Code to a Cart
- This will take the Customer directly to the Cart with the Coupon Code added for them.
- Add this to the end of your Store URL: ?couponCode=coupon-code-goes-here
- Here's what the full URL would look like with a 'suzytiktok' Coupon Code:
https://britney-demo-account.v2-template.commerce7.com/?couponCode=suzytiktok
Step 2: Adding a Custom Field to the Coupon Code Link to Track Influencer Sales
To automatically add Custom Fields (formerly Meta Data) to a Coupon Code link (ie for tracking of Influencer sales), first setup the Custom Field by navigating to Developer > Custom Fields > Order and click the Add Custom Field button. To learn more detail about Order Custom Fields, click here.
When choosing 'Data Type', be sure to choose Select as your Type. Then add your Options below that. These could be Influencer names, or it could be social media sources like Instagram, Facebook and TikTok.
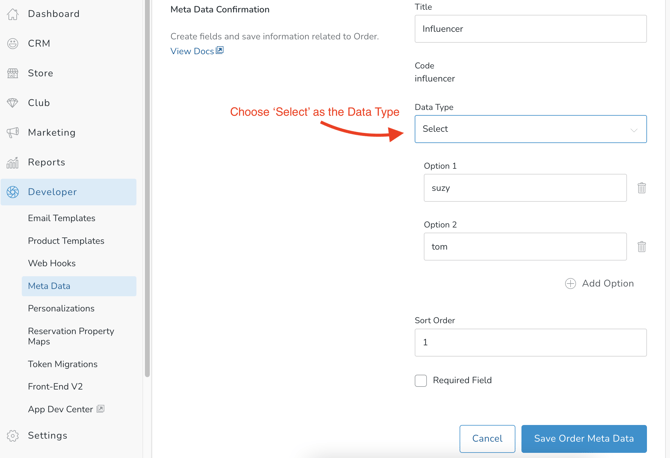
Once you setup the Custom Field ensure you get the code. Let's assume you setup Influencer and the code is 'influencer', use the following to configure the shareable link:
- This will provide the Customer with an automatic Coupon which you can track and report on, in addition to having Order Custom Field about the Influencer.
- Add this to the end of your Store URL:
?couponCode=coupon-code-goes-here?meta-meta-data-code=value-goes-here - Here's what the full URL would look like:
https://britney-demo-account.v2-template.commerce7.com/?couponCode=suzytiktok&meta-influencer=suzy
- Add this to the end of your Store URL:
Reporting on Influencer Sales
Once you've created the Custom Field to track Influencer sales, there are a couple of ways to report on it.
OPTION 1: Reporting using the Order Export
-
- Go to the Store Tab > Orders
- Click Actions > Export Orders
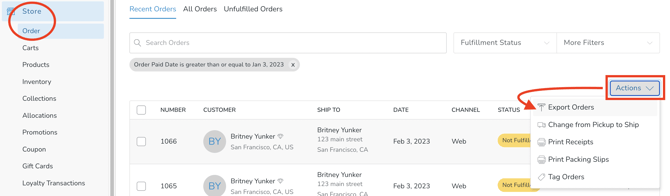
- You will see the Custom Field Title in the last column in the export. From there you can sort and/or sum as-needed to get your totals.
OPTION 2: Reporting/Analysis using Dynamic Order Tags
-
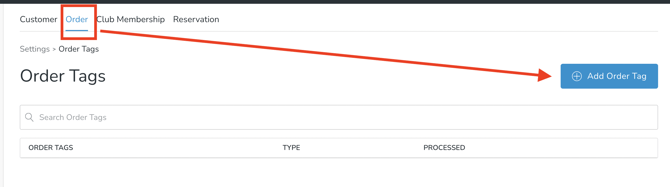
- Go to Settings > Tags
- Choose 'Order' in the menu at the top of the page
- Click the Add Order Tag button.
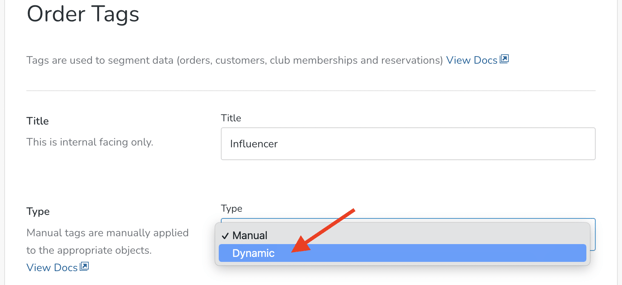
- Title it (ie Influencer), choose 'Dynamic' as the Type.
- Choose the Item, Condition and Value to be associated with your Tag.
- Item = Choose the Custom Field Title in the dropdown
- Condition = Is equal to
- Value = Choose the applicable Custom Field value (Influencer name)

- Click the Add Order Tag button to save it.
Now that your Dynamic Tag is set up, you can now Filter in a number of places (like the Orders screen and in Queries for use in further analysis).