In this article:
- Configuring Wifi (VIDEO)
- Removing a Network Profile
- Activating your Terminal for Commerce7 (VIDEO)
- Disconnecting from Merchant Track (for troubleshooting purposes)
- Troubleshooting
Note the following Network Requirements:
- Allow outbound https port 443 traffic to tripos.vantiv.com
- Allow TCP/IP traffic to port 9001 of device.tripos.vantiv.com
- Minimum Internet Speed recommendation of 5Mbps (Learn more here about WiFi requirements).
- Most standard consumer or business firewalls permit all outbound traffic as a default. If you have a managed firewall or enterprise firewall you need to ensure the ports above are enabled for outbound traffic.
Do you have a firewall?
Note: If you have a firewall ensure that the following ports are open to allow traffic on your firewall. Otherwise this device will NOT communicate correctly.
| Port | Domain |
| 9001 | device.tripos.vantiv.com |
| 443 | device.tripos.vantiv.com |
| 7003 | temterminalsnar01.icloud.ingenico.com |
| 443 | prodssl.protectedtransactions.com |
Testing to confirm the ports are open
Run the following tests from Windows command prompt or Mac terminal to confirm these ports are open.
Port 9001 device.tripos.vantiv.com
curl -vLI telnet://device.tripos.vantiv.com:9001
You should see this response:
* Trying 40.83.221.118:9001...
* Connected to device.tripos.vantiv.com (40.83.221.118) port 9001
(note: the IP address may be different)
Port 443 device.tripos.vantiv.com
curl -vLI https://device.tripos.vantiv.com
You should see this response:
* Trying 40.83.221.118:443...
* Connected to device.tripos.vantiv.com (40.83.221.118) port 443
(note: the IP address may be different)
Port 7003 temterminalsnar01.icloud.ingenico.com
curl -vLI temterminalsnar01.icloud.ingenico.com:7003
You should see this response:
* Trying 34.86.9.39:7003...
* Connected to temterminalsnar01.icloud.ingenico.com (34.86.9.39) port 7003
Port 443 prodssl.protectedtransactions.com
curl -vLI https://prodssl.protectedtransactions.com/AUTH
You should see this message:
* Trying 64.57.149.110:443...
* Connected to prodssl.protectedtransactions.com (64.57.149.110) port 443
If there is no internet going to the device it does NOT give an error message - it will just show the triPOS logo. Make sure to verify the ethernet port is working by trying to connect the unit directly to your router, bypassing it and going to the modem, or plugging it into a wired port that you know is already working.
If you encounter difficulties during router/firewall configuration, we recommend contacting your IT team for additional support. Please be aware that our Support team is unable to assist with router issues as they can vary greatly depending on the specific circumstances.
Configuring Wifi + Generating Activation Code
Turn on or Reboot the Terminal
- Turn on with the green button - hold 2 seconds.
- Reboot press and hold the # key and yellow key simultaneously until chirp, will reboot if plugged into power, or shutoff if on battery.
- What's in the box?
- Move5000 device
- Power supply
- Where is the Serial Number?
- As the unit is booting up it will come up in the following screen:
- As the unit is booting up it will come up in the following screen:
- When the Terminal is at the home screen (where it says FullSteam):
- Press 0001 on the keypad to open the Admin Menu - Press 3 - WIFI Parameters
- Press 2 - Scan Networks
- Touch the screen to select your Wifi Network
- Note that only Wifi Networks that are password-protected will appear in the available Networks list.
- Enter the Wifi Password and press the green key.
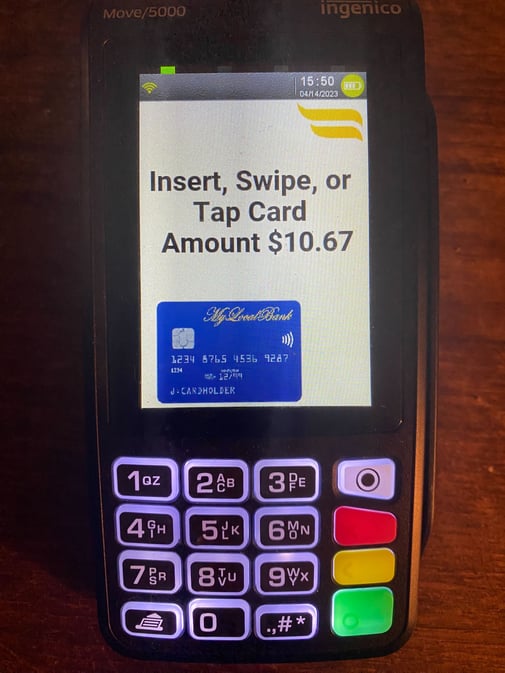
- You will be take back to the home screen and it will take a minute for the Wifi connection to complete, you will see the Wifi symbol in the top left of the screen turn orange while connecting then green when connected.
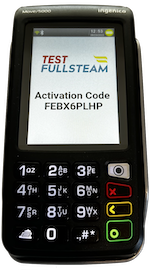
- An Activation Code will then be presented on the screen of the terminal.
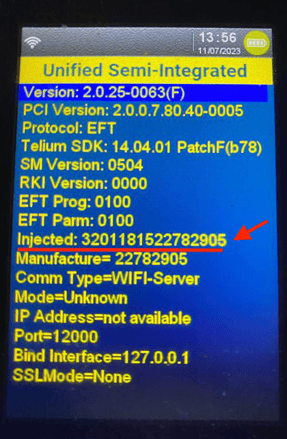
Note: If no Activation Code has been shown after a few minutes, reboot device by simultaneously pressing the yellow key and # key. Confirm that the Wifi symbol in the upper left is green showing you are connected. Additionally, if you have a firewall, ensure that these ports are configured.
Removing a Network Profile (Wifi Access Point)
- When the terminal is at the home screen (where it says FullSteam):
- Press 0001 on the keypad to open the Admin Menu - Press 3 - WIFI Parameters
- Press 3 - My Networks
- Press Delete all (On the screen)
- Now all Wifi profiles are deleted, you can follow the steps above to connect to Wifi.
Please note: After removing the Wifi Network and re-adding a new Wifi Network - you may need to reboot the device to get it to work. Please do so by pressing and hold the # key and yellow key simultaneously until chirp, will reboot if plugged into power, or shutoff if on battery.
Activating the Terminal
- In Commerce7 under Settings > POS Profiles, select a Profile
- Scroll down to Chip & Pin Devices and click Configure Device
- If you receive a "The PhoneNumber field is required" error, it just means that you need to add a phone number to your User Profile. Click here to learn how to do that.
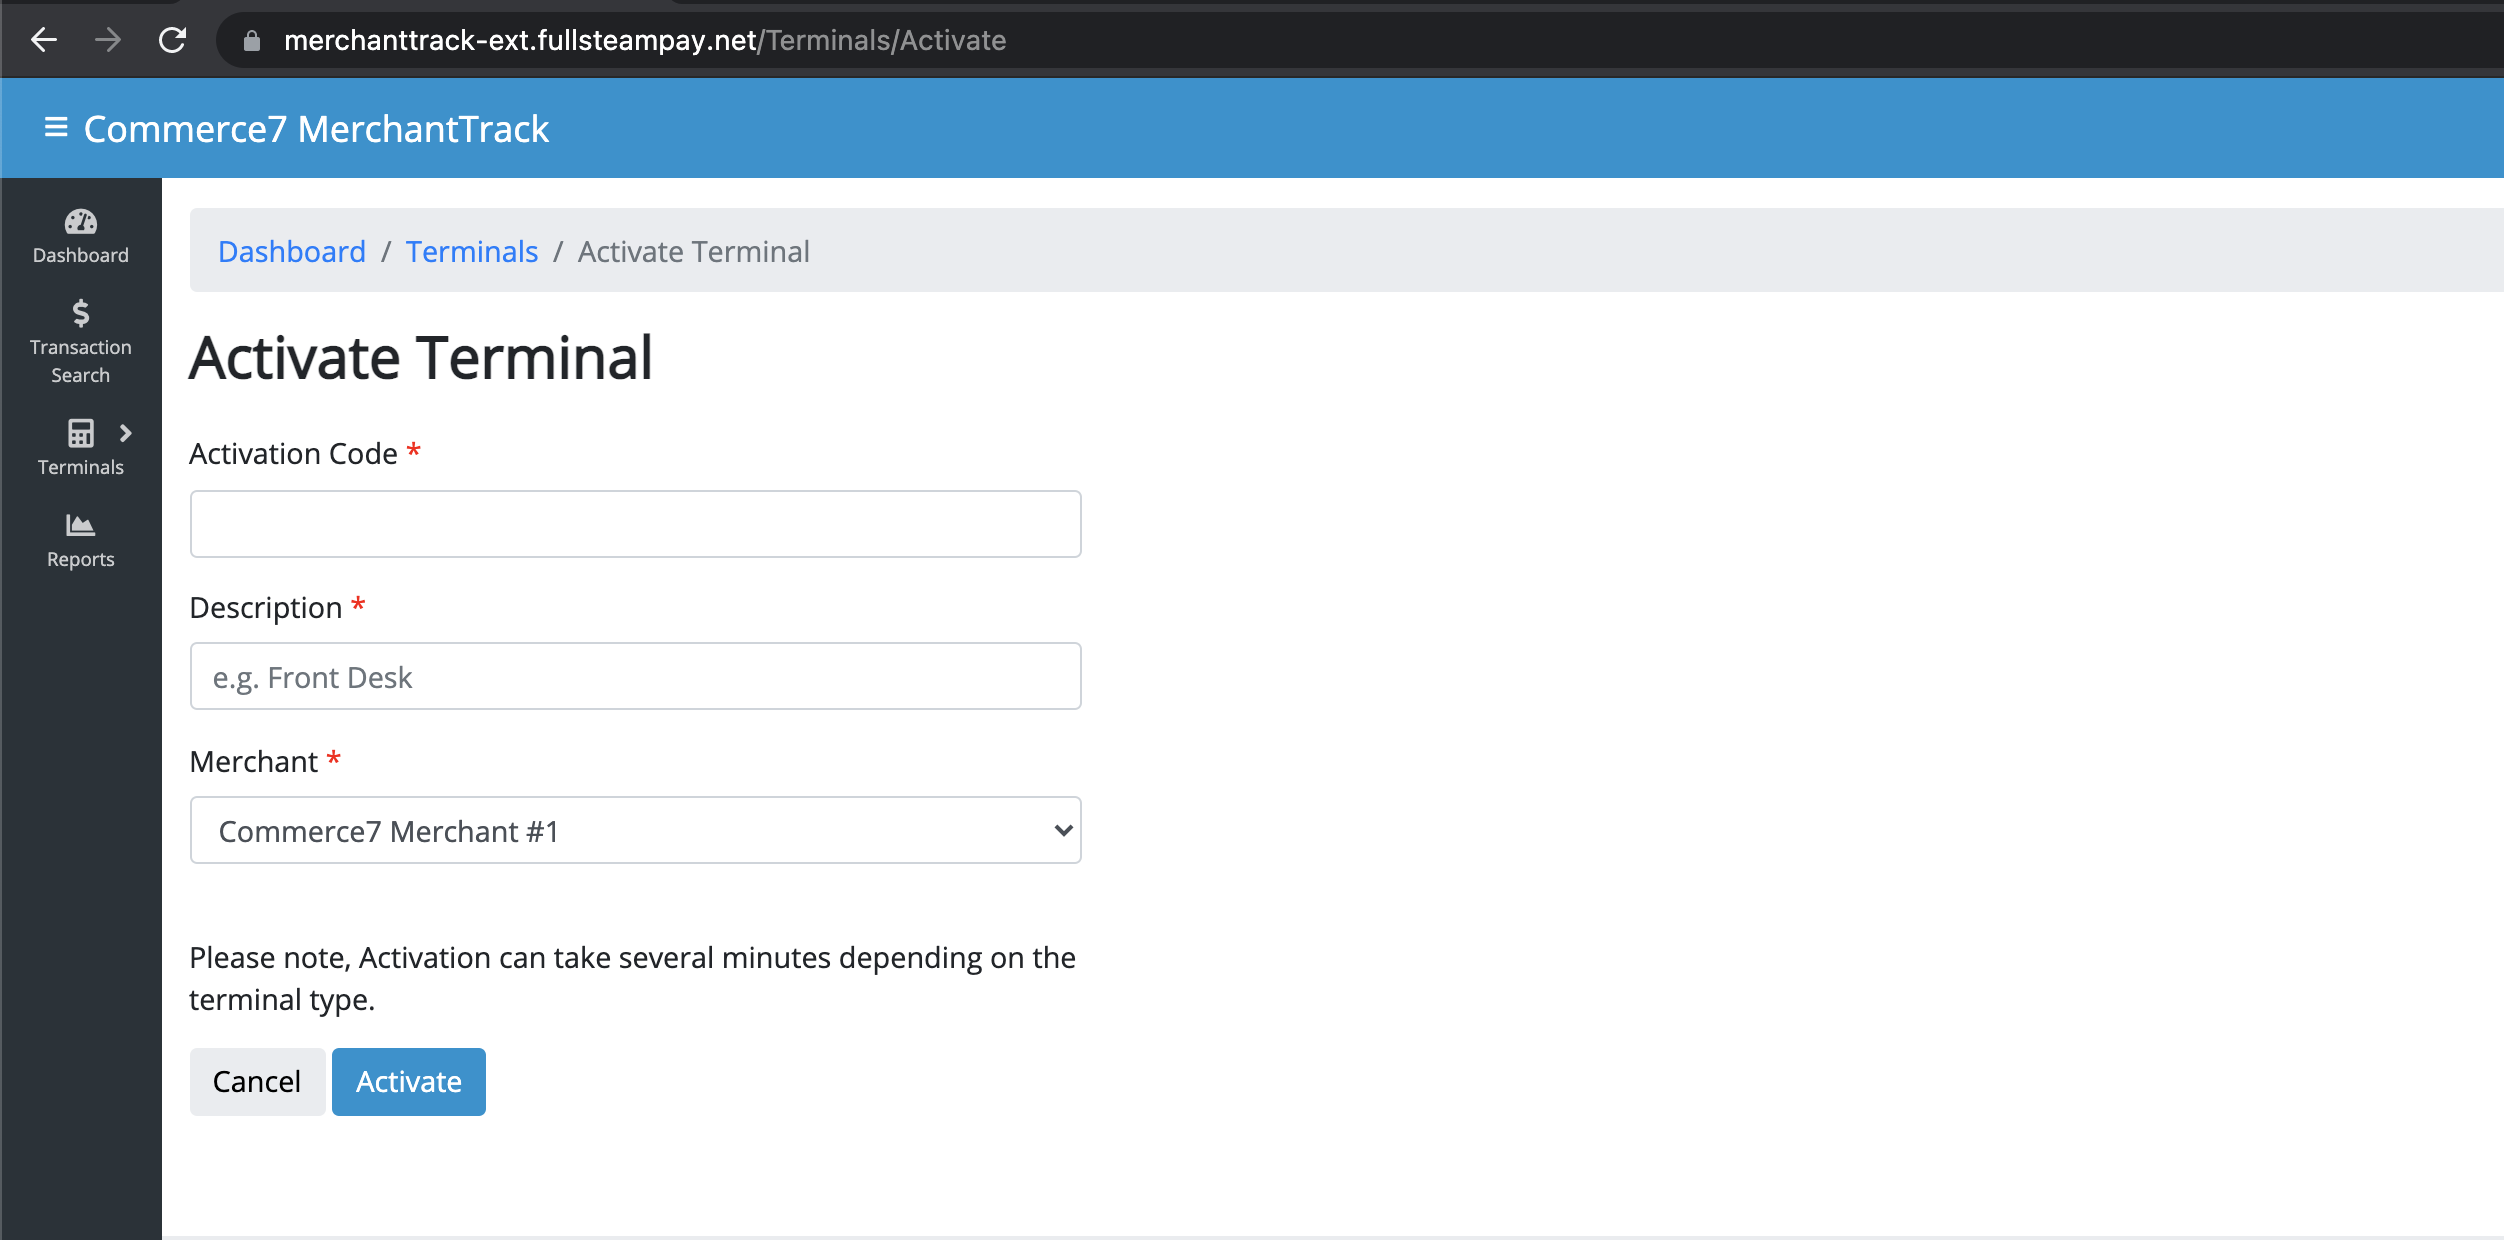
- Clicking the button will take you to Merchant Track > Terminals > Activate. Enter the activation code that you received from the device Wifi configuration above and click Activate.
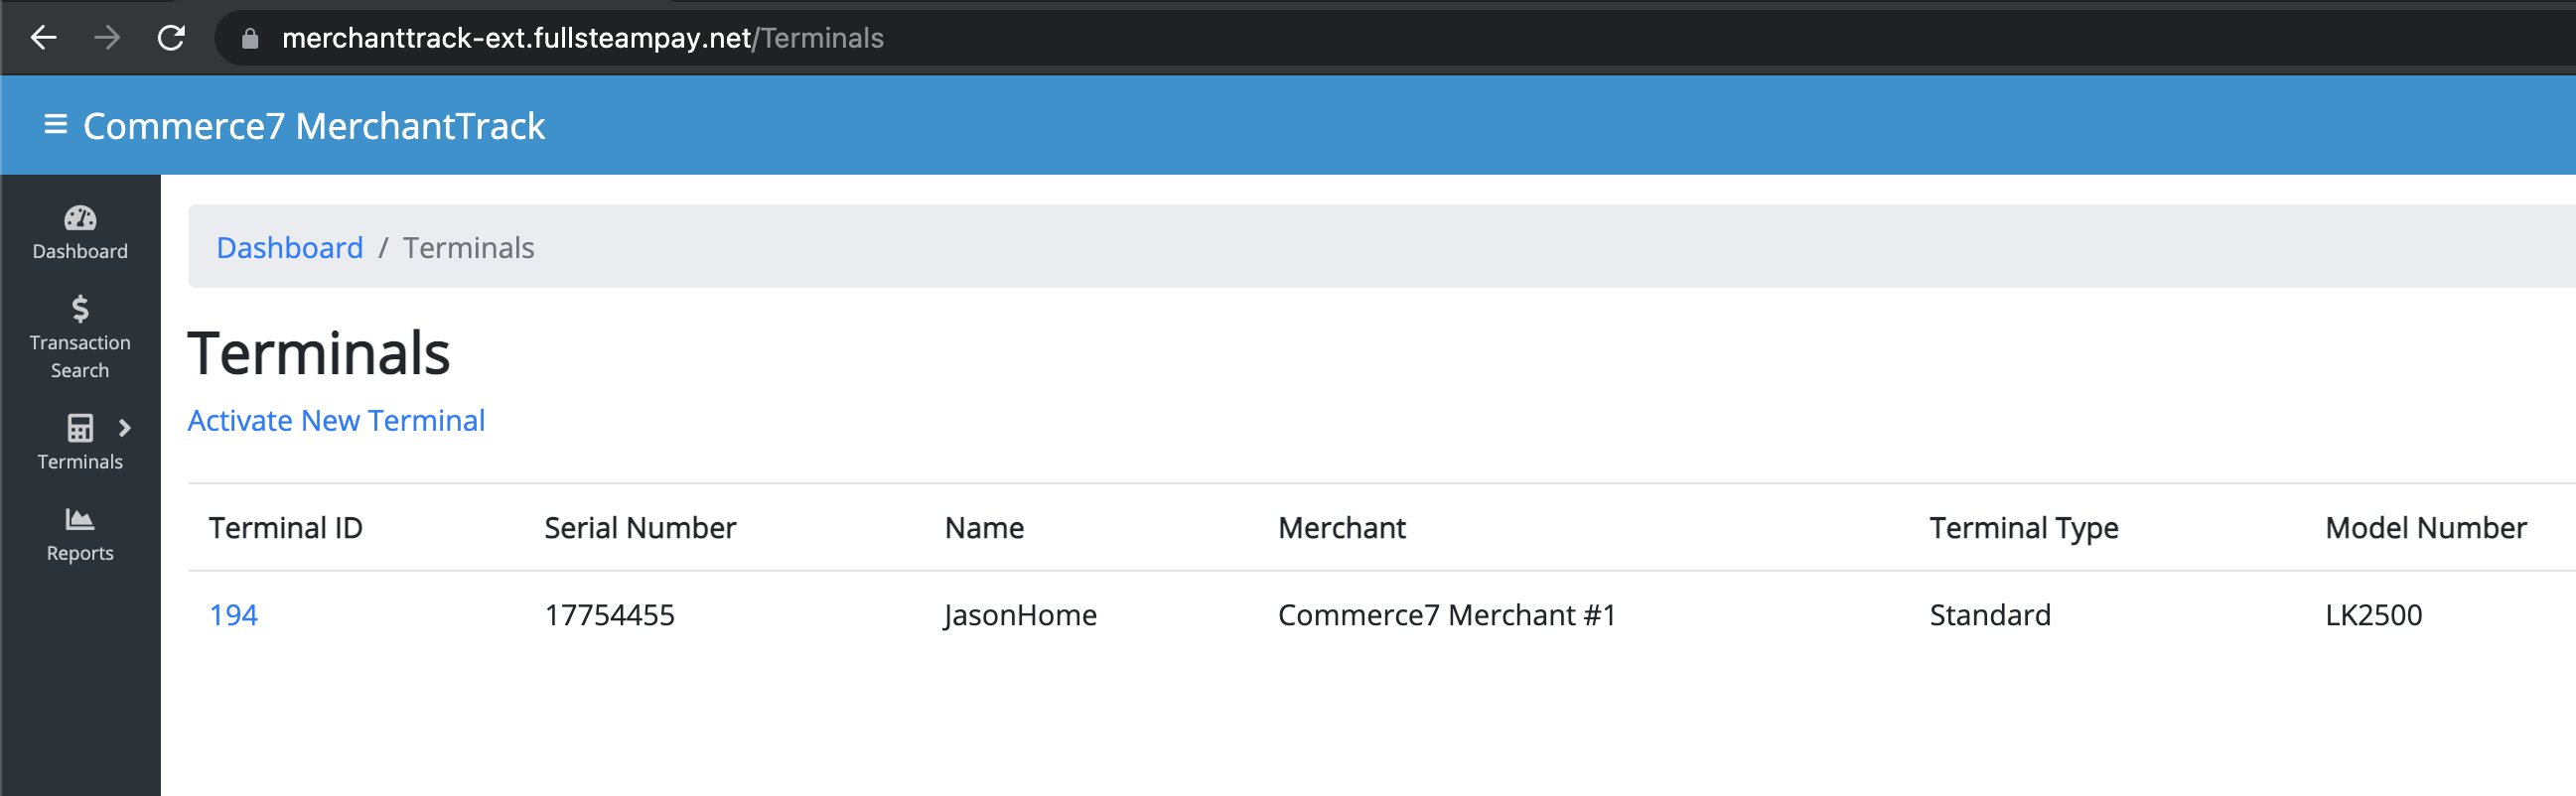
- Copy the Terminal ID as you will need to enter this into Commerce7. (The Terminal ID in the screen shot is 194).
- Go back to your Commerce7 POS Profile (click back in your browser)
- Scroll to Chip & Pin Devices
- Title: This is the name that is displayed in the POS when selecting the Terminal.
- Terminal ID: Enter the Terminal ID from Merchant Track (above).
- Type:
- Move5000: Choose if you want the ability to print from the Move5000 device.
- Other: Choose if you do NOT want the ability to print from the Move5000 device.
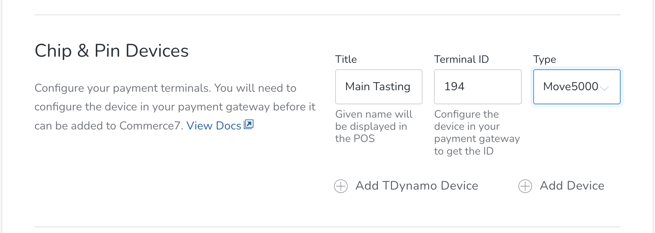
- If you have more than 1 Terminal to enter, click the Add Device button to enter additional Terminal IDs.
- Click the Save button either at the top or the bottom of the screen.
- Wait a few minutes for your device to complete configuration. It may reboot durning this process. When it goes to the "FULLSTEAM" screen it's ready to accept payments.
Workflow: Using the Move 5000
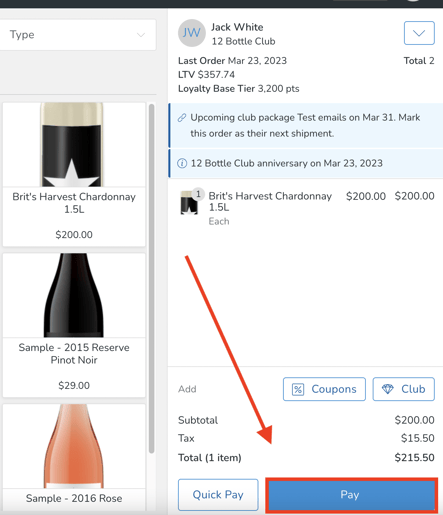
- When your Customer is ready to checkout, click the Pay button in your POS device.
- On your POS device, click 'EMV'.
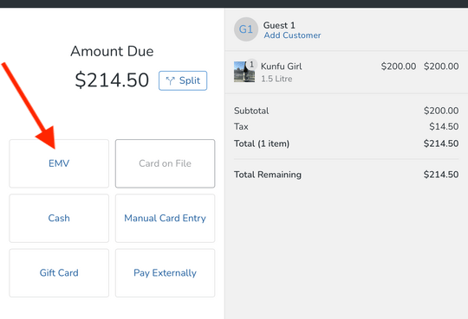
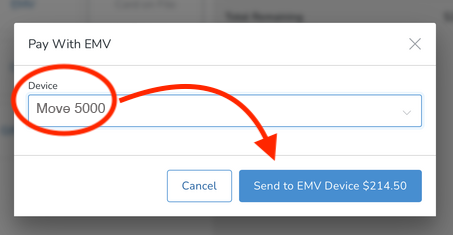
- Choose Move 5000 and click the 'Send to EMV Device button'. You'll see a progress screen as it connects. (Note that the system will remember the last device that was used, so it will be automatically selected for you. In other words, you will not need to actively choose it each time).
- This will bring up a Tip modal on the Move 5000. Hand the device to your Customer so that they can choose an applicable tip.


- Finally, the Customer will swipe, tap or insert the card into the Move 5000 to complete the transaction.
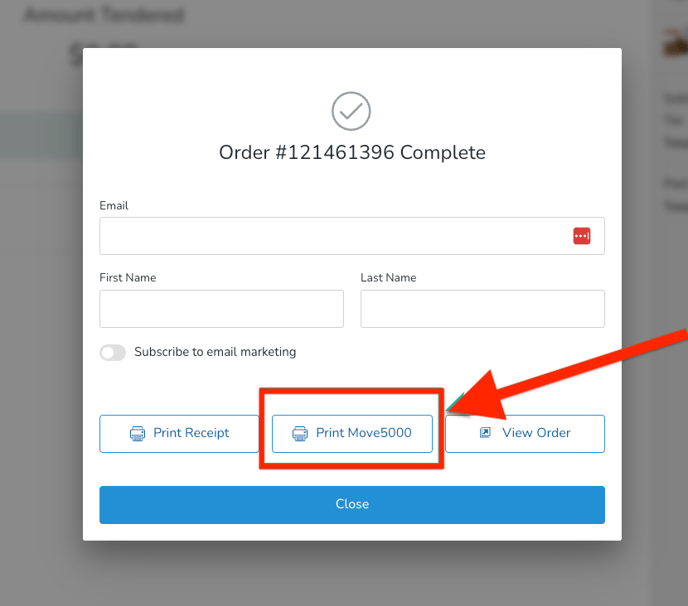
- Once the Order is complete, you will see this screen on the POS.
- Click the Print Move5000 button to print a thermal receipt directly from the device.
Extra Tips:
- When needing to go back a previous screen, Press red key to go back.
- If the device is plugged in, it will turn on automatically.
- Only Wifi Networks that are password-protected will appear in the available Networks list.
Disconnecting from Merchant Track (for troubleshooting purposes)
Sometimes (as a last resort) we will recommend that you remove and re-add your device to your Merchant Track account and POS Profile. Here's how:
-
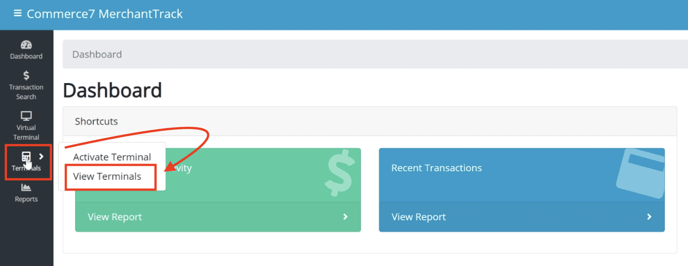
- Access your Merchant Track Dashboard
- Go to Terminals > View Terminals.
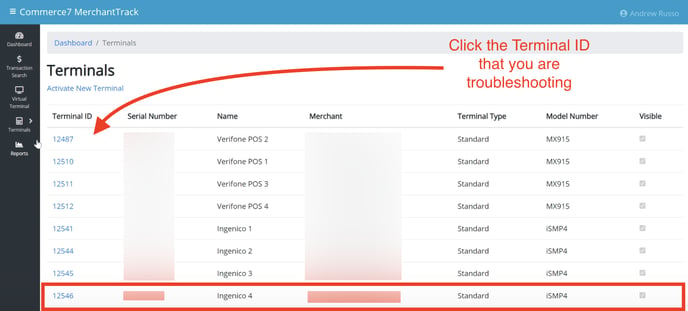
- Click the Terminal ID that you are troubleshooting.
- Click Edit in the bottom right.
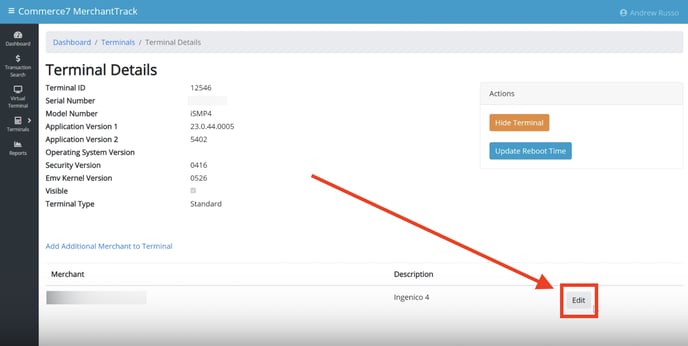
- Click the Remove button.
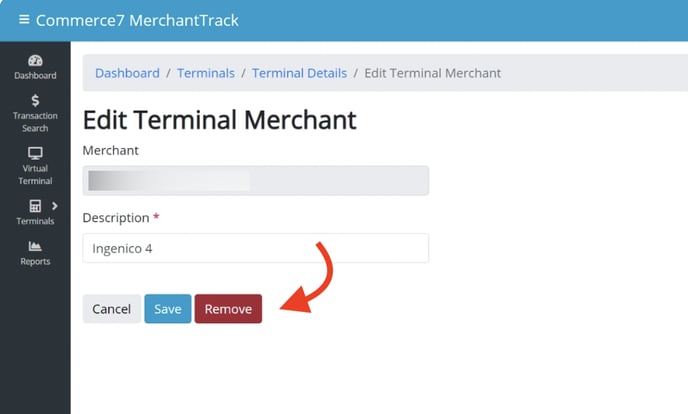
- Now that it's removed, begin the device setup process from the top here.
Troubleshooting
- What does the 'Terminal not found for merchant specified' error mean?
This error appears in the POS when an EMV device is selected and the Terminal ID entered in the POS Profile does not match an active Terminal ID in Merchant Track.
This can occur if the serial number is entered instead of the Terminal ID, if there’s a typo in the Terminal ID, or if the terminal has been removed from Merchant Track. To resolve, confirm that the Terminal ID in the POS Profile matches an active Terminal ID in Merchant Track.
If you are having trouble with the setup, feel free to reach out to support@commerce7.com to request a Zoom call.