WineDirect > Commerce7 Stripe Setup (anywhere outside of US, Canada and South Africa)
Stripe Setup steps for those outside of US, Canada and South Africa switching from WineDirect to Commerce7 (This includes Australia and New Zealand)
Setting Up Stripe Payments in Commerce7
As part of your move from WineDirect to Commerce7, you'll need to create a new Stripe account to securely process payments. This guide will walk you through the setup, along with key considerations to ensure a smooth transition.
A Note on Stripe’s Card Verification:
Once your Commerce7 account is live and connected to Stripe, any newly saved credit card on file may trigger a $0 pre-authorization on the customer’s card.
This does not apply during the credit card token migration process - it only occurs when a new card is added manually to customer profile. This pre-authorization is a normal part of Stripe’s card verification process and will not result in any actual charges. Please note that only customers who have transaction or card activity notifications enabled may receive an alert about this authorization.
In this article
Requirements
- Admin-level access in your Commerce7 account.
- Authority to open a Stripe account (typically the business owner or equivalent).
- Company details, personal identification, and bank account information ready.
Stripe Setup Steps
- Log into Commerce7.
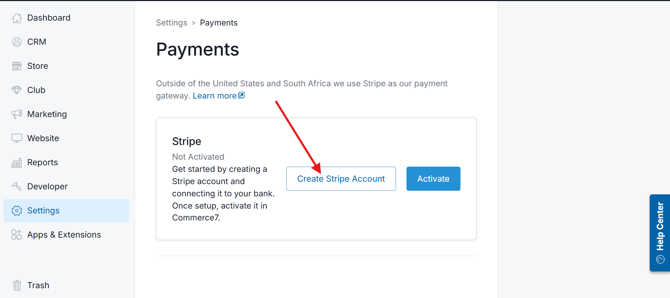
- Go to Settings > Payments.
- Click Create Stripe Account.

- You will be directed to the Stripe signup screen.
- Enter the email address you'd like to associate with your Stripe account (this is usually the business owner or admin).
- Create a password.
-Jun-20-2025-07-53-46-2593-PM.png?width=670&height=375&name=image%20(1)-Jun-20-2025-07-53-46-2593-PM.png)
- Enter your business details as prompted.
-4.png?width=670&height=369&name=image%20(2)-4.png)
- Verify your email and complete your profile.
-3.png?width=670&height=370&name=image%20(3)-3.png)
- Add business details including ABN, Address and Mobile number.
- When asked about industry, select: `Regulated and age-restricted products > Alcohol` (for wine sales).
-2.png?width=670&height=360&name=image%20(4)-2.png)
- Add personal information, as required by Stripe for verification.
- Input your bank account information to receive payouts from Stripe.
-1.png?width=670&height=376&name=image%20(5)-1.png)
- Secure your account with one of the available options.
.png?width=670&height=376&name=image%20(6).png)
- Complete any remaining questions to finalize setup.
- Once finished, you'll return to Commerce7 and your Stripe account will appear in Settings > Payments.
.png?width=670&height=369&name=image%20(7).png)
IMPORTANT: PLEASE READ
Once your Stripe gateway is connected to Commerce7, live payments are immediately enabled, meaning real transactions can be processed right away.
Therefore, it's crucial to proceed with caution during this onboarding phase:
- Avoid testing transactions with actual customers.
- Instead, set up a test customer and a test club membership, then perform live transactions yourself to ensure that the Stripe gateway is operating correctly.
This process helps verify that everything is functioning properly before your official launch, preventing any confusion or unintentional charges for your customers.
General Timeline
Token Migration Process and Timeline
- The client raises a support ticket directly with Stripe requesting a token migration.
- Stripe responds with an email containing a PGP secure link. If support@commerce7.com and datamigration@commerce7.com are not copied on this email, the client should forward it to both addresses.
- A Commerce7 data migration specialist securely uploads the token file to Stripe.
- Stripe imports the tokens. This step can take up to two weeks.
- Stripe sends an email requesting validation of two credit cards from the migrated dataset.
- Once validation is complete, Stripe finalises the import and confirms completion via email.
- Commerce7 data migration then requires approximately two business days to map the tokens to the client’s Commerce7 tenant.
Clients are responsible for the following actions during the process:
- Raising the initial token migration ticket with Stripe.
- Forwarding all Stripe related emails to datamigration@commerce7.com and support@commerce7.com
- Validating the two customer credit cards requested by Stripe.
FAQ
Will customers be charged during card import?
No. Some may receive a $0 pre-authorization notification depending on their bank or card settings, but no charges are applied.
Can I use an existing Stripe account?
We recommend creating a new Stripe account specifically for Commerce7 to ensure smooth integration and reporting.
What if I don’t complete Stripe setup in one session?
No problem you can resume any time via Settings > Payments in the Commerce7 Admin.
How soon are payouts processed?
Stripe’s payout schedule varies by region and by customer - and can be viewed in your Stripe dashboard once your account is live.
