Epson TM-T88VII Printers
Step 3: Generating a Printer Certificate
!! IMPORTANT !!
Use Google Chrome on your computer to generate and download the certificate.

- Enter a title for the printer, static IP address, and set Type = Epson Local.
- IMPORTANT: The printer Title should not contain spaces or capital letters.
- Take note of the title that you assign to the printer as it will be used along with your tenantName to name your SSL certificate [ -.local.commerce7.com ]. (This is important because only a correctly named certificate will allow the printer to make the necessary API calls).

- In the URL bar of your web browser (Google Chrome) enter the Static IP Address found on the printed receipt (i.e. 192.168.1.29).
- You should see the page “Your connection is not private” as a SSL certificate has not been installed on your computer.
- Click the Advanced button.

- Click the Proceed to 192.168.1.29 link (but this will be your IP address) to access the administration screen.

- You should now be viewing the TM-T88VII Series admin panel.
- Click Administrator Login in the upper right.

- Enter the password for the printer. The default password should be the Serial Number located on the side of the printer.
- Click the OK Button.

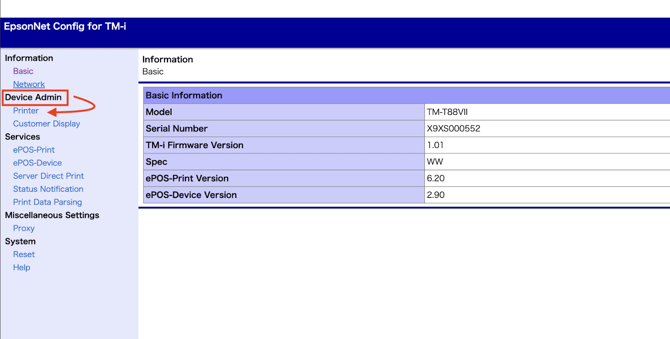
- Navigate to Status > TM-Intelligent > EpsonNet Config for TM-i.

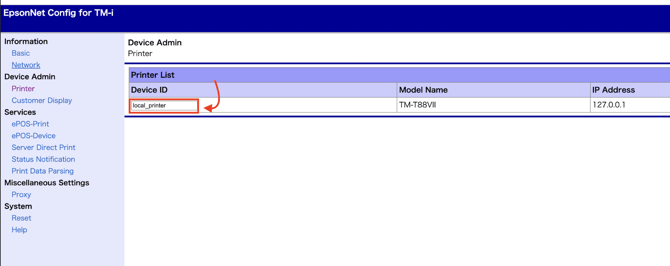
- Click Device Admin > Printer
- Set Device ID = local_printer
- Close the EpsonNet Config for TM-i tab and navigate back to the TM-T88VII Series admin panel.
- Navigate to Network Security > SSL/TLS > Certificate.
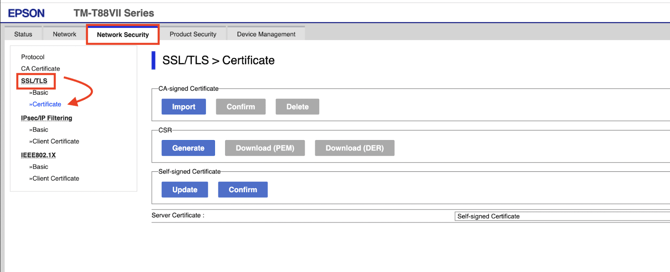
- Click the Update button.
- Update the Common Name.
- Common Name structure:
[printerTitle]-[tenantId].local.commerce7.com
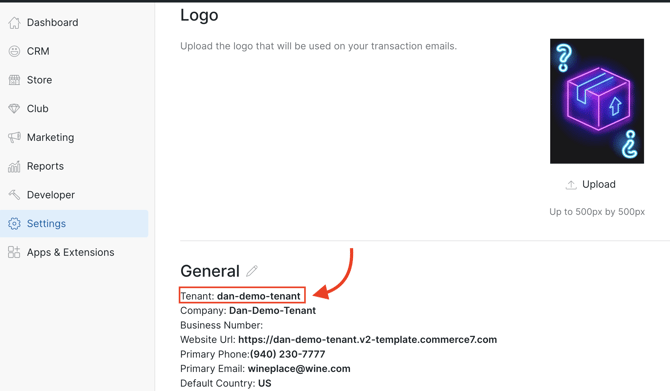
Example: [kitchen-dan-demo-tenant.local.commerce7.com]. - Your Tenant ID can be found under Settings > General:
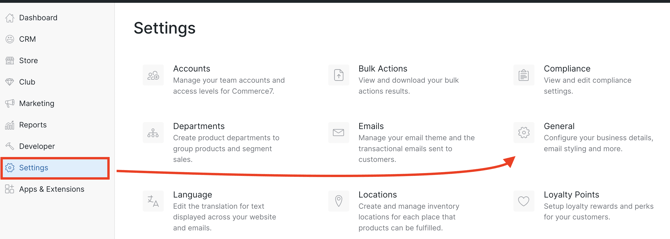
- It's the first item listed under the General Section.
- Common Name structure:
- Update Certificate Validity (year): 1

- Update the Common Name.
- Click the NEXT button.
- Click the OK button.
- In the URL bar of Chrome navigate to the new URL. This should display the same “Your connection is not private” message as before.

- Click Not Secure > Certificate is not valid > Details > Export and save the certificate to your downloads folder.

<< Back to main article |
Final Step! Installing the CertificateChoose a Device: |